How does it work
You can add new contacts to your JustClick account by making a request to the service API programmatically.
The request is sent by the POST method in the URLencode format to the address: https://username.justclick.io/api/addupdatelead, where username is the user’s login in the system and his 3rd level domain in the JustClick service.
In response to the request, your system will receive the function execution result in JSON format. For example, like this:
{"error_code":0,"error_text":"OK","result":[],"hash":"******************************"}
For more details, see the article “Service API Responses“.
Parameters passed in the request
The request parameters are as follows, the required parameter is “rps_key” – your API key:
- rpsKey – API key; the key for your account is in the “Integration and API” section, the link to the section is in the footer of your personal account or here /shops/setts/apisettings /
- add_to_lists – which groups to add the contact to; string, group (s) IDs are indicated, separated by commas (group editing => API tab, for example 1473249885.2899961004)
- remove_from_lists – from which groups to remove a contact; string, group (s) IDs are indicated, separated by commas (group editing => API tab, for example 1473249885.2899961004)
- add_tags – which tags to add to the contact; string; tags separated by commas
- remove_tags – which tags to remove from the contact; string; tags separated by commas (remove contact tags)
- lead_email – contact email (if not specified, it will be created without email); string
- lead_first_name – contact name; string
- lead_middle_name – middle name of the contact; string
- lead_last_name – contact surname; string
- lead_phone – contact phone number; string
- lead_utc – contact time zone (UTC + 03, +03, -01, 3, -1); string
- lead_description – information about the customer, visible in the contact card; string
- lead_personal_manager – id of the personal manager for the contact (id is taken from the employee edit link/shops/access/)
- lead_shipping_address_1 – delivery address, visible in the contact card; string
- lead_shipping_address_2 – delivery address (it is recommended to use it as an additional field in case of complex addresses), visible in the contact card, will be indicated with a comma after the previous address; string
- lead_shipping_city – delivery address (recommended for a city), visible in the contact card, will be indicated with a comma after the previous address; string
- lead_shipping_zip – delivery address (it is recommended to use it for the index), visible in the contact card, will be indicated with a comma after the previous address; string
- lead_shipping_country_code – delivery country code; string; send in the format [ISO country codes] (ex. “US”, “CA” etc), in the contact card will automatically be replaced by the country (for example, “US” will become “United States of America”)
- lead_shipping_state – shipping address (recommended for region / state), visible in the contact card, will be indicated with a comma after the previous address; string
- lead_billing_address_1 – billing address (recommended for the index), visible in the contact card, will be specified with a comma after the previous address; string
- lead_billing_address_2 – billing address (it is recommended to use it as an additional field in case of complex addresses), visible in the contact card, will be indicated with a comma after the previous address; string
- lead_billing_city – billing address (recommended for a city), visible in the contact card, will be specified with a comma after the previous address; string
- lead_billing_state – billing address (recommended for region / state), visible in the contact card, will be specified with a comma after the previous address; string
- lead_billing_zip – billing address (recommended for zip code), visible in the contact card, will be indicated with a comma after the previous address; string
- lead_billing_country_code – country code for billing; string; send in the format [ISO country codes] (ex. “US”, “CA” etc), in the contact card will automatically be replaced by the country (for example, “US” will become “United States of America”)
- lead_facebook – Facebook contact id; string
- lead_instagram – contact id on Instagram; string
- lead_whatsapp – contact id in Whatsapp; string
- lead_telegram – contact id in Telegram; string
- lead_viber – contact id in Viber; string
- lead_vkontakte – contact id in Vkontakte; string
- lead_in – id of the contact on LinkedIn; string
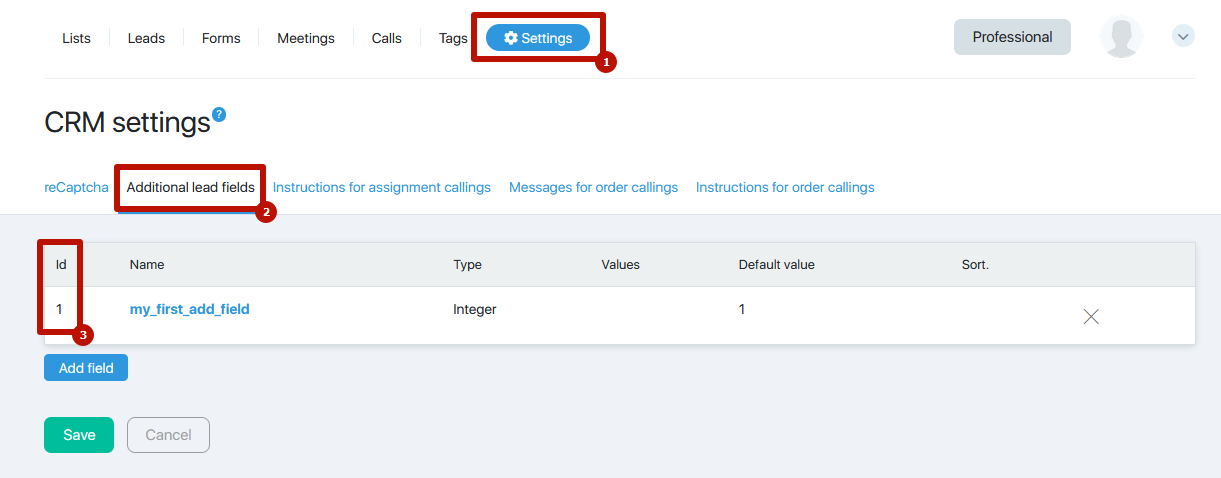
To change the value of an additional field, pass the parameter value
- ex_fields[1]
where “1” is the id of the additional field. You can take it in the “id” column for additional CRM fields
PHP example (cURL)
<?php
  $curl = curl_init(); curl_setopt_array($curl, array( CURLOPT_URL => 'https://username.justclick.io/api/addupdatelead',
  CURLOPT_RETURNTRANSFER => true,
  CURLOPT_ENCODING => '',
  CURLOPT_MAXREDIRS => 10,
  CURLOPT_TIMEOUT => 0,
  CURLOPT_FOLLOWLOCATION => true,
  CURLOPT_HTTP_VERSION => CURL_HTTP_VERSION_1_1,
  CURLOPT_CUSTOMREQUEST => 'POST',
  CURLOPT_POSTFIELDS => array('rpsKey' => ' Your API key','lead_email' => '[email protected]','add_to_lists' => '1594725950.5982672784,1605870811.1867176380','remove_from_lists' => '1534723950.5982672783','add_tags' => 'tag2020'),
));

$response = curl_exec($curl);

curl_close($curl);
echo $response;

?>
