Content
What are the tasks for?
This section assigns the tasks to the employees (additional admins, Call Center operators) or even to a Department.
Tasks enable you to select the hot leads or doubters, to suggest the best offers, to provide the best services. It becomes easier to arrange and to record the end-to-end interaction process with the clients. This is the main application of the Tasks (together with the existing Processes). Read two examples of this work below.
Tasks have some extra useful functions. You (or your employees) may from time to time need to call a client or to provide him/her with some extra materials or whatever it may be. More often than not, you may not have the proper instrument to record these tasks, and you just text them to your employees in different messengers (or external CRM system as a better alternative). In the best case these tasks are executed for a long time, sometimes they are partly done or even lost. Now you can assign the tasks in JustClick and monitor their execution.
A call to a website visitor (a simple case)
Goal: you would like to increase sales. You’ve decided to call your website visitors who, for example, visited a page with course description and to make them a special limited offer. If this offer is not accepted, then a discount on a product could be given.
What should be done?
- Go to Process editor and add “Visited page” in a start trigger. An example gives a typical page with a list of all courses. You are likely to have a landing page for a particular course or a group of courses.
The trigger is set to 1) “Visited URL” 2) “Without parameters” to count the visits with the ad tags and without 3) we enter the page address.
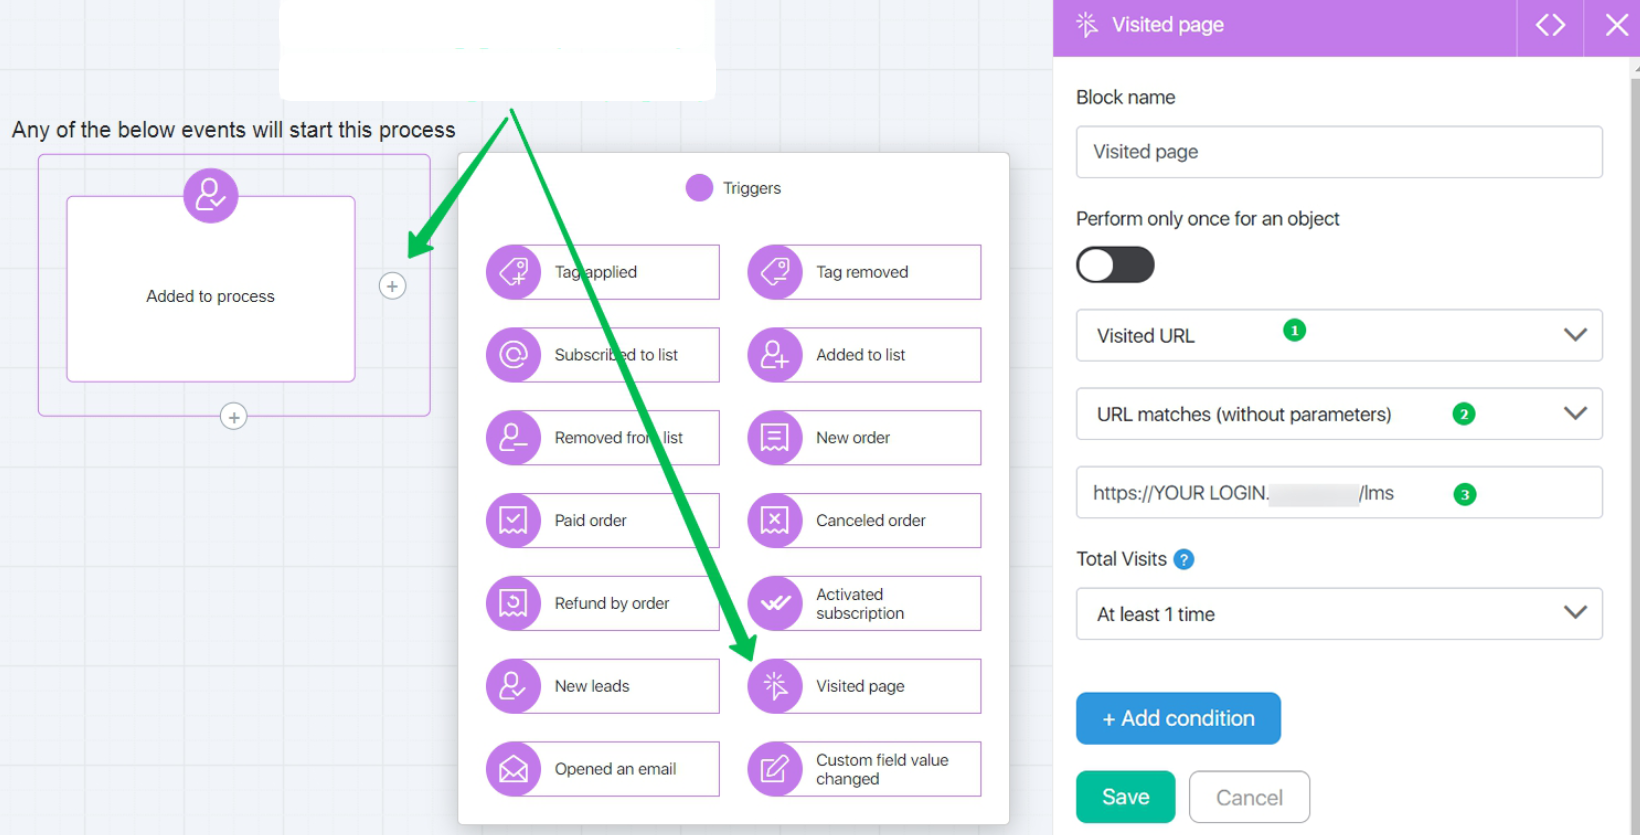
- Add “Task” action. It will automatically generate a task to a Call Center manager. See the manager view of the page at the end of the article. Now we will focus on the business logics design.
Let’s consider a simple case: a website visitor would like either to buy a course or not after the call. Let’s write as follows: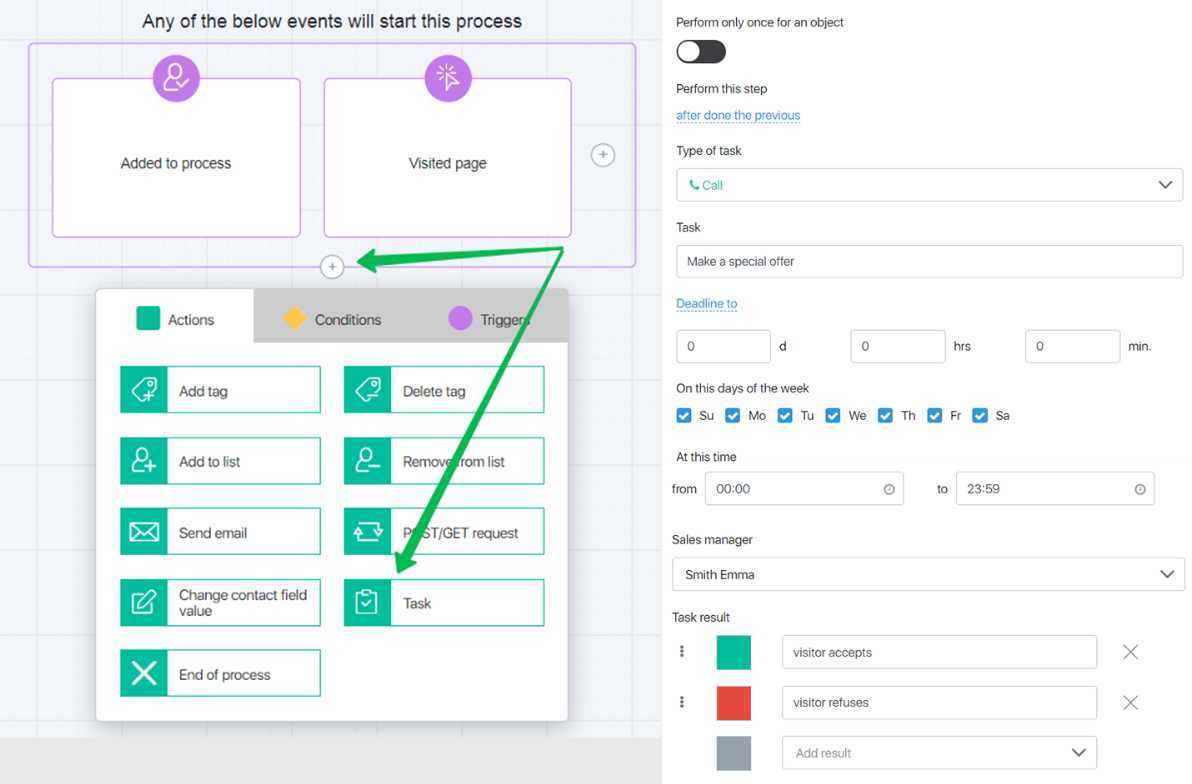
- Then we use already familiar Process instruments to configure the mailout for each case. If a visitor accepts a special offer – it’s one letter, if not – the other.
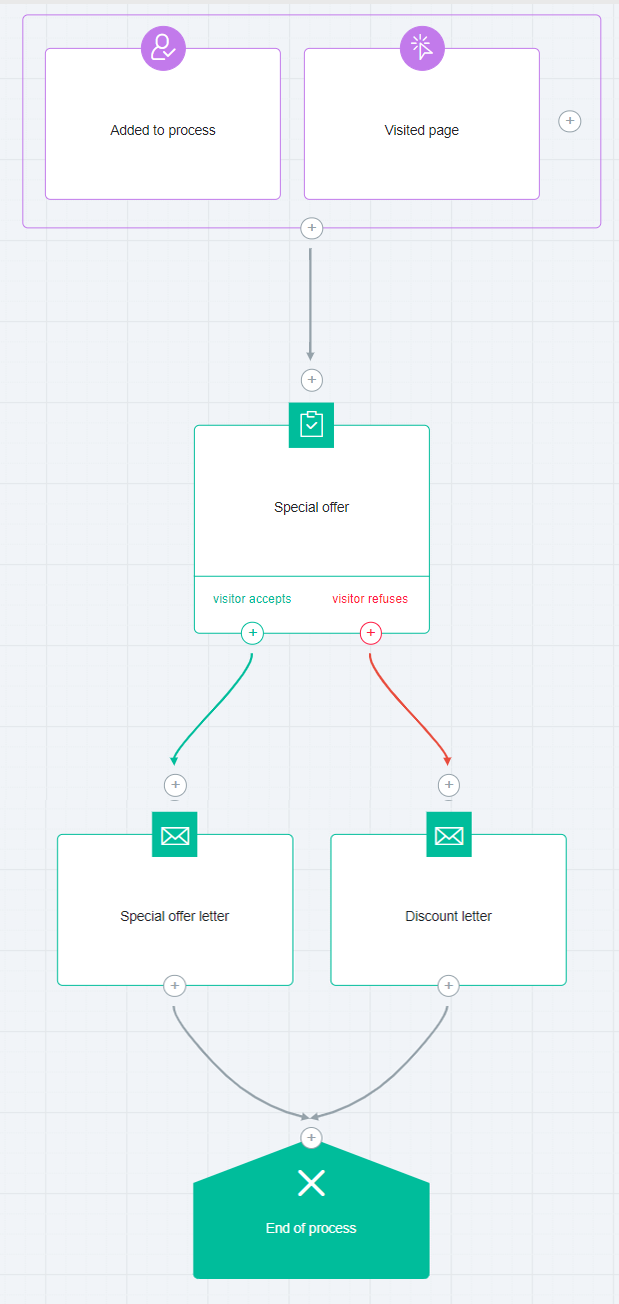
Result: A task to call is automatically assigned to a manager at the time when a visitor is interested in the course the most. The manager just registers the result, you have already configured the other actions which are automatically generated.
Calls to hot clients by Sales Department (a hot case)
Goal: you want to bring to the purchase the clients that have not asked for an order yet. Or they have been sent the order, but haven’t paid them. Do this asap, literally in 5-10 minutes after a webpage visit.
What should be done?
First find those clients that have opened the checkout page. Then see whether the order has been generated. This determines the next steps. We can generate automatic tasks to the Sales Department, then add call-dependent stages of our sales funnel. So, let’s consider the steps:
- Create an auto-list that will collect the unpaid orders by one of the products. This is a two-click action – like that.
- Now go to Process editor and add “Visited a webpage” to a start trigger. The example gives a typical checkout page.

- Now the order page visit triggers the process. How can we understand whether an order is generated or not? whether it is paid or not?
Here we use a filter and earlier created auto-list.
Filter parameters — they are in the auto-list with the unpaid orders by this product.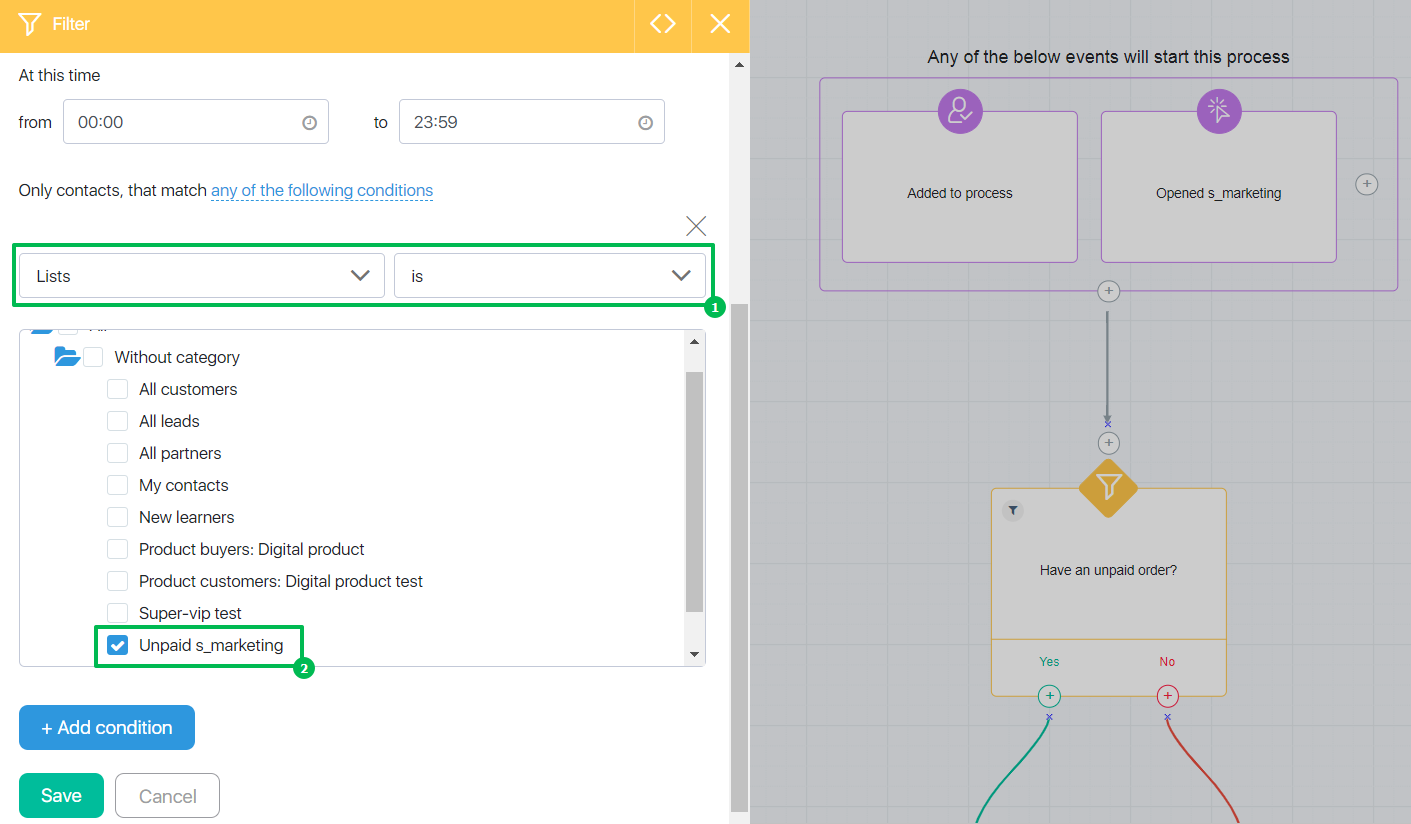
- This makes us assign the task to the Sales Department.
Thus, the first alternative: a customer 1) visits an order checkout page and 2) the order is not paid. In this case the Sales Department is assigned a task, and they call the customer and help with the buying process. The tasks are in Actions field. This is how it looks: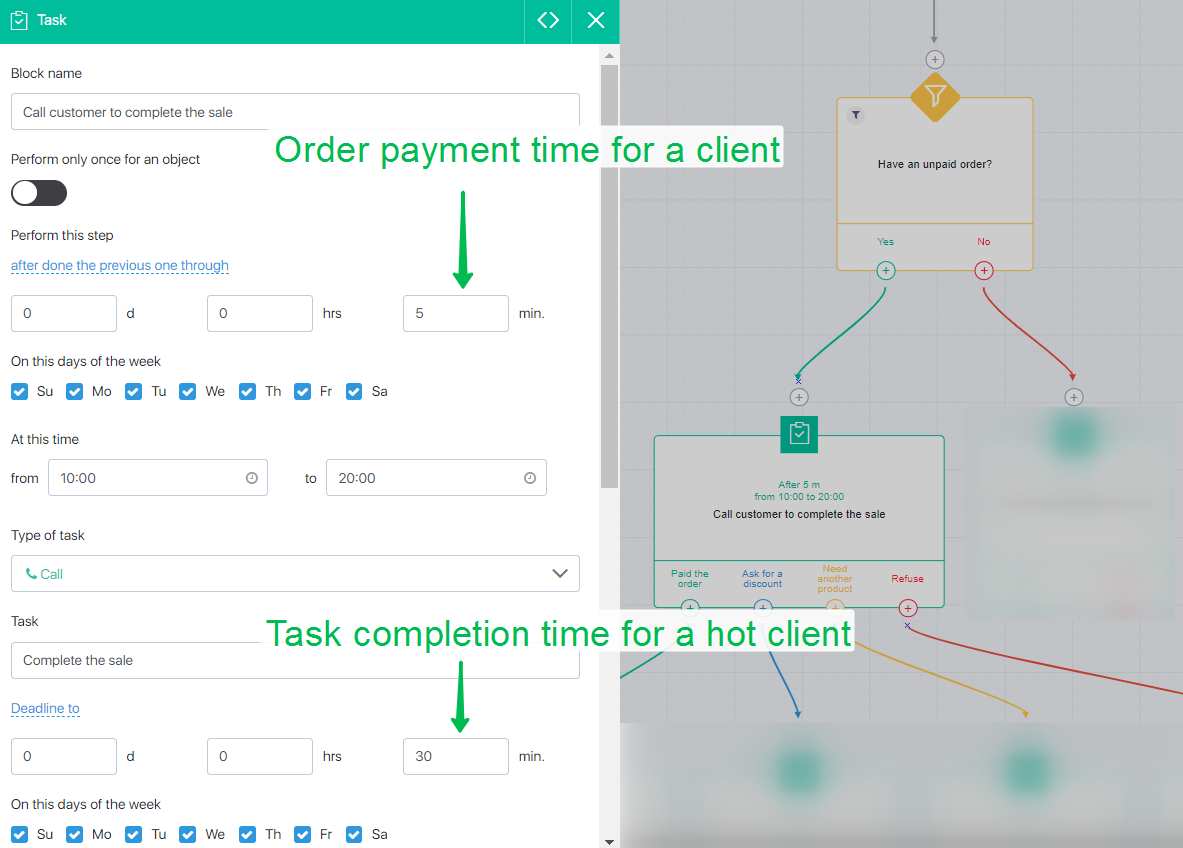
- Tasks give certain advantages by two factors: they are automatically generated once pre-defined (by you) settings are reached, and one can configure different scenarios at further stages. There are two alternatives by default — a task can be either “Done” or “Failed”. But the actual sales give various scenarios) A customer can pay the invoice during the call — a perfect scenario, can ask for a discount, the call can reveal a need in another product, etc. You can add any scenarios as a task result.
A Call Center manager just registers the task result that automatically triggers the process.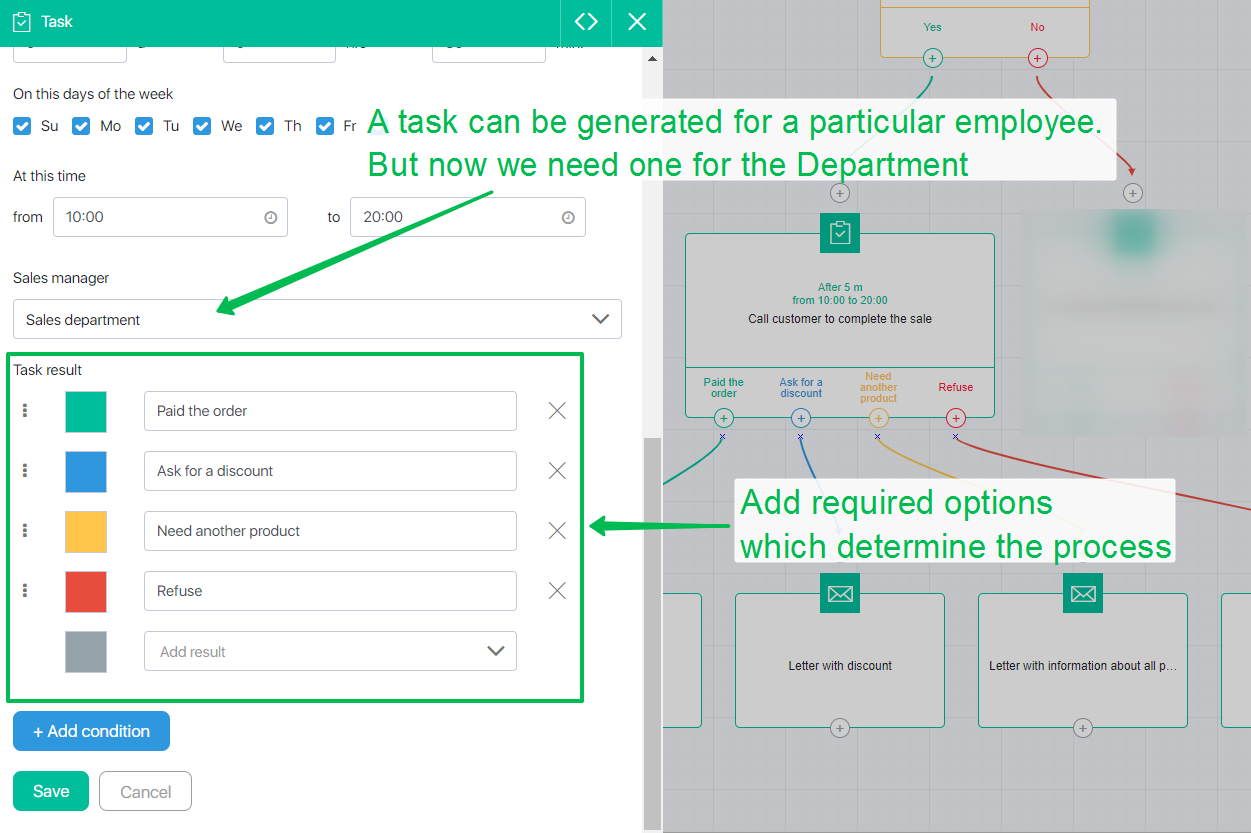
- Now all we have to do is to assign the actions for each case. For example, we can mail letters containing a link to sales page (and a discount offer), describe other products or mail some free useful information. These can be accomplished by familiar actions of the Processes, and we will not go deeper here. Let’s return to point 4. We have decided on our actions if a customer 1) visited a page 2) generated an order but did not pay it. What if the order is not generated? In this case we can set an automatically assigned task to the Sales Department to call with a different purpose — to find out why the order is not generated, to assist in its processing. We will not describe all steps — they are the same by nature. Ultimately, your process (or much more complicated process) will look like this:
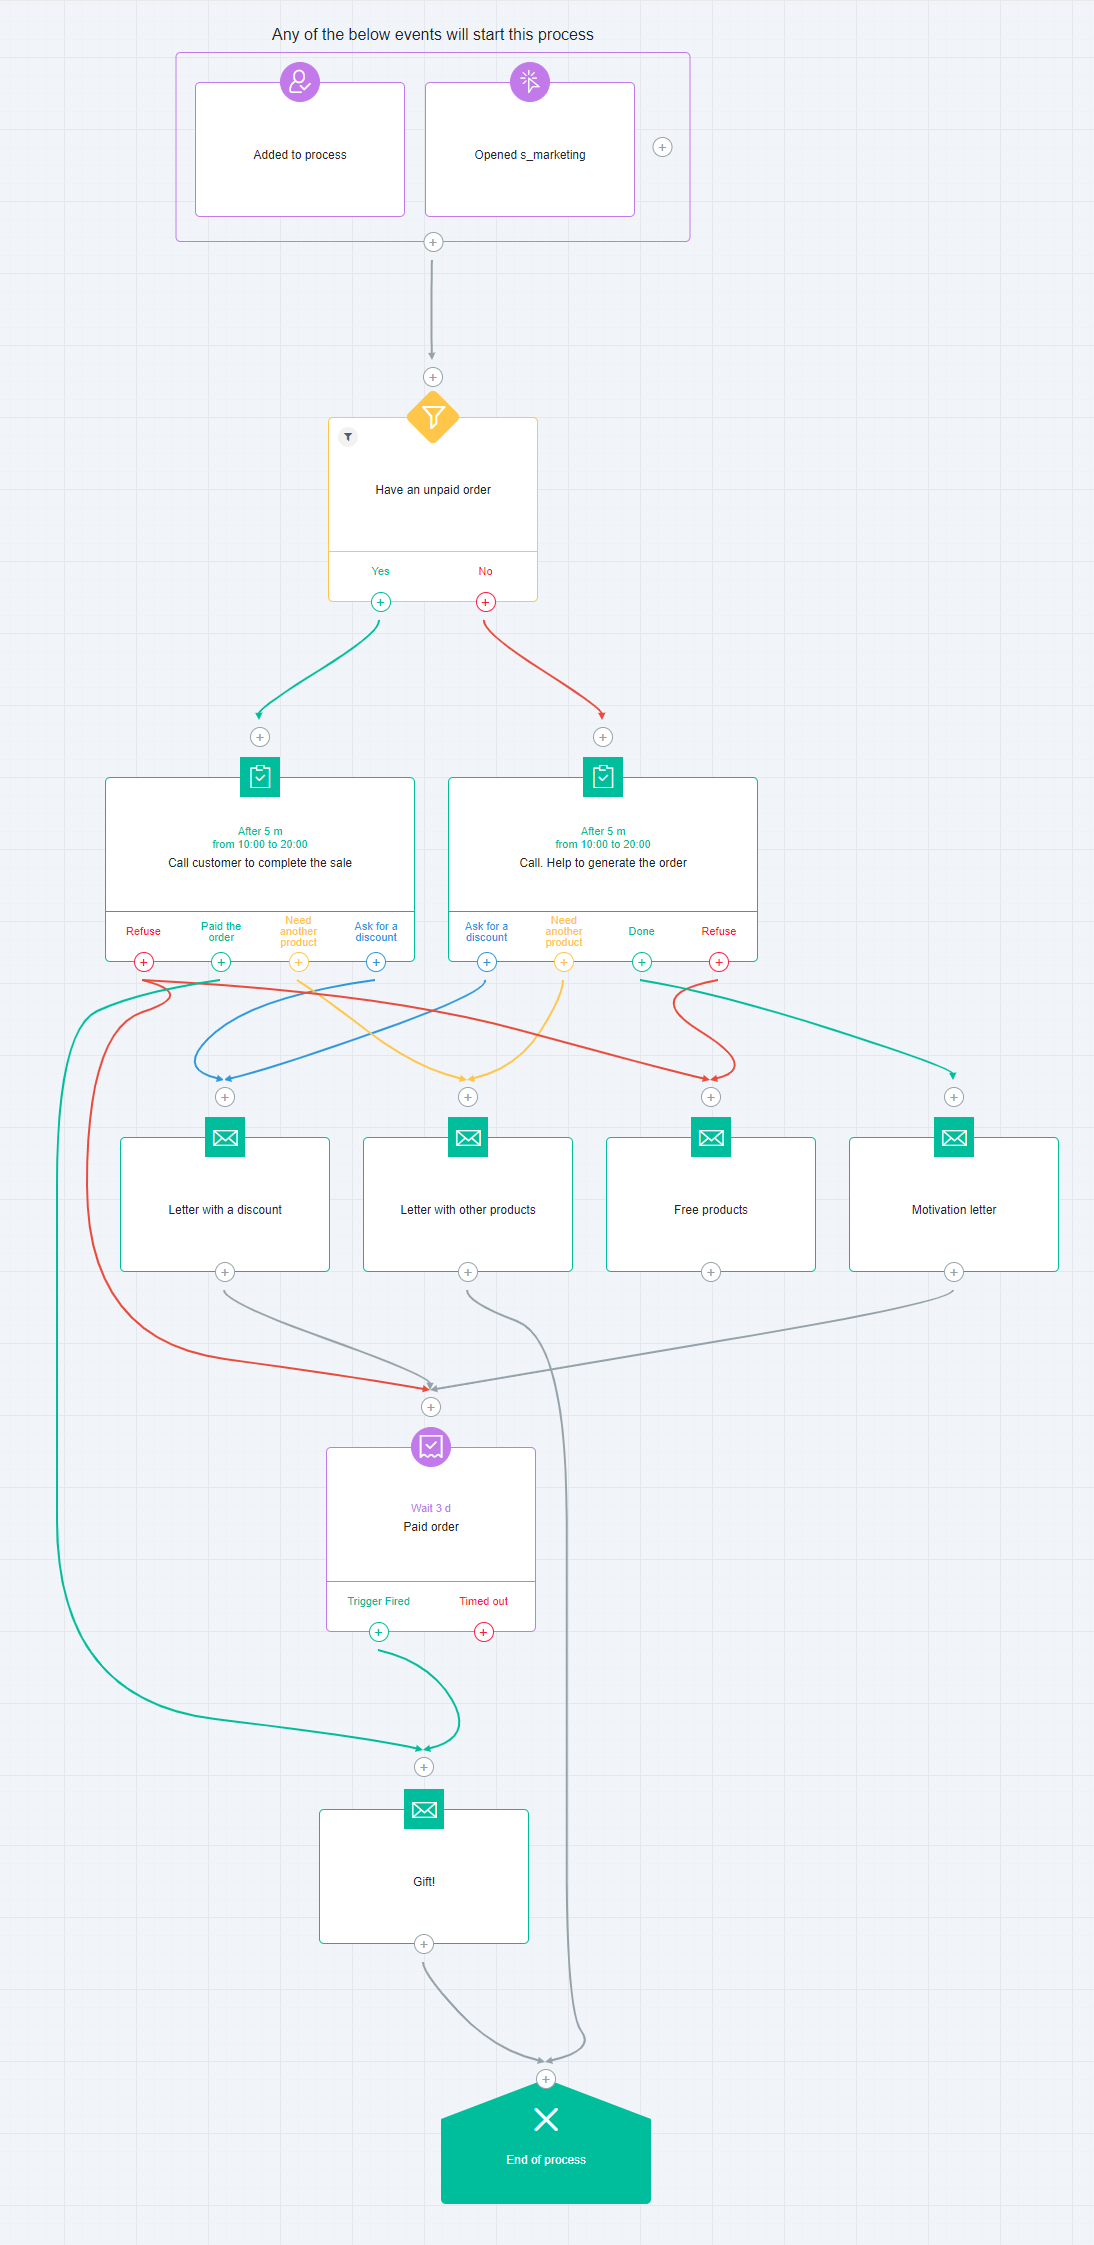
Result. The system identifies everyone visited the order checkout page. System generated tasks depend on the result from the order processing. Having talked with a potential customer, a manager selects further scenario in 1 click, and the process is automatically run. It becomes faster and more efficiently to work with a customer, more and more potential customers are reached.
Task — automatic Process action
We have talked about a real example above and have not said a word about some settings. These settings are not unique for the Tasks —you can find them in other actions of Processes. But you can select, for example, time and days of the week.
Let’s consider all possibilities on the screenshot below:
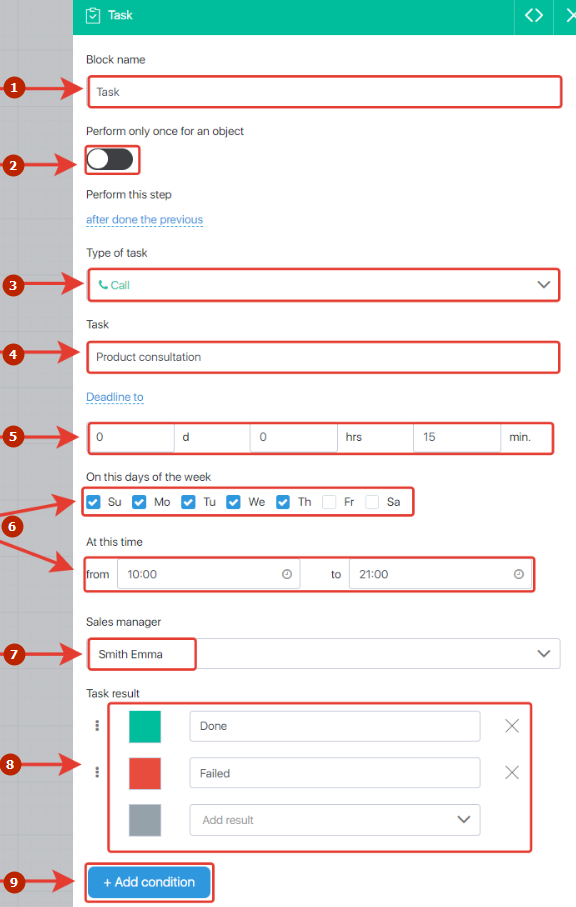
- rename a block
- number of repetitions for a lead
- select a task type
- task discription
- set a deadline
- task time
- select a person in charge
- change the result headings and add new ones
- add additional pharameter
Can we assign a Task manually?
Yes, we can. We mentioned that at the beginning of the article.
From Automation section
Go to “Automation” – “Task” subsection and click “Create a task”.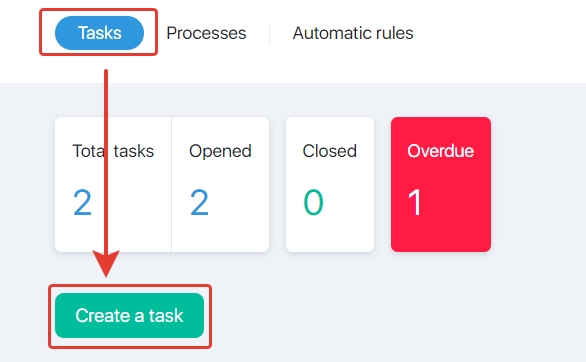
From Lead or Order cards
Lead and Order cards have a new tab — Tasks. Here you can see all tasks for this order or lead and add a new task.
Subsection features
General view
The main page of the subsection displays “Create a task”, “Types”, and “Filter” buttons. The left upper corner shows the overall number of the tasks, as well as the number of tasks by status: opened, closed, overdue.
Chief admin of the profile can see these tasks, the employees see the tasks assigned to them.
The main part of the window displays a list of generated tasks with detailed information about each task. Pink highlights expired tasks, green – the tasks to be completed by today, white – the tasks to be completed in the future.
Tasks generated within a Process will also be displayed here.
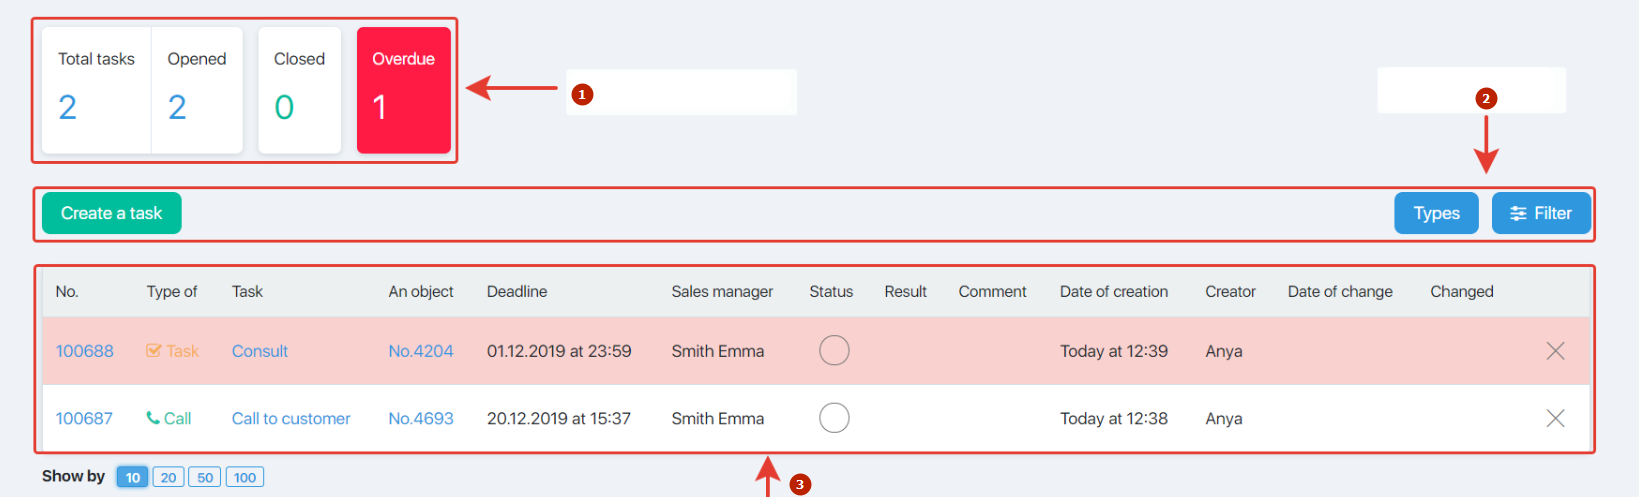
- number of tasks
- main buttons
- details about generated tasks
Types of tasks
“Types” button controls the types of tasks: rename them, tailor them, select an icon and color them, reorder them in a list. These can be any types: just a call by default or reading specialized books before having a call to a very important customer. The key point here is that you spend less time on communicating with your employees.
Your newly created tasks will definitely be available in the tasks inside the Process.
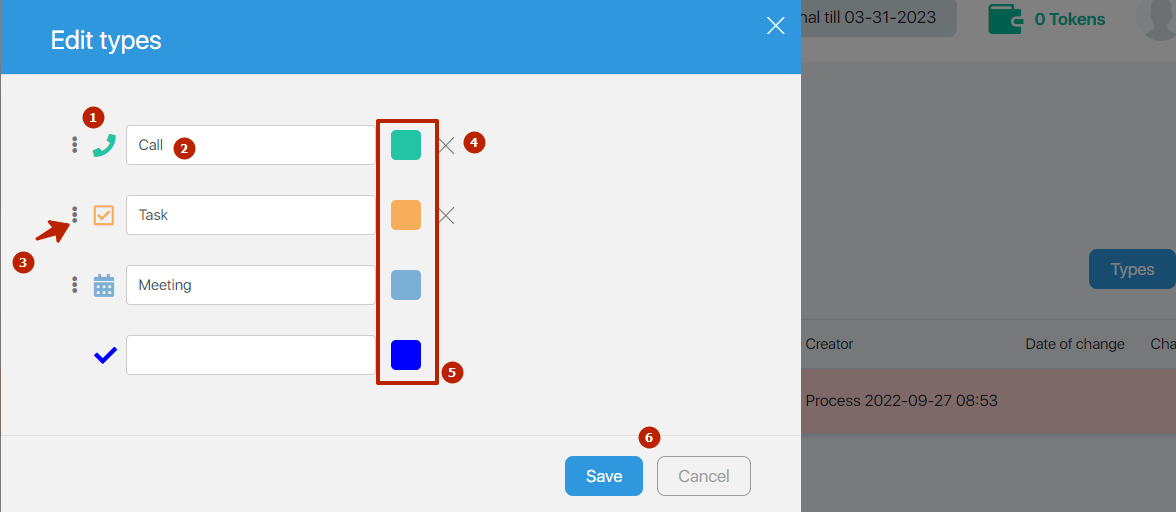
- select an icon
- rename a task
- reorder in a list
- delete
- change the color
- save or undo the changes
Task filter
“Filter” button can find all tasks by a pre-defined parameter or a set of parameters. Filter finds a task by its number or name, by type, selects all tasks assigned on particular dates, generated or executed on particular dates, finds the tasks by a manager in charge, by status, result or the tasks generated by a particular employee.
How to edit and delete the tasks
A task can be edited by the Chief admin only. To do this, open a task by clicking the number, task description or an object. Click task status in the opened lead card and then “Edit” button. Then you can change the task type, its description, dates or assign this task to another employee.

You can delete a task by clicking a cross to the right of the task description in the overall list of tasks or by going to task editing in a lead card.

How does an employee work with the tasks?
An employee sees the tasks in the overall list and opens them as we did it earlier. An employee can comment and select the result in a lead (or order) card, inside a task. The screenshot below gives both options by default. If you have already changed them or added your own, they will also appear in the task.

- comment
- select the result
