Content
This section is accessible from the “Automation” – “Processes” main menu.
What the processes are for and about the basic settings of the partition we told in this article.
Process name
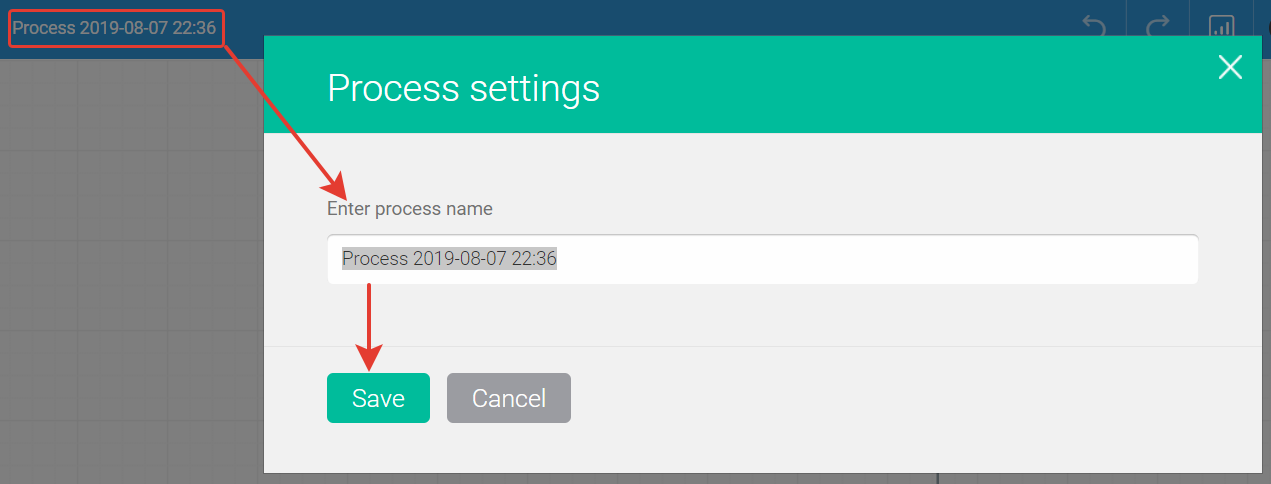
When you create a new process, it is named “Process from date and time” by default. You can change the name to something that makes sense to you. Customers and subscribers will never see this name.
Click on the name of the process; enter a new name and click “Save”

+Add Trigger
A trigger is an event that happens to a contact. If this event occurs, the trigger causes the contact to be added to the process and the process to execute.
Each process has a “Added to Process” trigger enabled by default. This trigger allows you to add a contact to the process manually. To do this, go to the Leed card by clicking on the post under Contacts – Leed. Then click the gear icon and select “Add to Process”.

To add an additional trigger, click the plus sign on the right and select the desired trigger:
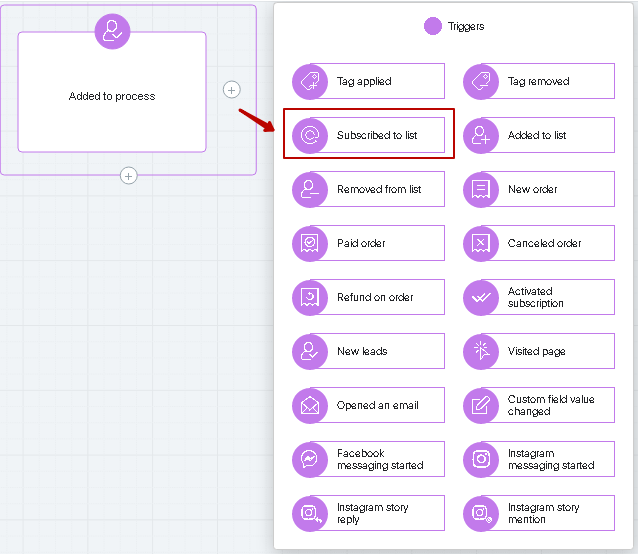
What could be the trigger?
Events work on the logic of “or”. For example: a contact (lead) OR subscribed to a newsletter OR placed an order – any of these events (including any combination of them).
A list of available events that will cause the process to run:
- tag applied;
- tag removed;
- subscribed to list;
- added to list;
- removed from the list;
- new order;
- paid order;
- cancelled order;
- return on order;
- activated subscription;
- new leads;
- visited page;
- opened email;
- Started Facebook messaging;
- responded to instagram story;
- Started Instagram messaging;
- Mentioned in Instagram history;
- Changed the value of a custom field.
Trigger settings
When adding a trigger, you can specify a name you understand, one or an infinite number of repetitions for one contact, set a trigger condition and add an additional condition.
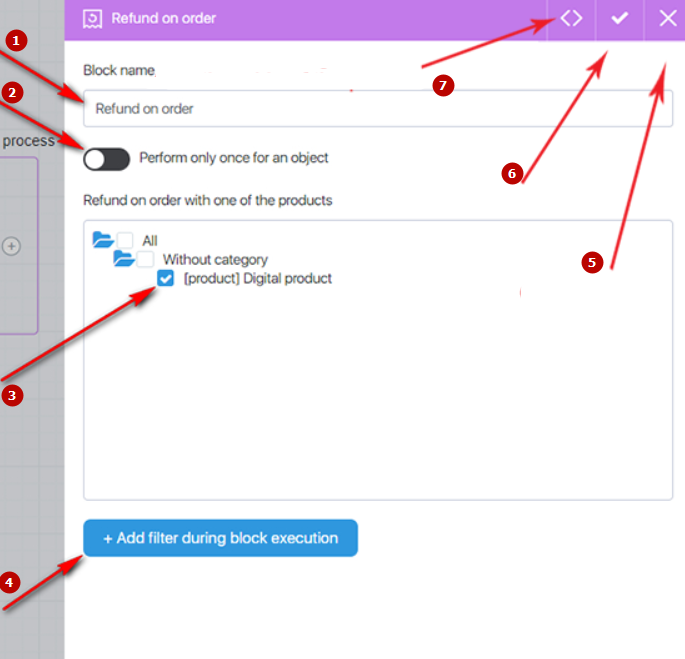
- to change the block name
- number of repetitions
- trigger condition work
- add one more condition
- close settings
- save settings
- open block settings from the other side of the process
When setting up a trigger (except for first-level triggers), you can configure it to go to the next step not only when the trigger is triggered, but also when the wait time is exceeded.
Let’s look at an example.
You want customers who have placed an order for a product to temporarily not receive the newsletter with other offers and not be distracted from the newsletter. You add them to a separate list in the process and want customers who have paid for the order to start receiving the newsletter again. That said, those who haven’t paid will start receiving it 10 days after the order is created.
In this case, we add a “Paid Order” trigger to the process, followed by a “Remove from List” action. In the “Paid order” trigger settings, select “Move to next step – when trigger is triggered or waiting time is up – 10 days”.
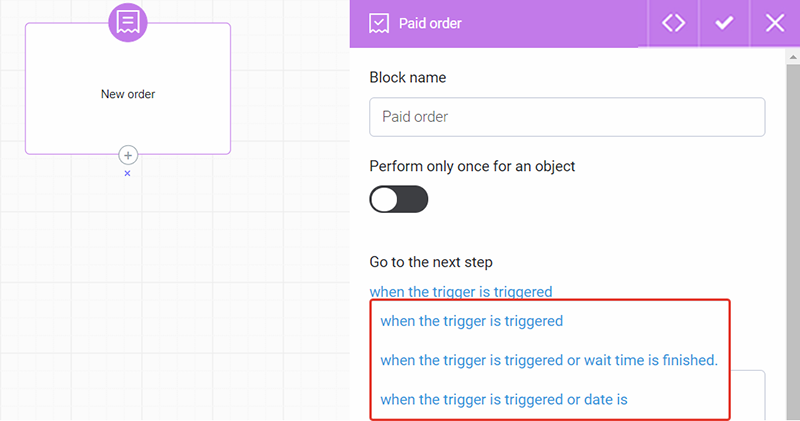
You can set the contact to move to the next process step after a certain time or a certain date, even if the trigger is not triggered.
+ Add next process step
Click the “plus sign” below to proceed to setting up the next process step.
The step can be “Actions”, “Conditions” or “Triggers”.
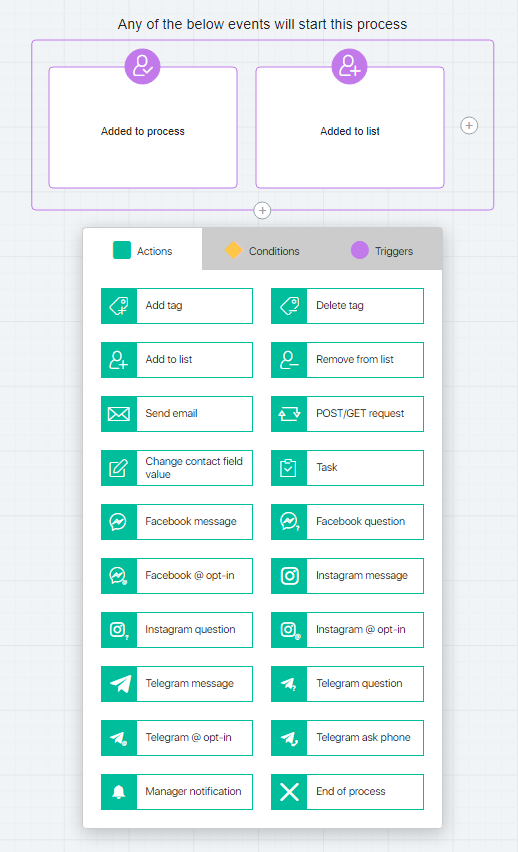
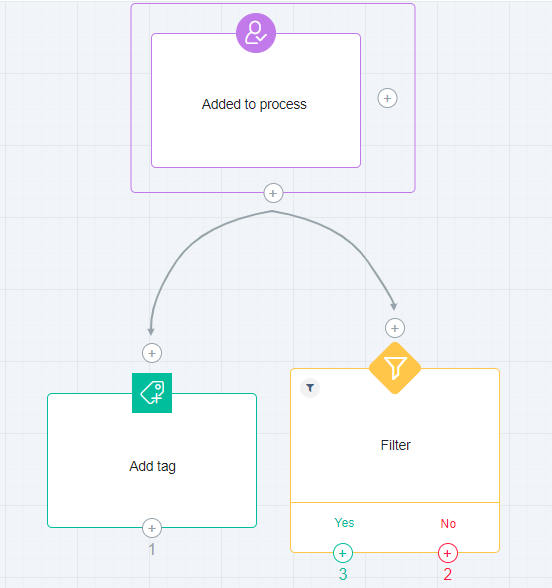
You can set up process branching. In this way, several different actions, conditions or triggers will be executed at the same time for a contact in the same process step.
You can use process branching if you want two actions to run simultaneously for a contact added to the process, for example, adding to a list and adding a trigger.
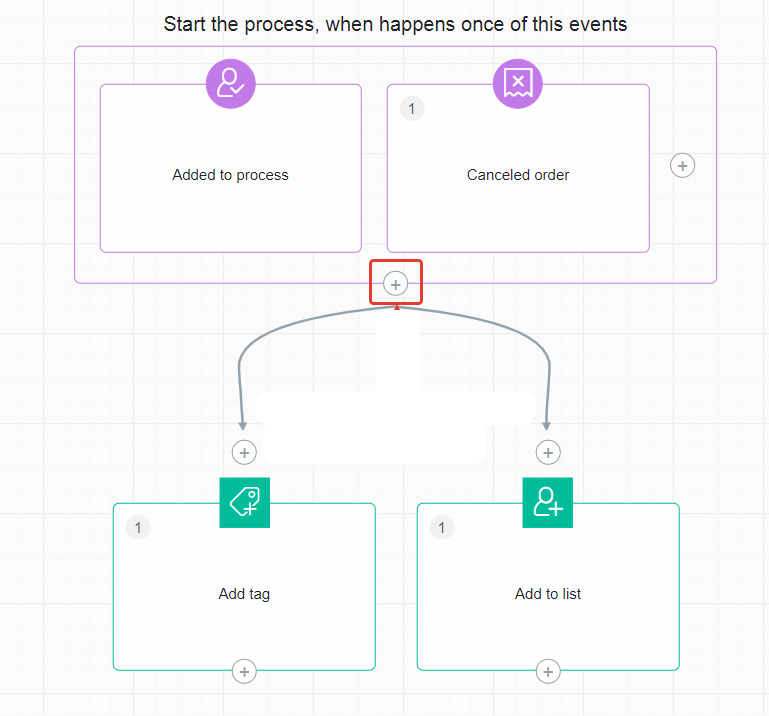
+ Add “Action”
The action is what happens to the contact after the trigger is triggered. If the trigger is in action, one of the following actions can be performed over the contact:
- add tag;
- delete tag;
- add to list;
- Remove from list;
- send email;
- POST/GET request;
- change the value of a contact field;
- task;
- Facebook message;
- Facebook question;
- facebook @ subscribe;
- instagram post;
- instagram question;
- instagram @ subscribe;
- manager notification;
- end of process.
Action “Send email”
With this action, you can set up an email to be sent directly in the “Process”.
We have already learned how to change the name of the block. In addition, you can set one or an infinite number of repetitions for a contact. If the toggle switch is off (black background color), the contact will receive an email every time they get into the process and reach that action. If the toggle is on (green background), the email will be sent to the contact only once.
The email can be sent immediately when the contact reaches this action, a specified time after the previous step, after the previous step, not before a certain date, or after the previous step only on a certain date.
You must select the sender contact on whose behalf the message will be sent. Then fill in the “Subject of the message” and write the letter in the usual visual editor.
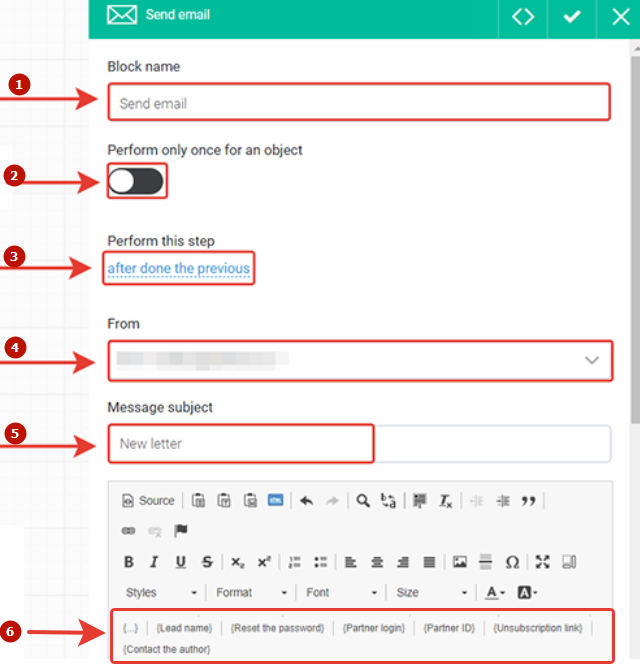
- change the block name
- perfom one or an infinite number of times for a single contact
- when to perform a step
- select the sender contact
- message subject
- list of variables that can be used in the letter
Before saving an action, you can evaluate an email via Preview, test it and add an additional condition, for example, not to send an email to contacts from a certain list.
The editor panel now has a {…} button, which allows you to add information from additional contact fields to emails. More information can be found here.
Action “Change contact field value”
With this action, you can change the values of fields and points for accrued contacts depending on the tasks.
Let’s look at this function as an example.
The name of the box changes depending on your task, you can set one or an infinite number of repetitions for a contact. If the toggle switch is off (background color black), the number of points for a contact will change every time it enters the process and reaches that action. If the toggle switch is on (green background color), the points will change per contact only once.
Points will be awarded on the date specified in the “Perform this step” setting.

The current number of points a contact has is displayed in their Leeds Card.
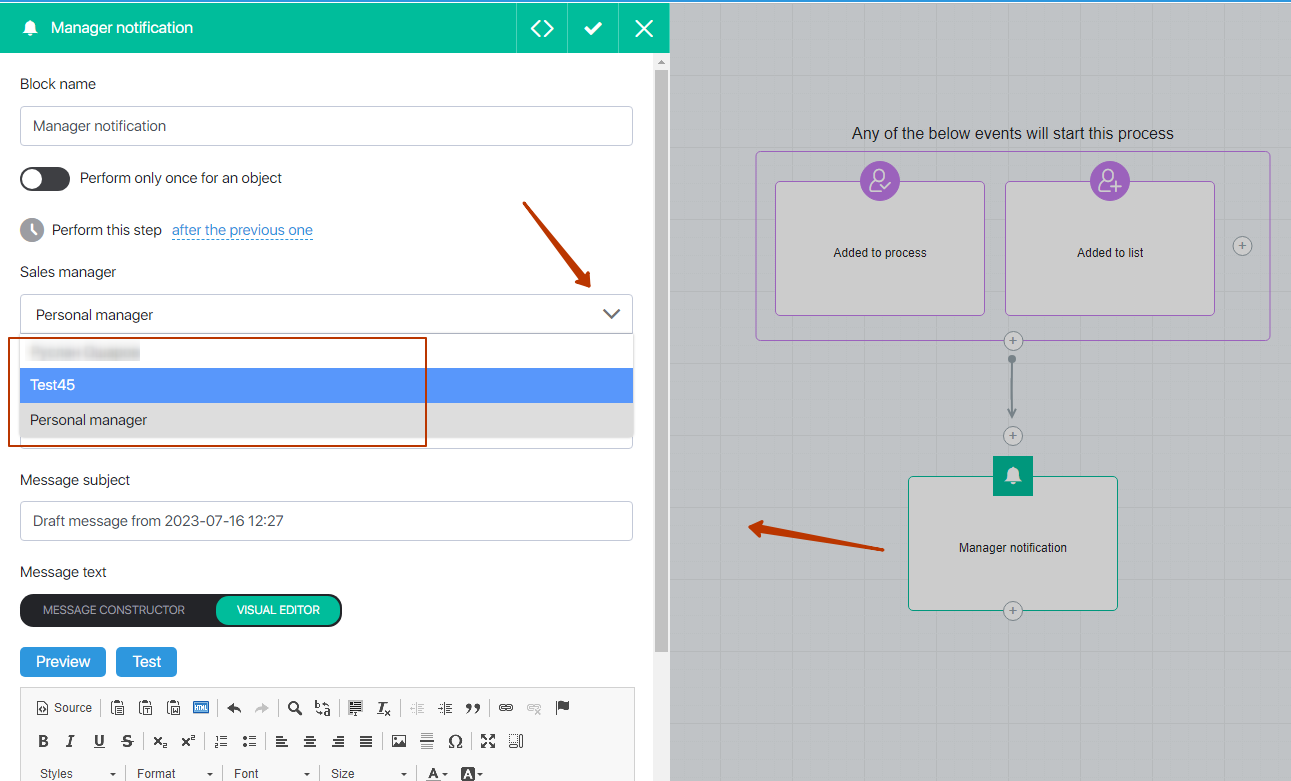
Manager notification action
After certain actions, such as adding a contact to a group, you can set up a notification to the employee, the contact’s personal manager, or the account owner.
To do this, add the “Manager notification” block, select the employee or account owner from the list, create a notification email and save the block.
End of process action
Every process chain must end with an “End of process” action. If this action is not at the end of the chain, the process for the contact is not completed. This means that these contacts are not included in the “Done” statistics. Also, if a process can be started for a contact any number of times, but not at the same time, the contact will not get into the process a second time because it is “stuck” in the process. Finally, your processes created in the Funnels interface will not be linked to other blocks.
You can have several End of Process blocks (this is more convenient in case of several parallel branches) or one block for all (when all branches of a process end there).
Consider the following process:
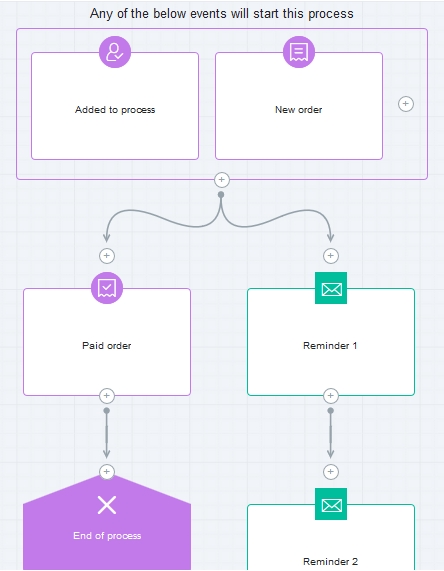
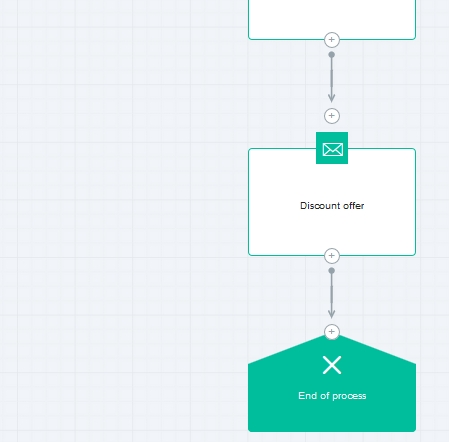 We see the simplest scenario with 2 parallel branches. Once a lead generates an invoice, they get into 2 branches at the same time: the left branch has a trigger Invoice Paid, while the right one contains a series of letters. The letters remind about the payment and to force the lead into paying for the product. If this does not work, then a discount is offered.
Now, let us say that a lead pays the invoice once it is generated. It is obvious there is no need to send them reminders and to offer discounts – this is useless and harmful. What should be done?
- Scenario 1. Add a block Filter before each letter to check whether the invoice has been paid (for example, if a product’s client group includes this lead). This scenario is good, and it works, but you should expect more work to be done and less clear visual presentation of your process.
- Scenario 2. If the lead achieves the end of the left branch, don’t let the lead move along the right branch. This scenario is good and perfect for this task. Let’s focus on it.
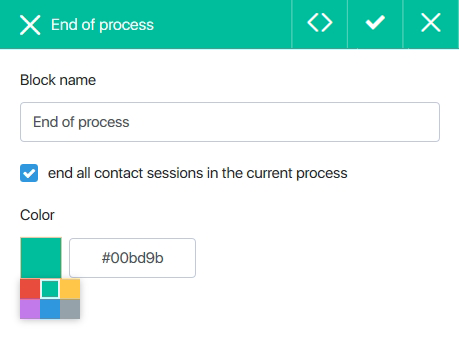 You can edit the block End of process — change the name and the color of the block. But now we are more interested in the setting “End all contact sessions in the current process”. We choose this setting for the left branch for now, i.e. when the lead paid the invoice. Thus, when the invoice is paid, the lead is deleted from the right branch (in other words, the lead session will end in this branch).
Be careful with this setting. It is Ok for our example. However, if your parallel branch has such tasks as to add to other groups, to nominate an employee for the tasks, etc., rather than a series of letters, then this branch should not be interrupted. Wrong process design could damage this setting and bring a lot of troubles. It may happen later, once the existing process has been improved and upgraded.
We are talking about usual logic: let’s say that initially your process was similar to the one we have just looked at. Then you decided to add a third branch which attaches a tag to all leads. Why? Let’s say that the tag attachment triggers another process which you’ve started to design.
However, you completely forgot that there is no tag for immediate invoice payment in the first process (because all parallel branches will be interrupted). As a result, most leads work fine as planned, while some leads can’t have the tag attached for no obvious reason, which disrupts the second (new) process.
The case with the third branch is sure to be an imaginary one, and you are likely to add a tag in the existing left branch, but a real-life case will be more complicated and less understandable.
Action settings
In addition to changing the name and number of repetitions, you can specify the time of the action, select a list or tag, add an additional condition.
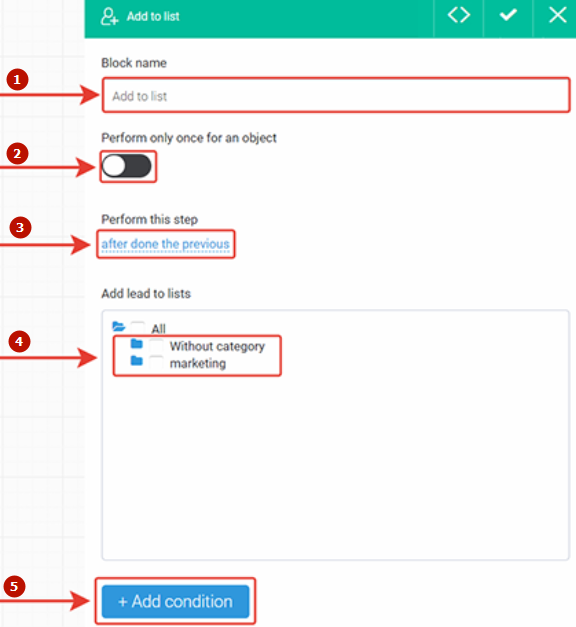
- change the block name
- perfom one or an infinite number of times for a single contact
- when to perform a step
- select a list to add a contact
- add more condition
You can adjust the response time of the action.
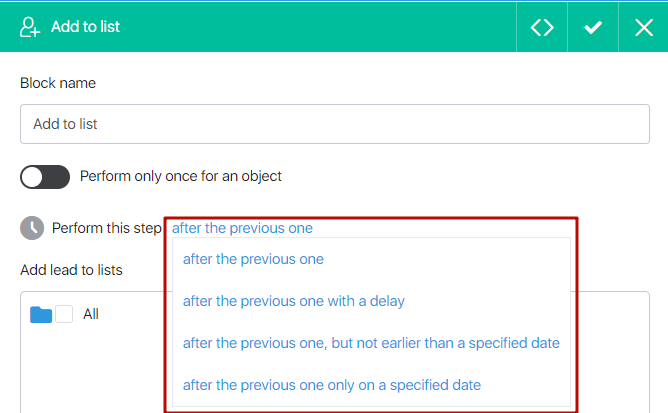
The execution time of the action can be:
- after done the previous;
- after done the previous one through;
- after done the previous on date;
- after the previous one only on a specified date.
By selecting “after done the previous one through”, you can choose which days and at what time the action will be performed. For example, the action can run 7 days after the previous one, but only from Monday to Friday or from 08:00 to 21:00.
+ Add “Condition”
You can set a filter or use the A/B Test to distribute contacts into two different chains when certain conditions are performed.
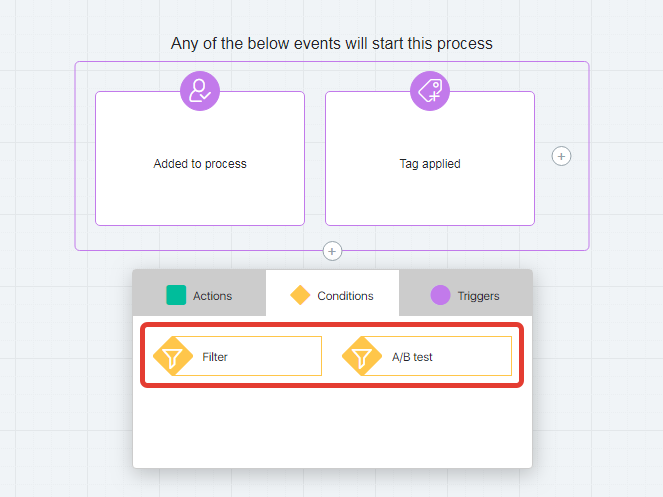
Filter
In the filter, you can choose whether it is necessary to fulfill all the conditions for passing the filter or any one, specify one or more conditions, add an additional condition.
After you add a condition, you must add an action, condition, or trigger that will trigger when the condition performed and or not performed.
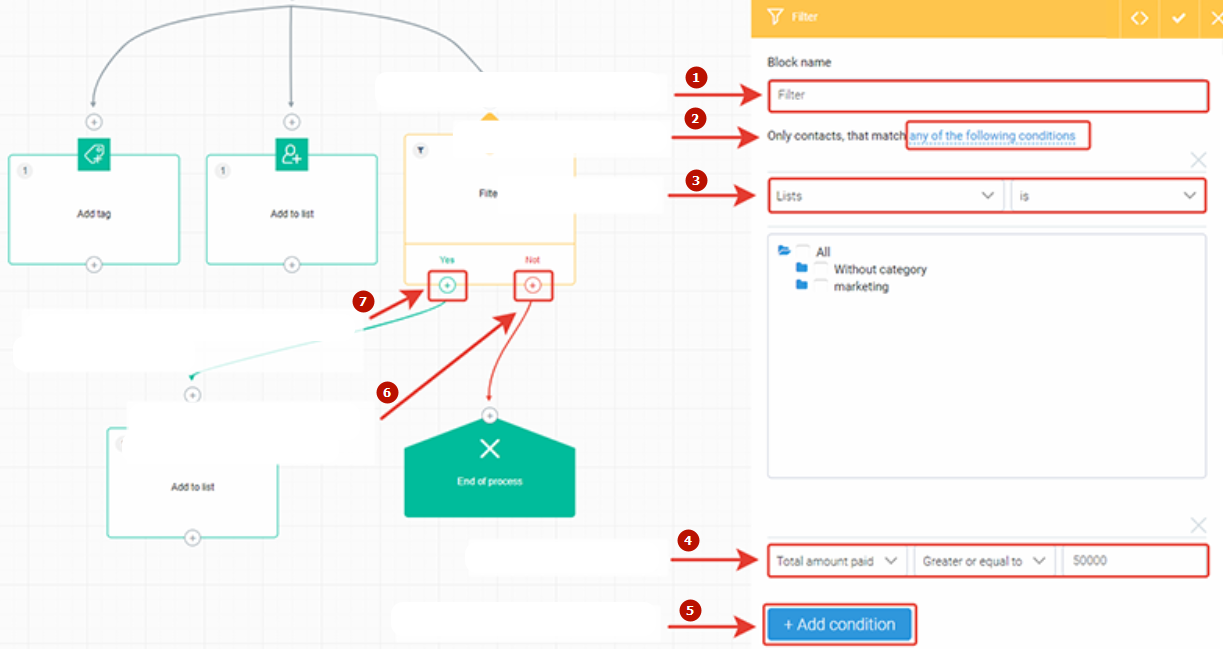
- change the block name
- all or one condition
- first condition
- second condition
- add one more condition
- add step if conditions are not performed
- add step if conditions are performed
Examples:
- In the sales newsletter we send out a special offer to buy a new course and give a link to the course’s sales page.
In the Process, we set up a Condition that will check the subscriber’s visit to this selling page, and if he visited it, send him an email with an offer to receive an additional bonus or discount on this product. Thus, we “fuel interest” in our offer and stimulate sales of a new product. - We want to drive repeat sales. To do this, we set up a condition that will verify the payment of bills of the first paid Product No. 1 of our auto-funnel (tripwire) and customers who have paid for it a certain number of days after the purchase, we will send a letter offering discounts on Product No. 2, which will complement Product No. 1 well. Thus, we encourage customers to repeat sales and get more profit in our project.
A/B Test
When the “A/B Test” condition is applied, the process will go along one of the branches specified in this block. The percentage of distribution of contacts depends on the values set in the variants settings.
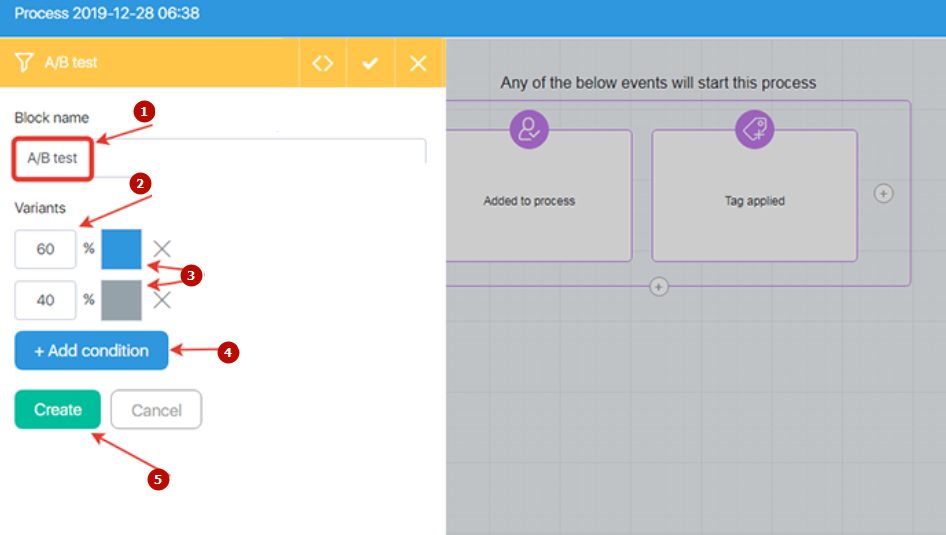
- name change
- the distribution of percent between variants
- color choise variants
- adding additional variants
- when the condition A.B test is configured, click Create
The percentage value in the variants can be changed.
Example:
We launched the “A / B Test” with a distribution of 50/50 variants.
In the first variant, we send a letter with a discount offer for Product No. 1 to customers who have paid bills in the amount of more than 500 dollars, and in the second variant we send a letter with a discount offer for Product No. 2.
Based on the analysis of statistics, they realized that according to the first variant, the process works much more efficiently; letter No. 1 brings the project more profit than letter No. 2.
We change the distribution of percent in variants by 100/0.
The process continues to work with high performance indicators, and process analytics is not lost. With this approach, the process does not need to be reconfigured.
How to reach webinar attendees by time of attendance
You can use the “Attended Webinar” filter to reach those who were on the webinar at a certain time or were on the webinar before a certain time from the start of the webinar. For example, you need to send an email to those who have been on the webinar less than 15 minutes since it started.
- Add a “Filter” block to the process.
- In the block, add a filter and select “Was on webinar”.
- In the box below, select the webinar from the list, then specify the “Total” and “Less than or equal to” condition, and in the box add the time in minutes.
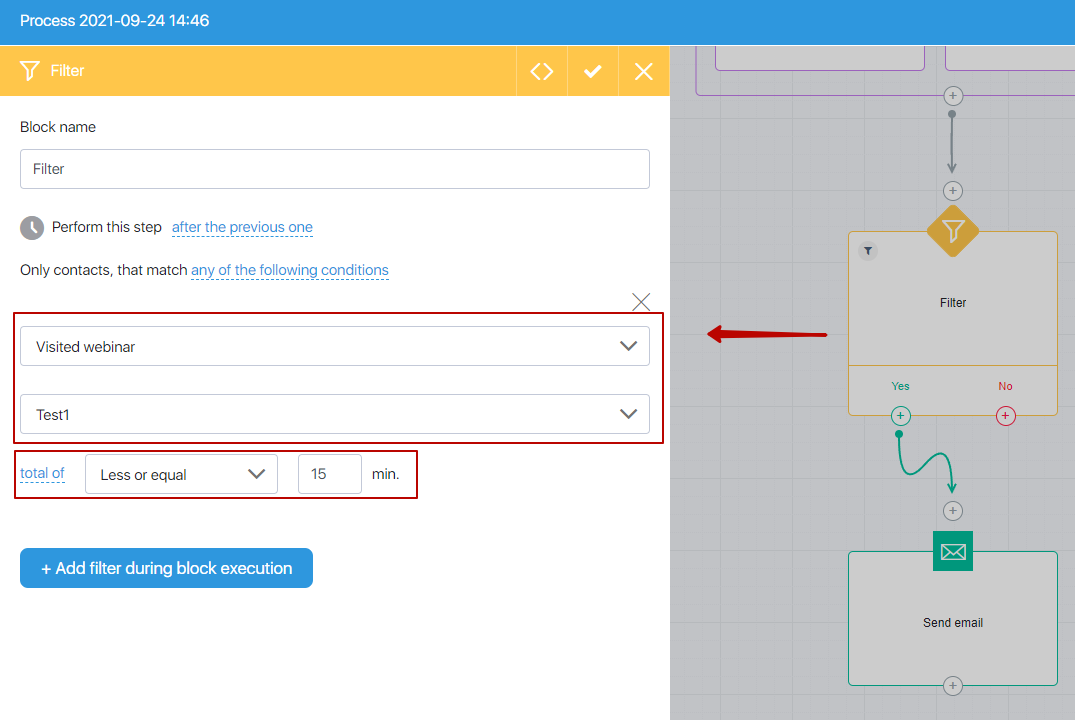
In the example above, the email will be sent to those webinar participants who have been on the webinar for 15 minutes or less since the start of the webinar.
The “Was on webinar” filter in the “Filter” block works in both processes and funnels, as well as in any blocks where it is possible to add a filter within the block itself.
You can select the following parameters for the “Attended a webinar” filter:
at
- Matches // was at the specified minute
- Does not match // was not present at the specified minute
- Greater // was in any minute of the webinar more than specified
- Less // was any minute of the webinar less than specified
- More or equal // was in any minute of the webinar more or equal to the indicated one
- Less or equal // was in any minute webinar less or equal to specified
total of (counting only from the beginning of the webinar)
- Matches // was the specified number of minutes in total
- Does not match // was not a specified number of minutes in total
- Greater // was more than specified minutes total
- Less // was less than the specified minutes total
- Greater or equal // was greater than or equal to a specified total of minutes
- Less or equal // was less than or equal to a specified total of minutes
Temporary field of the process editing
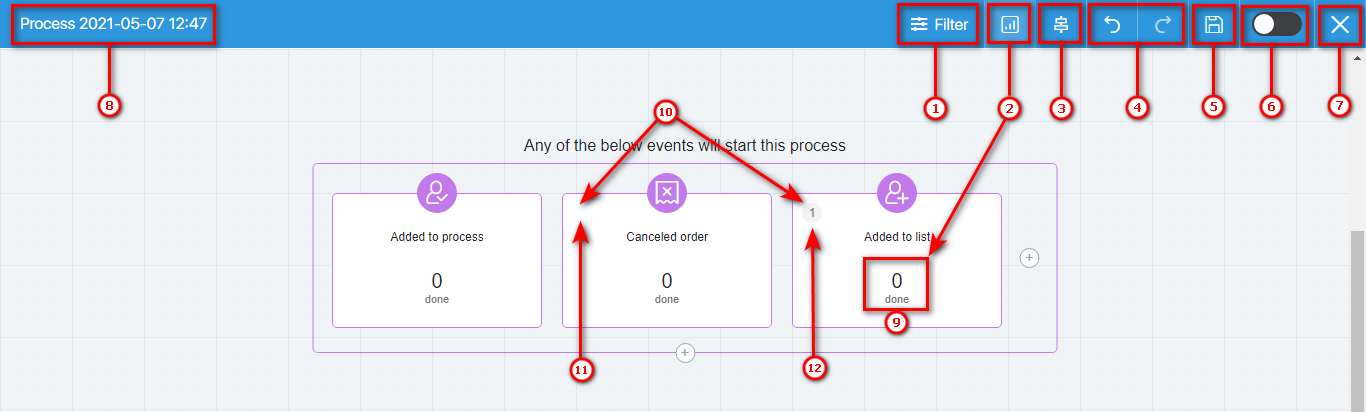
Upper right corner has the following buttons:
- A filter that allows you to trace the path of the contact in the process for a certain period of time;
- “Show statistics” button, when it activated, the “Filter” button appears and in each action, trigger and condition the number of repetitions for each contact is shown, as well as the number of times this action, trigger, condition has already been performed;
- Center alignment button;
- Cancel or redo button;
- Save button;
- Process start button;
- Button for exiting process editing.
Demonstration of statistics and filter will help you to see the progress of the process, at what stages of the process contacts are stuck. You can use this data to adjust your sales funnel.
- Allows you to trace the path of the contact in the process for a certain time interval.
- Statistics. How many times has been done.
- Center alignment of blocks.
- Undo or redo an action.
- Saving the process.
- Inclusion of the process.
- Exit editing the process.
- Change the name of the process.
- How many times has been done.
- Shows the number of repetitions for a contact and how many times a trigger, action, or filter has been performed.
- Performed many times.
- Performed once.
You can change the location of the elements by dragging them and thus create a convenient visualization of the process.
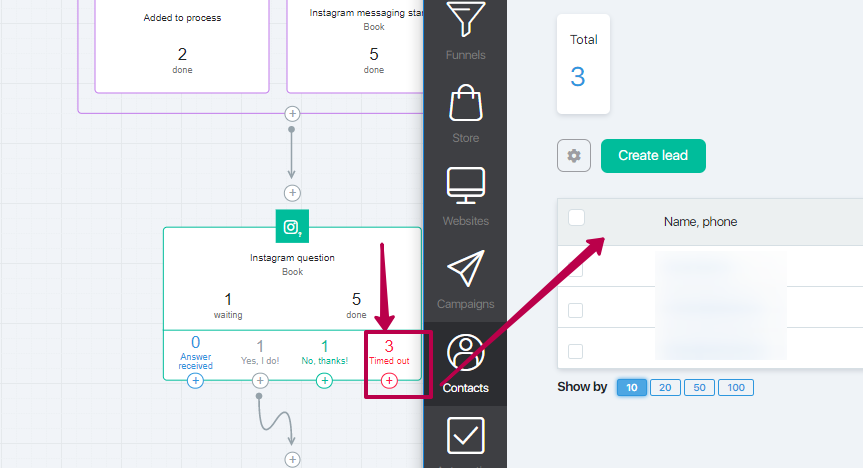
If there are leads waiting for action in the process blocks, their number will be displayed in the output data of the blocks.
All of the Process blocks/outputs statistics are clickable.
That is, when you click on the numbers that the statistics show, the system will automatically generate for you a list of contacts for that block and you can further work individually with those contacts. For example, you can add them to a separate group or Export.
FAQ (frequently asked questions)
Yes, you can edit the process if it is already running. Before saving changes, the system will ask what to do with incomplete sessions. If you have deleted some process steps, the process will end for the contacts for which these steps have been completed. You can select one of the End Process actions to apply to those contacts.
For those contacts who are not in deleted steps, you can select one of two options: continue the process or select the End process action.
