Content
General information
What is a DKIM signature?
DKIM (Domain Keys Identified Mail) is a digital signature used by email services to identify and classify legitimate email. The presence of a signature indicates that the sender is a verified and approved person. Such a signature directly affects the delivery of emails to subscribers.
To put it more simply, DKIM is one way to make sure that the email is not forged and has been sent by the actual owner of the mailing address.
Can you please be more precise?
Sure! The pair generates an open-private key. The private key is placed on the server for sending mail, the public key is registered in the DNS. When sending a message, it is said that it will be signing the domain X. Next, some unique fields (recipient, subject, date, text) are taken from the message and a digital signature is generated using the private key. To verify a signature, you need to obtain a public key from the DNS for domain X, decrypt the signature, and verify that the signature and content of the message match.
Thus, for DKIM to work on domain X, a person must have access to the DNS of domain X, as well as to the mail server to accommodate the keys.
Pros of using DKIM
- You increase your delivery-rate by several percentage points. When a message is signed using DKIM, the mail service allocates for itself such a sender and in due course its reputation is formed. Messages from a signer with a good reputation will pass a less thorough check by the recipient’s filters and the attitude to the emails will be more supportive. Of course, this is not a panacea if you do not follow the basic recommendations
- You have a spam rating, independent of the spam rating of the mailing list service. This is the first step to ensure that other authors of mailings can not even indirectly affect the delivery of your emails
- You get the first stage of personal protection from scammers and competitors who try to forge their spam or phishing mail under your emails (or maybe just purposefully worsen your spam rating this way)
To whom is the setting available?
All letters sent through the service are signed with one digital signature. This allows you to get a good basic level of protection against forgery and meet the technical requirements of the largest mail services. Projects that do not focus on email newsletters or have a relatively small database can easily manage the regular DKIM Service. For larger projects, it’s better to use your DKIM.
How to connect?
Create a domain mail
To connect DKIM, your email, which will be listed in your JustClick account as the sender’s email, must be on your domain.
For example info@my_site.com, where my_site.com is your domain.
To create such an email, you can use the services provided by the postal giants: the Yahoo service, Google, etc. Almost always a similar service can be found at your hoster.
To increase the loyalty of mail services and the correct operation of the DKIM signature in the email name, it is not recommended to use dashes, dots, underscores and names like “no-reply”.
The best options are:
We also strongly recommend you to reply with this email to your subscribers. If you receive an email in response to your newsletter, be sure to respond to it. This will show the mailing services that the newsletter is live and you are in dialogue with your subscribers, and not just sending them emails.
Contact Support
Write to us. The easiest way to do this is directly from your private office.
In the query subject, specify: “Configure the DKIM signature”. In the message itself, you must specify:
- Your login
- Your email for which you need to configure DKIM
- Your domain
In our case it will look like this:
“Please configure DKIM signature for the account -” your_login “
email: info@my_site.com
domain: my_site.com »
Get a response and add one entry
The digital signature is configured both on the side of our service and on your side. Having received your message with the initial data, our programmers will make the necessary settings. In the response message we will ask you to make some settings on your hosting, for example:
“Write the following entry in the DNS editor on your hosting for the domain my_site.com:
<em> default._domainkey IN TXT "v = DKIM1; k = rsa; s = email; p = MIGfMA0GCSqGSIb3DQEBAQUAA4GNADCBiQKBgQDUpF + 8E9liTlxc9ICYRQpyciJsWlJ2moGqI / 5q3ysSAiFGIACbJm9UD9VQPWpsGp0Vfts7DwJFc3AuNGqTNyjemJDBL0mHABzi1sMGs6RIB6drmSwzu8jpWtUw5k6NMw + 6U74EOFAS / KtC0P7GYgUIqaBhmjh + Vdv7wIDAQAB" </em>
After that you need to go to your hosting and add this record.
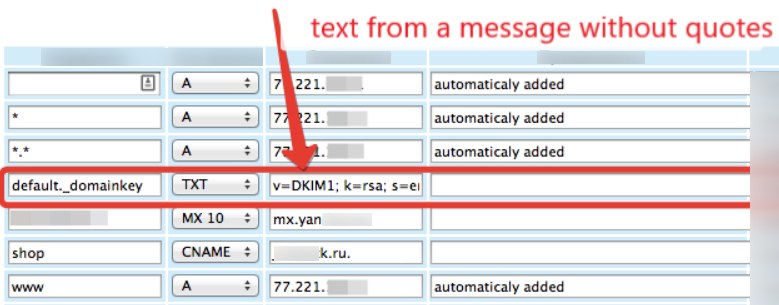
On the hosting it will look something like the screenshot below. Approximately, because the control panels of different hosting sites may differ, but the meaning of where and what to write you will be clear from this screenshot.
Note that in the Value field, we insert this text without quotes.
"v=DKIM1; k=rsa; s=email; p=MIGfMA0GCSqGSIb3DQEBAQUAA4GNADCBiQKBgQDUpF+8E9liTlxc9ICYRQpyciJsWlJ2moGqI/5q3ysSAiFGIACbJm9UD9VQPWpsGp0Vfts7DwJFc3AuNGqTNyjemJDBL0mHABzi1sMGs6RIB6drmSwzu8jpWtUw5k6NMw+6U74EOFAS/KtC0P7GYgUIqaBhmjh+Vdv7wIDAQAB"
This text is given for an example, you insert your unique text, which our programmers will generate for you.
Check the entry and report that everything is read
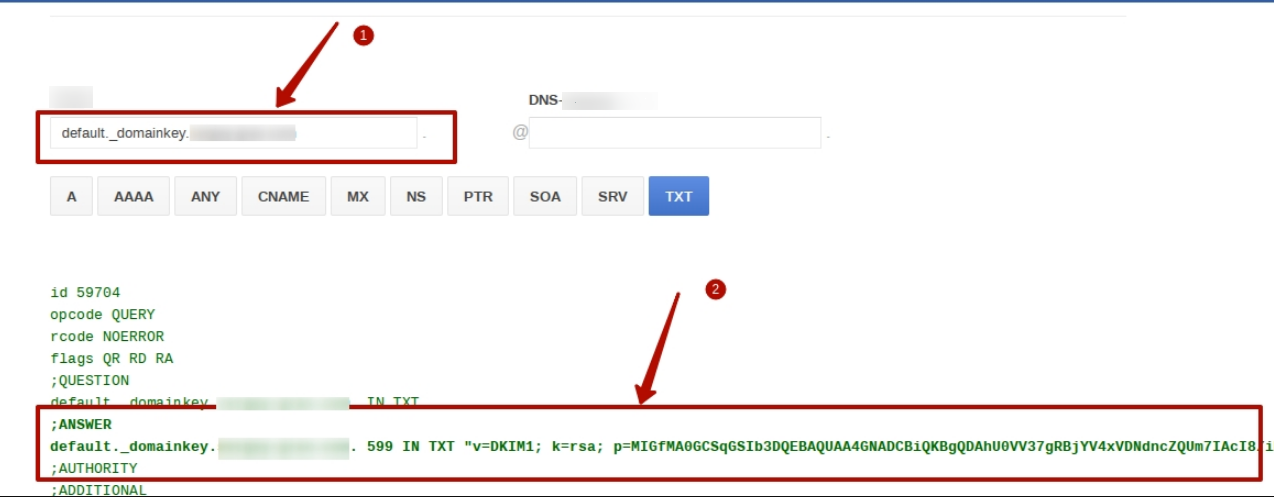
After you write down the necessary data on your hosting, you need to make a check by clicking the link https://toolbox.googleapps.com/apps/dig/#TXT
Pay attention that changes on hosting occur most often within 24 hours – the exact time depends on your hosting.
In the “Name” field, enter default._domainkey.my_site.com and click anywhere on the page. Below is the answer to your hosting, which should be the entry you made.
After you make the settings described above, let us know by return email. We will include DKIM-signature for your emails and write you about it.
The settings will be completed.
How to verify your DKIM signature?
To verify that your DKIM signature is working, you just need to send an email from your account with the email of the sender for whom the DKIM signature was configured.
In the email that you receive from your mailing list, you will see a similar picture in the information about the sender.
It can be displayed differently in different mail services, but there it should be written that the signature type is “DKIM”, and the email is sent from your domain.
If you look at the properties of the email, you will see that your domain is also registered there, as in the screenshot below:
After such a check, you can be sure that the DKIM signature for your email is configured correctly.
What should I do next?
After configuring the DKIM signature, you need to configure FBL for your domain, otherwise the subscribers who press the SPAM button in your messages will not be automatically deleted from your database. In more detail, we’ll talk about this in the following article.
Unfortunately, setting up DKIM does not cancel other mail system requirements, so we recommend that you read the general rules of mailing the general rules of mailing on JustClick service.
Attention: As the DKIM signature setting is done manually by our programmers for each user, it takes some time, depending on the load of the programmers. Typically, DKIM setup takes from 1-2 days to a week.


