Google reCaptcha — protection from spam
We are provides a new option you have been waiting for. This is an option to install invisible Google reCaptcha for your subscription and order forms.
Google reCaptcha protects the forms on your website against spam and robots. reCaptcha verifies a user by the behavior on the website. If the algorithm finds the behavior patterns suspicious, then a window with an image to select will appear for verifying if a subscriber is a robot.
To start using Google reCaptcha, you should obtain 2 special keys and then insert them in account settings.
You can obtain these keys with a Google account. Follow a link and log in your account. If you have no Google account, register in Google mail and log in your account.
How to add Google reCaptcha to your forms
Let’s follow the steps how to install and enable Google reCaptcha for your forms.
- Follow a link https://www.google.com/recaptcha/admin/ and log in.
- If you are new to creating reCaptcha, then you will see a window to create it. Fill in the fields and check the type of reCaptcha (see information about filling in the fields below).
- In a field “Label” enter a name for your reCaptcha which can be found in your personal account. You can type any name you like.

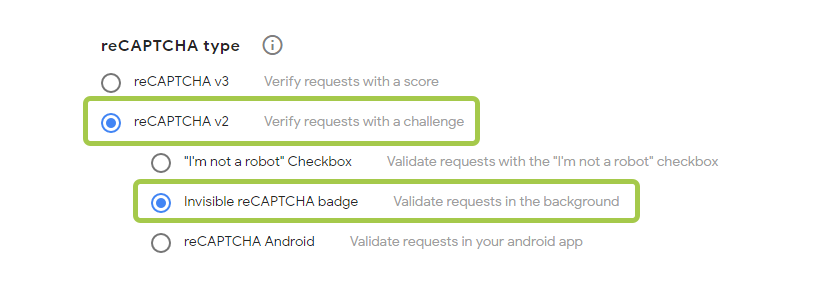
- Then choose reCaptcha type. For invisible reCaptcha check “reCAPTCHA v2”, then (in a drop-down menu) check “Invisible reCAPTCHA badge”.
- Then fill in a field “Domains”. Type in one or several domains (depending on the number of sites you want to use reCaptcha for).

In any case, mark a default domain of JustClick:
justclick.io
login.justclick.io
If your own domain is delegated to Justclick (for example, mysite.com), then mark it too.Specify a domain without http and https protocol. You have to register all domains that you use for forms and payment pages. If you lose some domain, the order creation may not work correctly. - Accept the reCaptcha Terms of Service and click “Send” button.
- Then you will be redirected to the page with the keys. You should copy these keys.

Site key (required for displaying reCaptcha widget on the page with the forms);
Secret key (required for communication with Google services and verifying the user’s response to reCaptcha).“Go to settings” button (opens the settings of the reCaptcha you created);
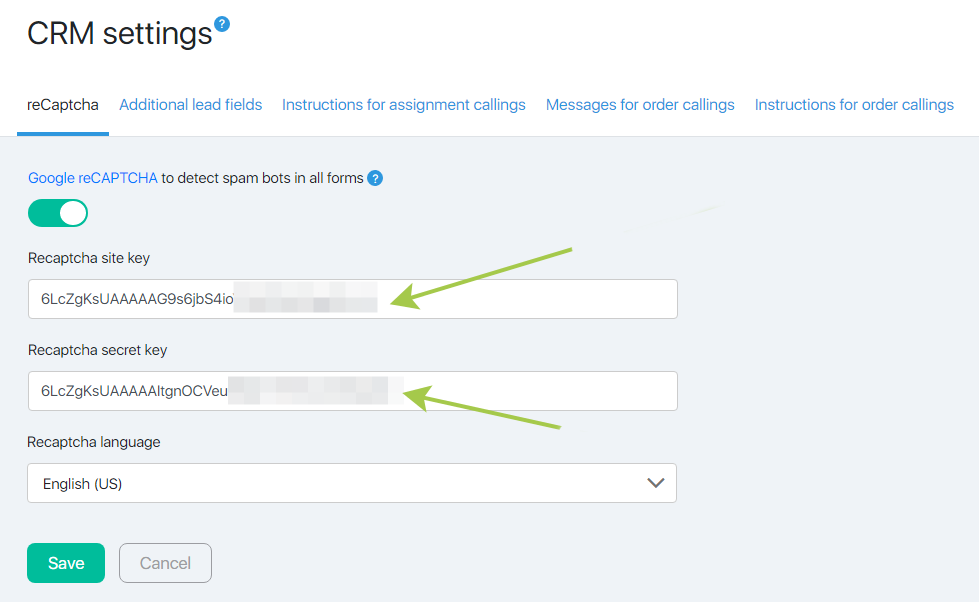
“Go to analytics” button (redirects you to the statistics page with all actions for the selected reCaptcha). - Now you should copy the keys and insert them into the settings of your JustClick account, in Contacts — Settings — “reCaptcha” tab. Copy the key from the first field on reCaptcha settings page in Google and paste in “Recaptcha site key” field in JustClick settings, while the key from the second field should be copied and pasted in “Recaptcha secret key” field. In the field below, select the language of your target audience.
- Enable the bar (it should be green) to add reCaptcha to your account.
Please note that reCaptcha is disabled if “Recaptcha site key” and “Recaptcha secret key” fields are empty. - Click “Save” button.
When reCaptcha is enabled in your account settings, invisible reCaptcha will be added to all your forms. It will be applied to all forms created in your JustClick account.
It will work for both the forms installed directly on JustClick pages and the forms added as codes on the third-party pages.
This is an easy and quick way to configure and to enable reCaptcha for the protection of your forms against spam and robots.
