Content
- 1 How to search for a lead card
- 2 Structure of a lead card
- 3 Lead’s financial statistics
- 4 A lead
- 5 Earning points for purchases
- 6 Lead’s History
- 7 Lists
- 8 Pages
- 9 Orders
- 10 Calls made to confirm orders
- 11 Emails
- 12 Broadcasts
- 13 Facebook pages
- 14 Email series and broadcasts messages
- 15 Calls of assignments
- 16 Clicks
- 17 Related contacts
- 18 FAQ
A lead card is a tool to work with particular clients and subscribers in JustСlick. It will help you get detailed information about any lead.
How to search for a lead card
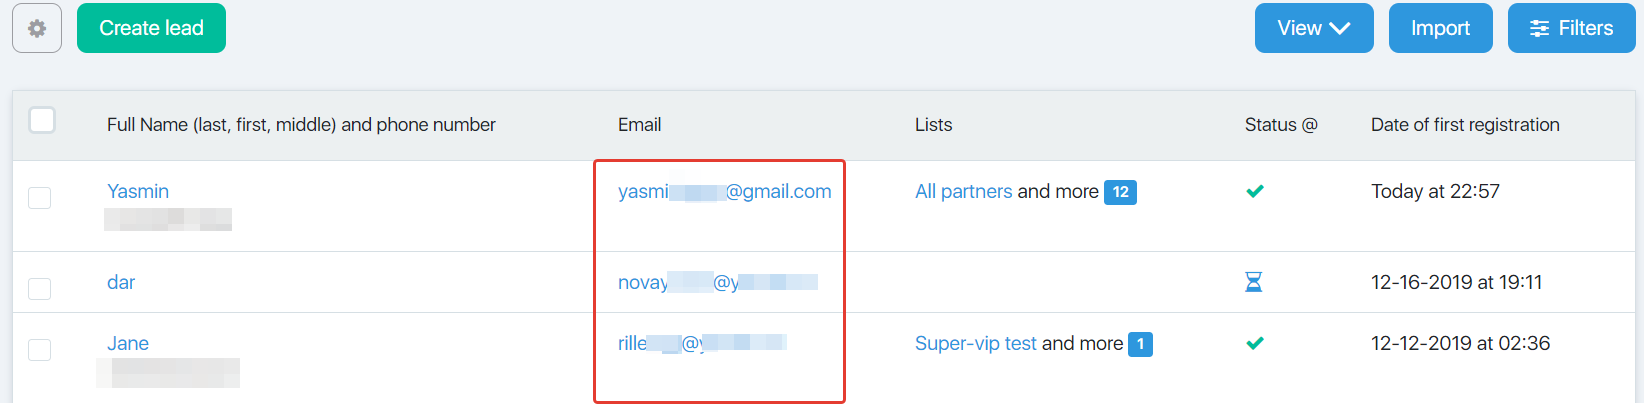
There are several ways you can find a lead card: from Contacts — Leads, from Campaigns — Subscribers and from Store — Orders. In some cases, you can open a card by clicking its name or lead email (in some cases you just click “No Email”).
Here is the first method:
- Open Contacts – Leads.
- Find the required lead by applying filter (or visually).
- Click the email of the required lead in Email column.
Structure of a lead card
A lead card contains 17 tabs:

- A cogwheel icon “To Add” attaches a lead to the selected process, a lead list, or you can apply rules to it, or delete personal information, Open access to the lesson*, Login to the academy as the student.
*By granting a contact personal access to a course/module/lesson, he gets priority access rights immediately, regardless of settings for groups, schedules, completed the task of the previous lesson or not.
- General information about a lead, key info. In this block, in addition to the name, e-mail and phone number, information will be displayed on the delivery address / address, time zone and points accrued.
The shipping / shipping address information is updated when the contact has created an invoice. If an invoice is issued for the purchase of a physical product, then the contact indicates the address in the order form. If an invoice is issued for the purchase of a digital product, then the country and city are automatically determined by the IP address. - Lead history displays all changes in a lead.
- Tasks allow you to look through all tasks for this lead and to assign a new task.
- Info about lead lists which a lead is attached to.
- A list of all pages visited by a lead.
- All orders of a lead.
- Info about the calls concerning the lead’s orders.
- List of all emails received by the contact.
- Information about webinars to which the contact was registered.
- Facebook pages visited by the contact.
- A list of sent email series (and actions of a chain).
- A list of broadcasts sent to a subscriber.
- Summarized info about call tasks which are connected with this lead.
- Info about click-through with the links with advert (and referral) tags. In other words, lead’s clicks. Read more about the definition of a click in our service in this article.
- Info about the leads associated with the lead. Related contacts are the leads which are used to perform some actions (subscription, payment, click-through) in one browser but they are not merged. In other words, these are the leads of one person but with different e-mails.
- Info about the leads merged with this lead. Merged contacts are the leads which are merged into one lead, while the second lead was deleted.
Lead’s financial statistics
It becomes available if a lead generates at least one order:

- Orders – total sum of all orders generated for a particular email.
- Expected – total sum of all orders with “Expected” status generated for a particular email.
- Confirmed — total sum of all orders generated for a particular email with “Confirmed” status.
- Paid — total sum of the paid orders for a particular lead.
- Income – total sum of the income from lead’s orders. It is calculated as “Paid” — “Expenses”. Find out more about the expenses on a product in this article, they can also be defined for the whole store.
- Profit – a sum which is left when we subtract the expenses (7+8+9) and refunds (10) from the income (5).
- Affiliate commission – a sum of all payments accrued to the referrals which bring this client into your sales funnel.
- Call-center – a sum of all payments accrued to the employees who persuade a client to buy your products.
- Co-authored — a sum of all payments accrued to the co-authors for the sales of the collaboratively developed products.
- Refund – a sum of all refunds paid to a particular client.
A lead
The main tab contains general info about a subscriber, including a lead’s email, first name, last name, middle name, phone number, city. The fields depend on what a subscriber enters in a subscription or order form when creating a lead. Some fields can be edited by you or your staff (for example, a phone number or lead’s names; appoint a personal manager).
Additional fields will be displayed if you define them in Contacts – Settings
You can also transfer data from add. fields with API 2.0.

Status – it shows whether a client can be sent a letter from the system (Activated or Subscribed statuses), or the letters cannot be sent (other statuses).
Here you can also assign a lead to a personal manager and enter extra information about a lead.
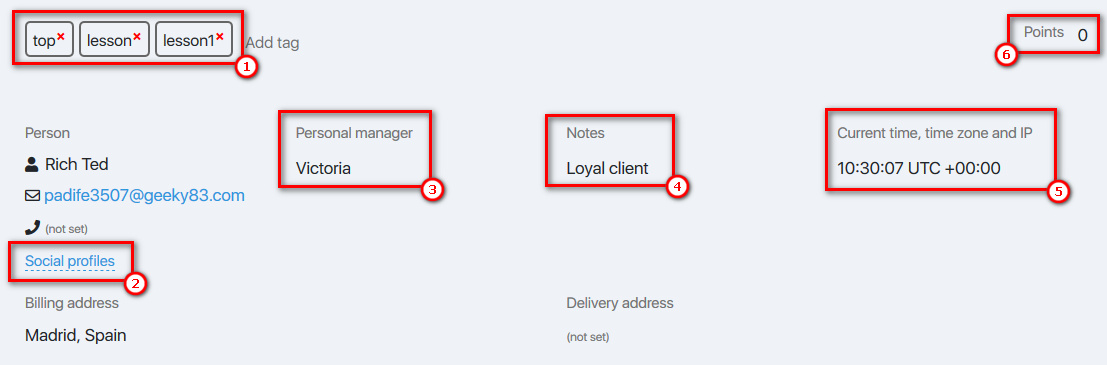
- Tags – what tags are currently assigned to this contact.
- This contact’s social media profiles.
By clicking, a list of social networks opens with the filled data (if any).

- Personal manager – the manager responsible for this contact (you can assign it, for more details in this article).
- Customer information – arbitrary customer information that can be added manually.
- Current time, UTC time zone and client IP.
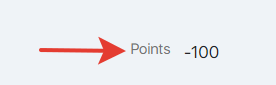
- Points displayed on the contact card. Read more about how to set up and credit points to the client for further payment of the invoice, read here and here.
And in order to change the number of points in the card of a specific contact, you need to click on the number of points (if the contact already has credited points), or on the pencil icon next to the number zero.
 And in the field that opens, enter the required number of points.
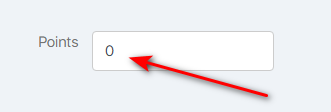
Points can be specified in both positive and negative values.
Earning points for purchases
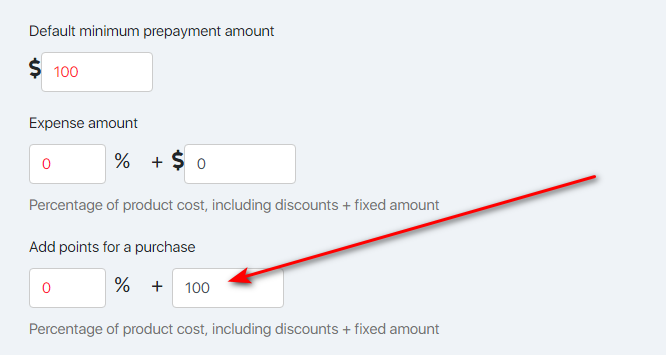
To add points for purchases, in the section “Store/Settings” – “General settings” set the desired value in the field “Add points for purchase”. 1 point = 1 dollar.
If you set a value for the accrual of points in this section, then this value will automatically be applied to all your products.
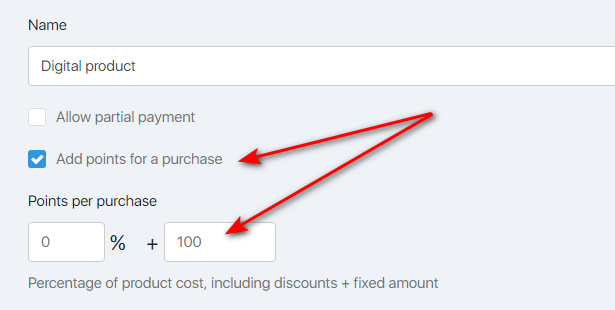
Also, in the settings of each product, a function has appeared that allows you to enable/isable the accrual of points for a purchase. To enable it, you must select the “Add points for a purchase” checkbox and enter a percentage of the cost of the product or a fixed number of points that will be awarded to the customer after the purchase.
If you set the value for the accrual of points in the settings of a separate product, then this value will apply only to this product and will not be affected by the value selected in the section “Store/Settings” – “General settings”.
Lead’s History
This tab displays the information about the previous actions with a particular lead. For more information on what actions are displayed in the history, read this article.
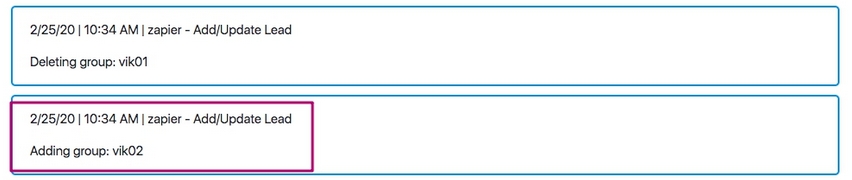
Also lead history displays the changes made by the Zapier service through the “Add / Update Lead” action (if you have integration configured). In this case, the note (next to the date and time) will indicate “zapier – Add / Update Lead”.
Lists
This tab displays all lists of the selected lead:
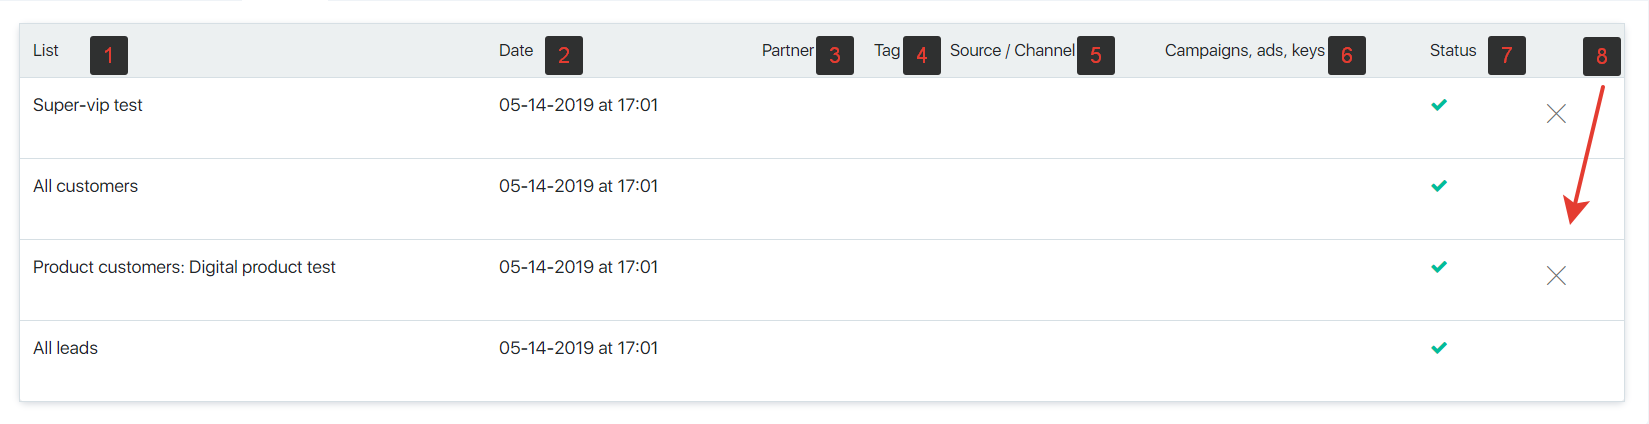
- List of leads – the name of the list which a lead has joined.
- Date – date when a lead subscribed to this list of leads.
- Partner – a login of the referral which brought the subscriber to this list of leads.
- Tag – a tag which subscribed a user to the list.
- Source/channel – utm-tags in the link where a user has registered in the list.
- Campaign, ads, keys – utm-tags for more advanced level.
- Status – lead’s status in the system, it describes the possibility to send letters to the lead’s email.
- Deletion from a list of leads — this button can delete a lead from the list. A lead can be deleted from usual lists, while you can’t delete a lead manually from auto-lists.
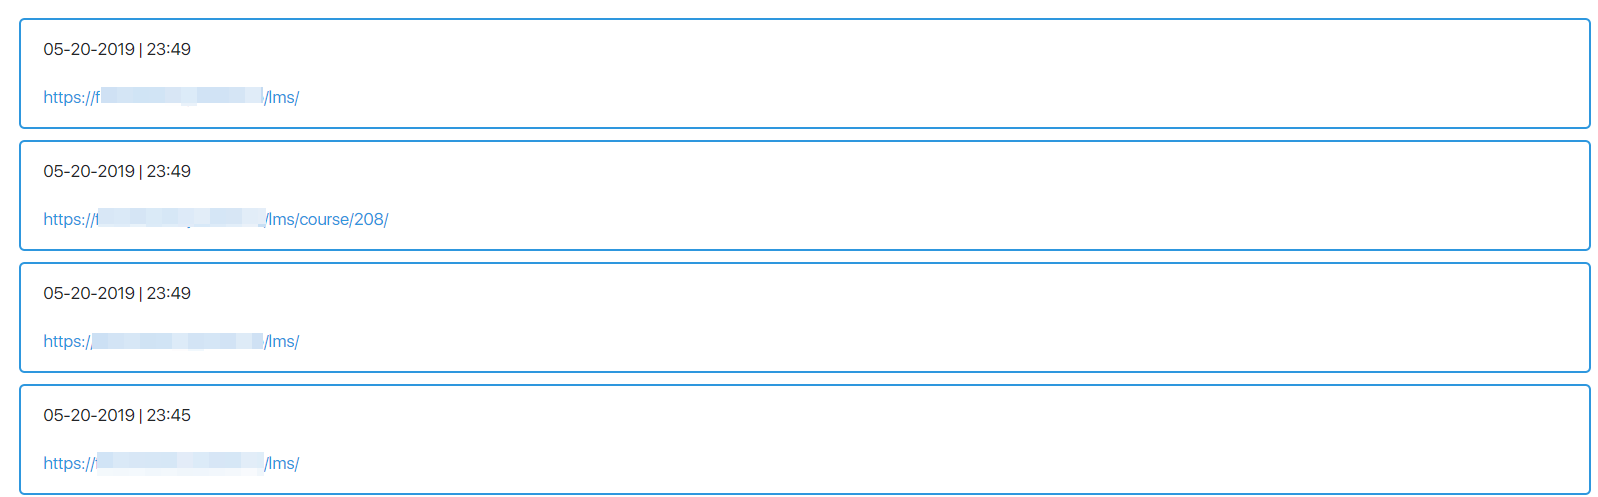
Pages
This tab shows a list of all pages visited by a lead:
Orders
This tab contains a list of all orders generated by a particular lead:

- Number – order number.
- Created – it displays the order generation date and time.
- Products – it displays product ID attached to the generated order.
- Partners – it displays the login of a referral who will be accrued commission fee under this order.
- ₽ – it displays the sum of a particular order.
- Payment – it displays the payment date or the current order status (confirmed, refund, cancelled).
- Source/channel – it shows utm-tags attached to a particular order.
- Campaign, ads, keys – it shows additional utm-tags.
Calls made to confirm orders
Information about the calls is given like this:

- Number – order number.
- Created – it displays the order generation date and time.
- Products – it displays the products attached to the generated orders and their prices.
- Status – order status.
- Comment – comments from an employee who was making calls.
- Manager – a login of an employee in charge.
Emails
The tab shows, in chronological order, a list of all emails that have been sent to the contact. Also, using the filter, you can display individual types of letters:
- Automatic chain letters;
- Instant emails;
- Chain letters;
- Processes letters;
- Funnel letters (both messages from the funnel itself and letters from processes from this funnel are displayed here).

- Filter by type of letters – by clicking on it, you can select from the drop-down list only letters of a certain type.
- Sent from – the name of the contact group to which the message is sent (if the group is deleted, there will be an empty field), as well as the type of message.
- Letter number – the number of the letter (or action) in the automatic chain that goes to the subscriber (if the group is deleted, the numbering is not saved).
- Email subject – the subject of the email sent to the subscriber.
- Sent – the date and time the letter was sent.
- Opened – the date and time the message was opened (if empty, the message is not open).
- Clicked – the date and time of the click on the link in the letter (if empty, there is no click on the link, or the account of clicks on the link is not configured).
- Unsubscribed – the date and time of unsubscribing from the mailing list using the link in the letter (if empty, there is no unsubscribing from the link).
- Spam – the date and time of clicking on the ‘this is spam’ button added to the letter by the service (the ‘Unsubscribe’ and ‘This is spam’ buttons, which can be added to the Campaigns – Settings – General).
Broadcasts
The tab shows detailed information about all webinars for which the contact was registered.

- Broadcasts – name and date of the webinar; Messages that the contact left in the chat of the webinar.
- Date and time – the date and time when the webinar was held.
- Was at the webinar – the time during which the contact was at this webinar.
Facebook pages
Facebook pages visited by the contact.
Email series and broadcasts messages
The tabs show all email series and broadcasts messeages sent to a user.
Email series:

- List – the name of a list which is selected for email series (if this list is deleted, the field will be blank).
- Letter number – the number of a letter (or action) in an email series, this letter is sent to a subscriber (if the list is deleted, the list will be renumbered).
- Name – the name of a letter sent to a subscriber.
- Done – date and time of sending a letter.
- Opened – date and time of opening a letter (if it is blank, the letter is not opened).
- Clicked – date and time of clicking the link in the letter (if it is blank, no link has been clicked, or click-through counter is disabled).
- Unsubscribed – date and time of unsubscribing from the mailshot by clicking the link in the letter (if it is blank, the letter is not unsubscribed).
- Spam – date and time of clicking the button “This is spam” added to the letter by the service (buttons “Unsubscribe” and “This is spam” can be added in Campaigns – Settings – Mailing settings), or clicking any button “This is spam” in a letter.
A table with the data in “broadcasts messages” tab contains the same information, except for the following options:

- Number – the number of broadcasts letter in the system.
- Sent – date and time of sending a letter.
Calls of assignments
If there are no task calls, the tab will not be displayed. It shows the statuses of a particular lead in the call tasks which are connected with this lead:

- Date when the lead is included into a call task.
- Call back — it shows the date to call later to a client.
- Status – it shows the current result in a call task for this lead.
- Comment – it displays the result of the call and some notes from an employee.
- Sales Manager – it shows the login of an employee who called.
- Name of the call task.
Clicks
This tab contains the information about utm-tags from every click-through with a user’s tags:

- Show clicks for – it helps define the click display period.
- Time – it shows the date and time of click-through with tags.
- Source – it shows a link tag “Source” which a user followed.
- Campaign– it displays a link tag “Campaign” which a user followed.
- Ad – it shows a link tag “Ad” which a user followed.
- Keys – it displays a link tag “Keys” which a user followed.
Find out more about utm-tag link generation in this article.
Related contacts
Related leads are the leads which a user exploited to make some actions (to subscribe, to pay, to follow a link) in one browser, but these leads haven’t been merged. In other words, these are the leads of one person but with different e-mails.
These features are very user-friendly as you don’t have to search for the old leads of a client if the client paid from a different email or if the client made a mistake in email address during registration.
FAQ
For each of the products, you need to set up the accrual of points after purchase. This can be done in the settings of the product itself.
Create a ‘Rewards program’ group (the name of the group can be anything you like) and add to it those contacts who participate in your bonus program.
Create a process in which the trigger ‘Paid the invoice’ is selected as the start trigger. And in the trigger itself:
1) select all products
2) add filter ‘Not in group ‘Bonus program’. 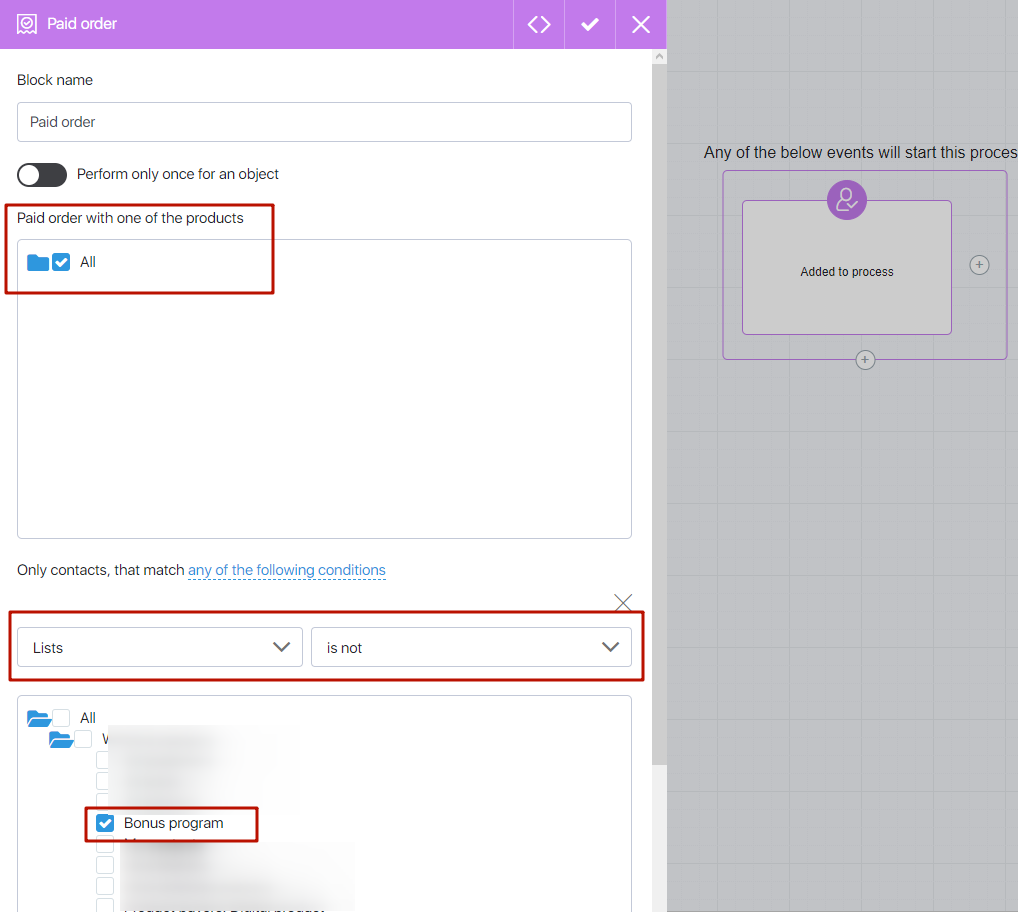
The second step in the process is to add the ‘Change field value’ action and select the ‘Points’ field zeroing. 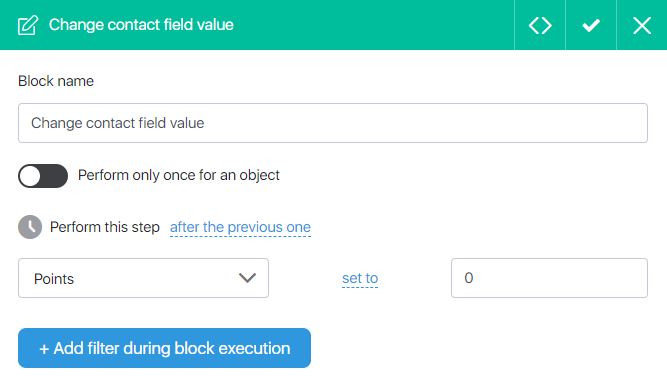
The result is a process like this: 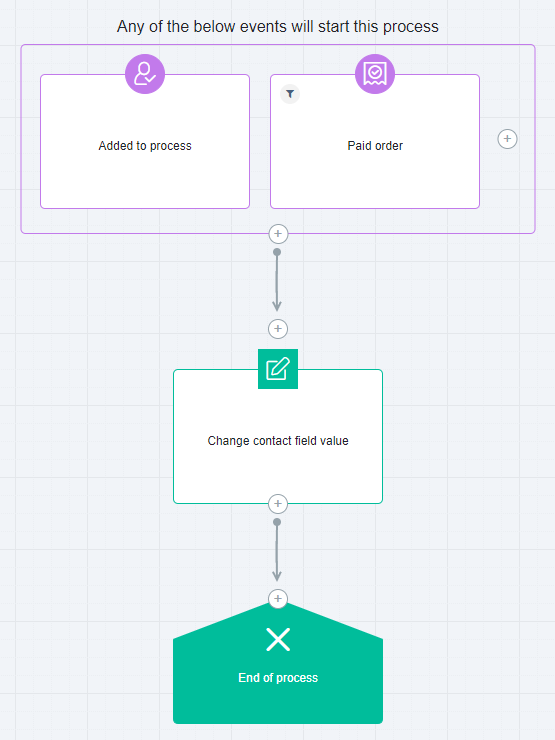
Create a process in which select the ‘Paid invoice’ trigger as the start trigger and select all products in it, for the purchase of which points are awarded.
Add the filter ‘Field ‘Points’ is greater than or equal to 1′ and set the filter delay to 1 minute. 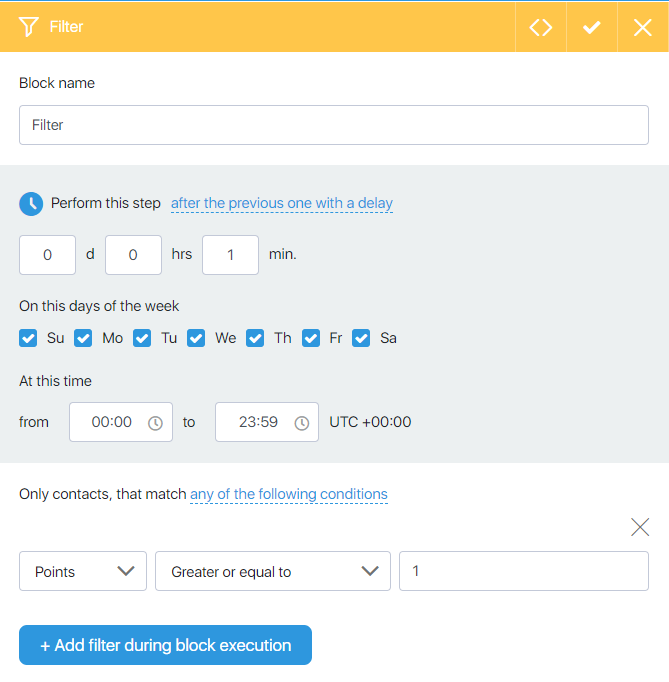
At the output ‘No’ from the filter, add the block ‘End of process’.
At the exit ‘Yes’ from the filter, add the ‘Send email’ block. Add notification text and a variable to display points in the letter. 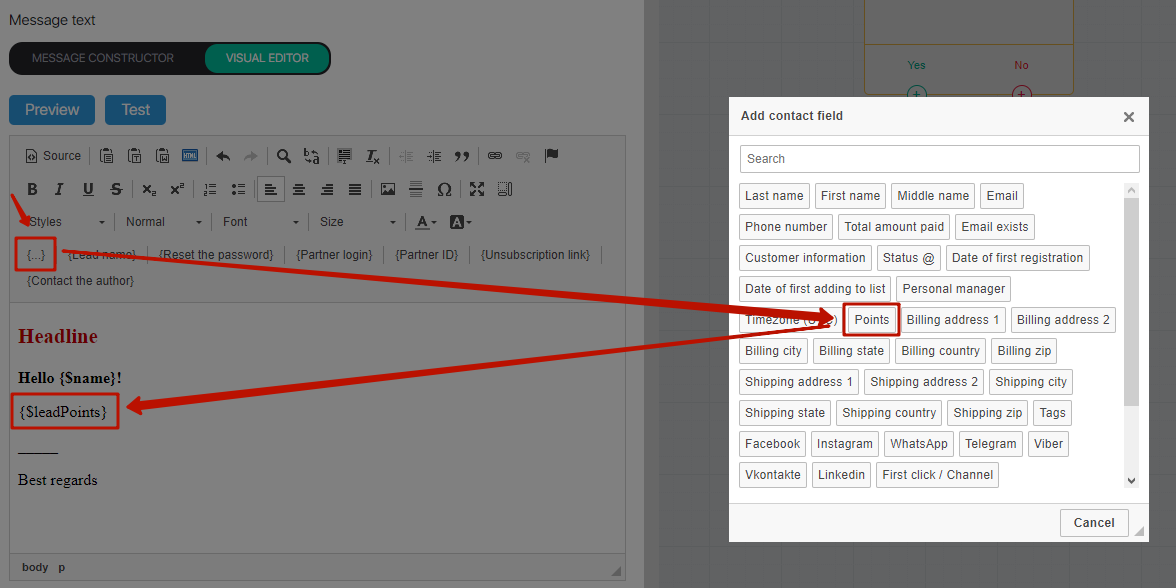
After the letter, repeat the filter ‘Field ‘Points’ is greater than or equal to 1′ and set a filter delay of 30 days (this will be the period through which the reminder will be repeated, the period itself can be any).
At the ‘No’ output from the filter, add the ‘End of process’ block (to not send any more notifications to those contacts who have 0 points).
From the ‘Yes’ exit, drag the arrow to the reminder email you created above. 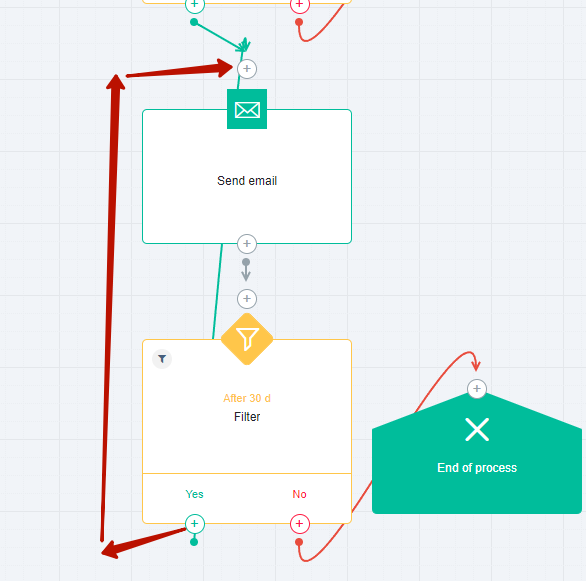
Thus, reminders will be sent while the contact has points and stop being sent if there are no more points.
The result is a process like this: 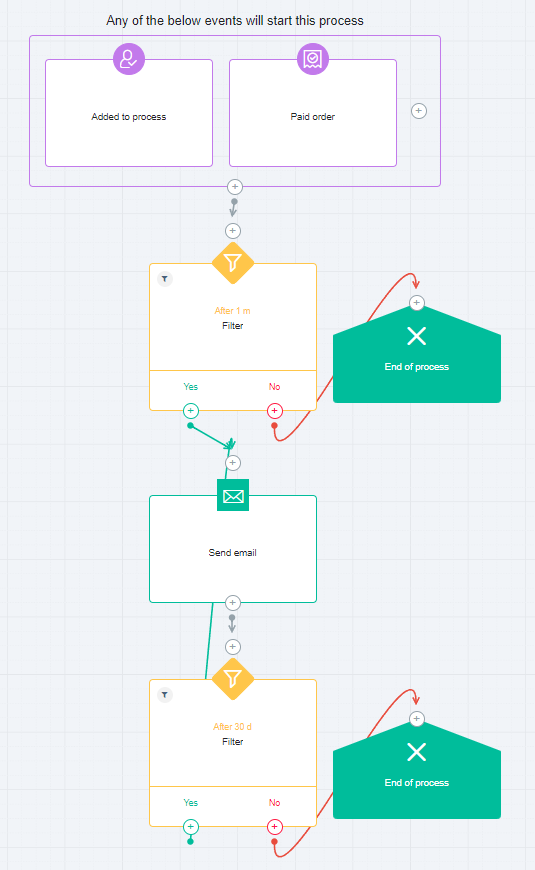
For the entire process, in the ‘Run for contact’ field, set the setting to ‘any number of times, but not simultaneously’. 
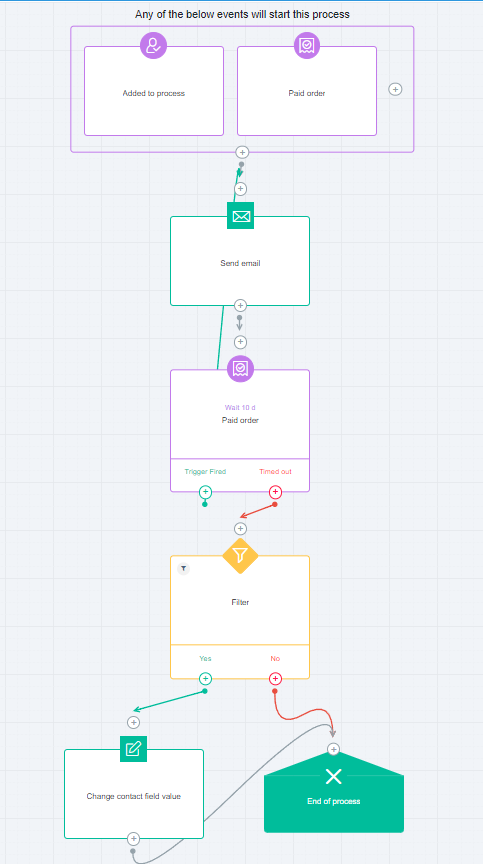
Create a process in which select the ‘Paid invoice’ trigger as the start trigger and select all products in it, for the purchase of which points are awarded.
Add block ‘Send mail’. Add a notification text to the letter that the points are valid for a limited time and a variable to display the current number of points. 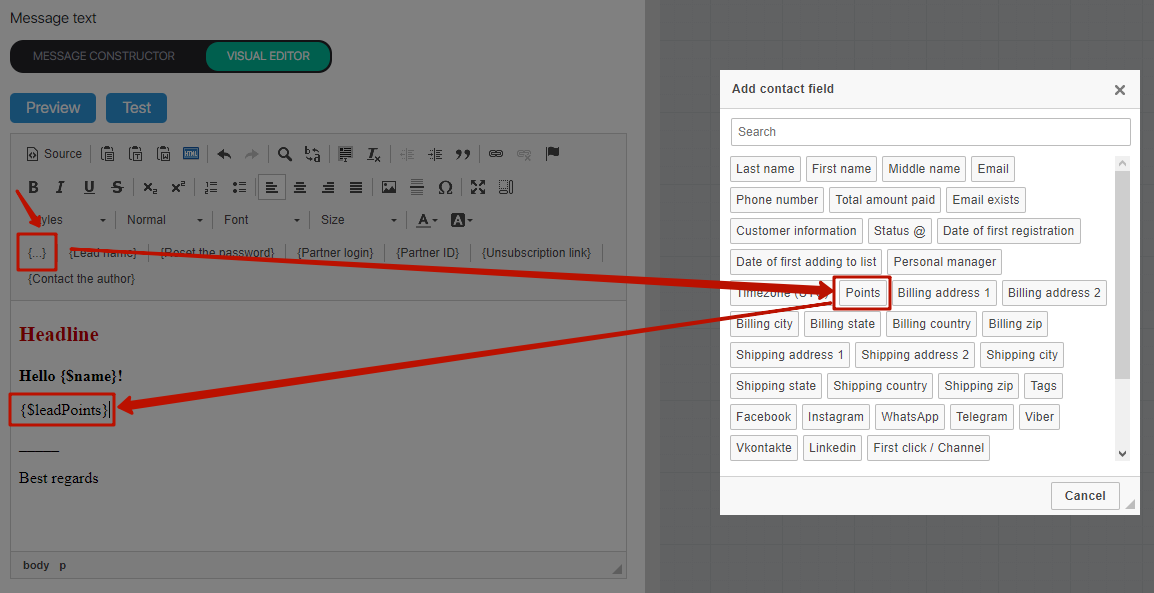
Add an ‘Invoice Paid’ trigger and select all products for which points are earned. In the ‘Go to the next step’ field, select ‘when the trigger fires or the timeout exceeded’ 10 days (or any other period after which you want to automatically write off the accrued points). 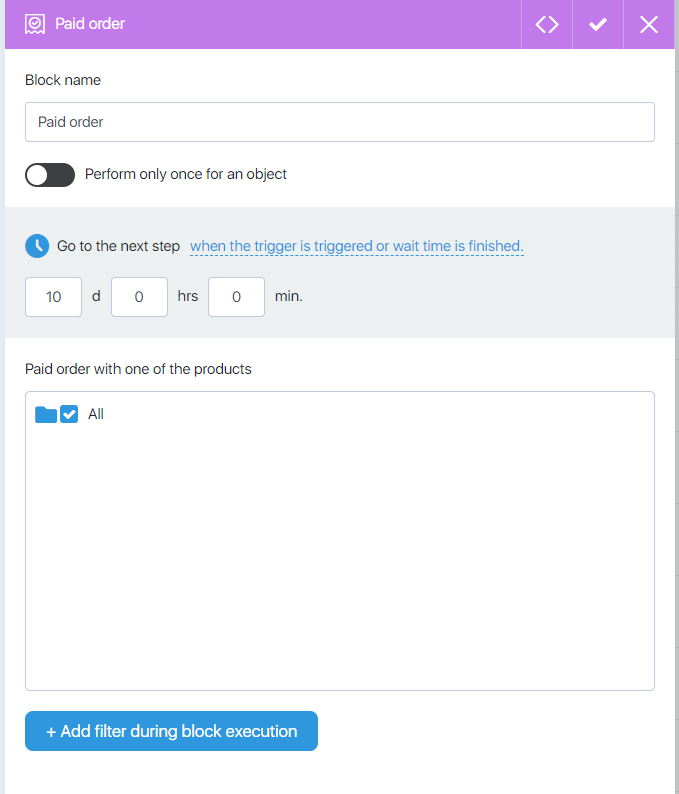
From the ‘Yes’ exit, drag the arrow to the notification email you created above. 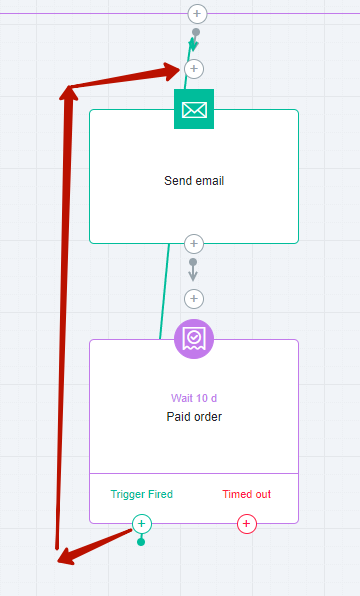
Thus, those who make a new purchase within 10 days will receive new points and extend their validity for another 10 days.
After exiting ‘No’ trigger ‘Invoice Paid’ add the filter ‘Field ‘Points’ is greater than or equal to 1′. 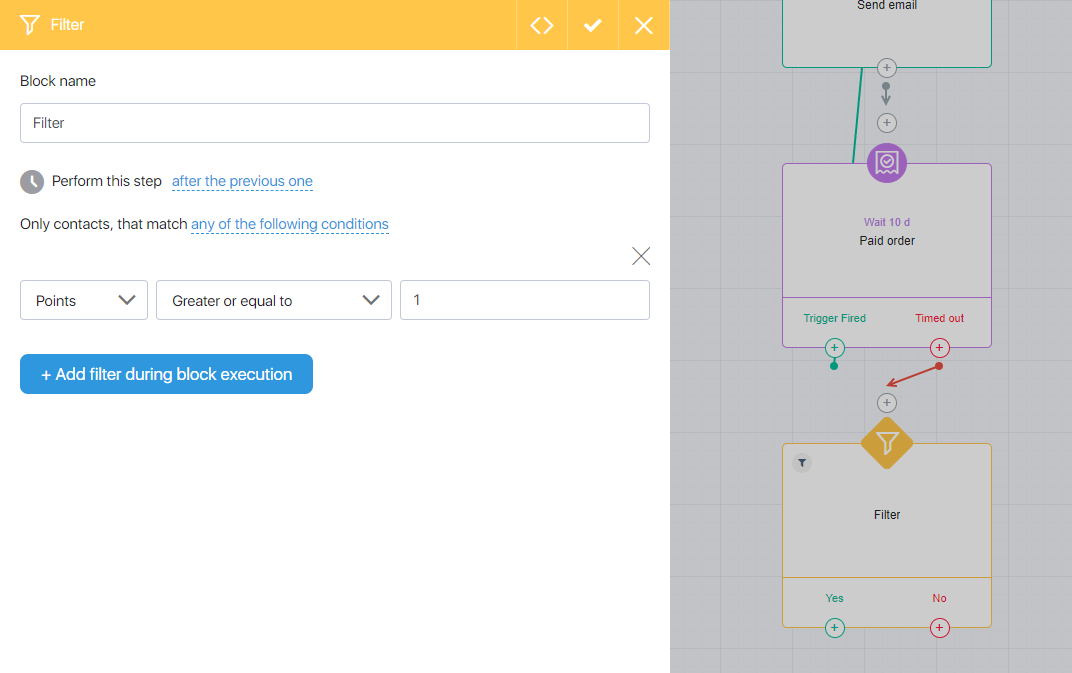
After the ‘No’ filter exits, add an ‘End Process’ block to end the process for those who no longer have points.
After the ‘Yes’ filter exits, add the ‘Change field value’ block, select the ‘Points’ field in it and ‘change to’ 0. 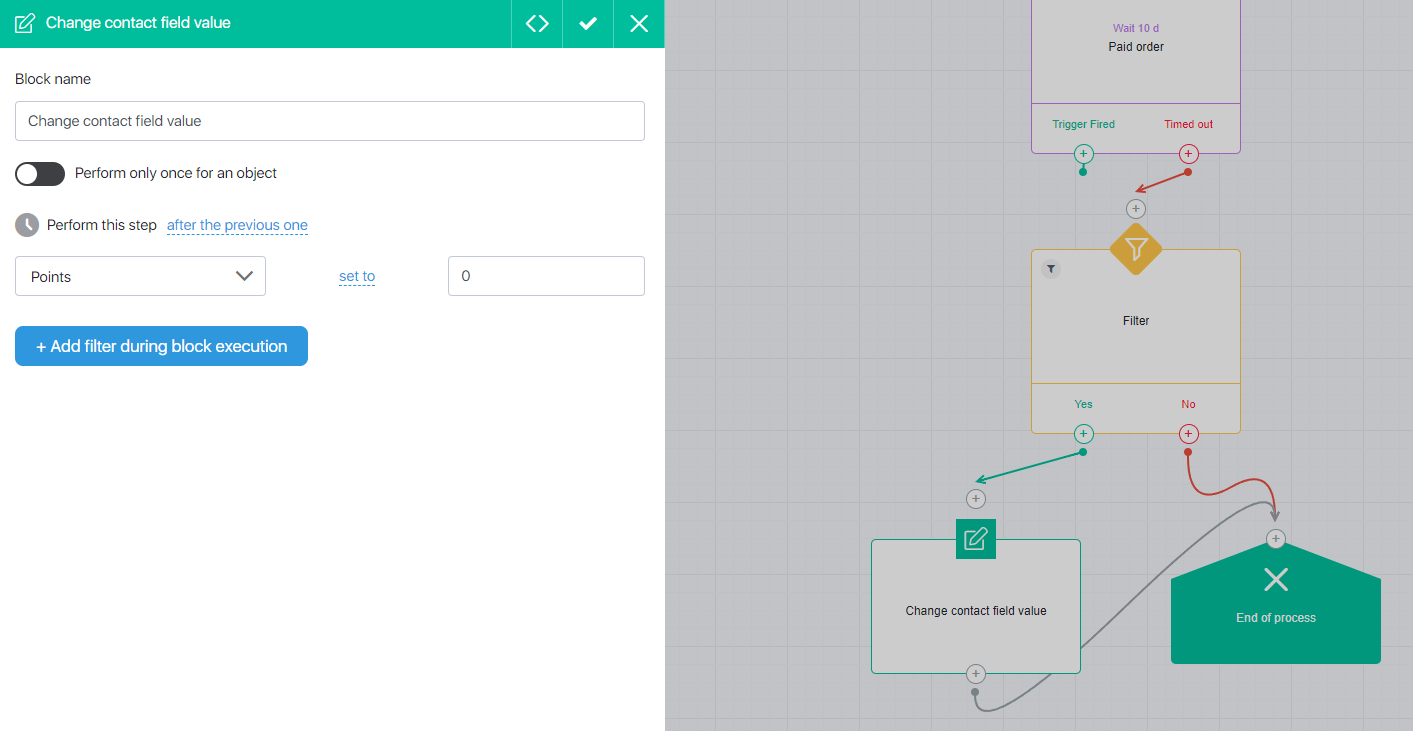
The result is a process like this: