Content
- 1 Name of a funnel
- 2 Editing field of the funnel
- 3 Funnel elements
- 4 Links between the funnel elements
- 4.1 How to link the funnel elements?
- 4.2 Link types between the funnel elements
- 4.2.1 Arbitrary exit
- 4.2.2 A lead is added
- 4.2.3 Subscription is activated
- 4.2.4 A page is visited. A page with a form is opened. A letter is opened
- 4.2.5 Next page. A link/button is clicked
- 4.2.6 How does the #nextPage tag work?
- 4.2.7 A lesson is completed
- 4.2.8 An invoice is generated
- 4.2.9 An invoice is paid
- 4.2.10 Next action
- 4.2.11 А/В test — Option А/Option В
- 4.2.12 Next action, if a lead matches/does not match the filter parameters
- 4.3 Enabling / disabling the display of action diamonds on link arrows
This section is available from the main menu Funnels — My Funnels.
Find out more about the purpose of the sales funnels and the main settings of the section in this article.
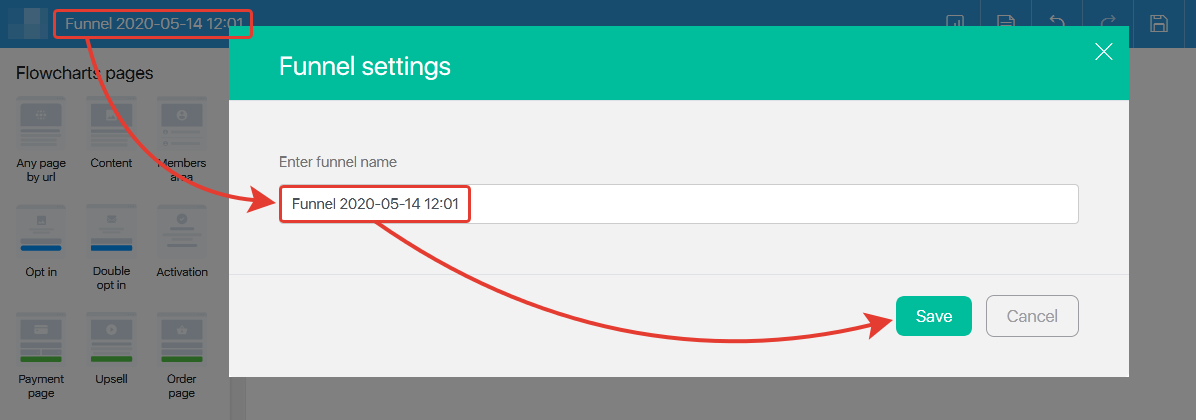
Name of a funnel
The name is set by default “DATE TIME Funnel” when this funnel is created. You can rename it as needed. It will never be displayed to the clients and subscribers.
Click the name of the funnel, enter a new name and click Save.
Editing field of the funnel
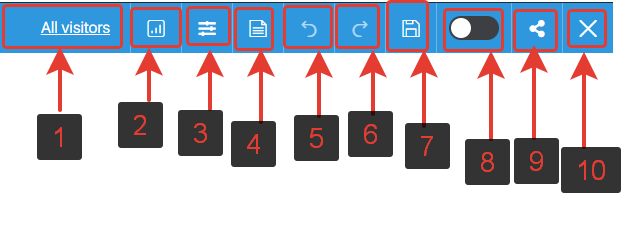
The top right corner displays:
- Analytics counter switcher – split into unique clicks and total.
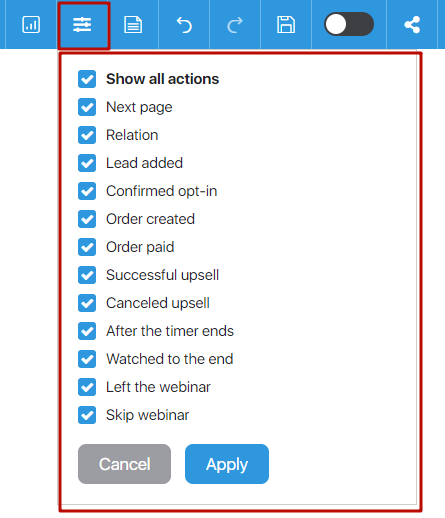
- Funnel analytics filter.
- A toggle button that can be used to enable / disable the display of the funnel analytics.
- Button for adding a text note.
- Button to cancel the previous action and return to it.
- Button for going to the next action (activated after pressing the button to return to the previous action).
- Save button.
- A toggle button with which you can turn on / off the funnel.
- A button with which you can share the funnel.
- Exit funnel editing button.
Funnel element panel is in the left part of the screen.

To add an element to your funnel, just hold the mouse over this element and drag it to the workspace:

Funnel elements
+ Key settings of the elements
All funnel elements have the same structure displayed on the screenshot below:
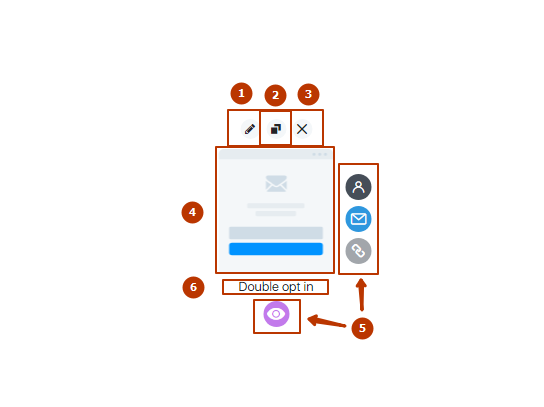
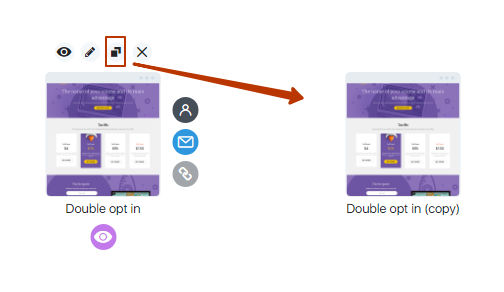
- edit the element
- element copying
- delete the element
- preview
- links with other elements (exits)
- name
Click “Edit the element” button to open its configuration window:
- rename the element
- select another icon for the element
And here you can make notes about the element:
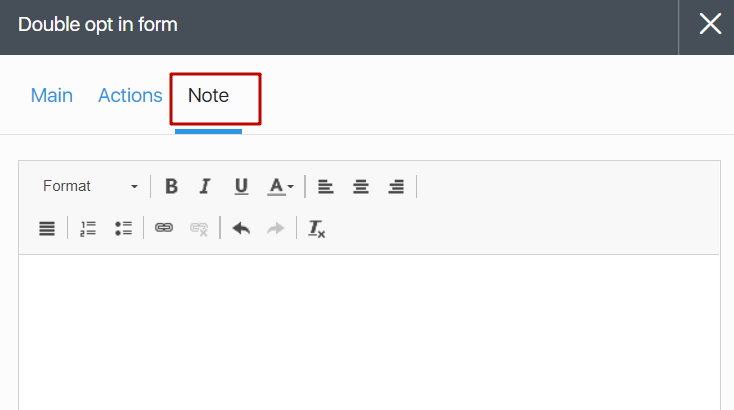
Rename, preview and make notes – these functions are available in an editing mode for all elements.
When you click the copy button, a copy of the block with all the previously added settings is created.
The other functions depend on the types of the elements. This will be discussed below.
+ Pages
Sales funnels can provide an access to / create several types of pages:
- Any page by url
- Content
- Members area
- Opt in
- Double opt in
- Activation
- Payment page
- Upsell
- Order page
- Countdown
- Webinar page
Let’s consider each type of a page in detail.
Any page by url
You can use this block to add a funnel on any your external page (created in JustClick or in any other service).
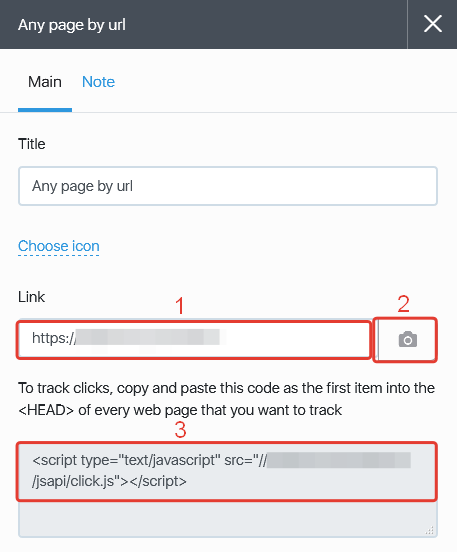
1. Link — add a page link to be added to the funnel. The link should be entered in full with the protocol (http:// or https://)
2. Preview button — use this button to make a page screenshot and to add it to the funnel as an element icon.
3. Click reference code — if the added page is not created in JustClick, then copy the proposed code and insert it in <HEAD> of this page, otherwise, the funnel does not count this page statistics.
Content. Activation
These elements are designed to create the respective pages directly via the funnel. The first entry to edit this element provides an access to create a page and to move to template selection.
Click to create a page and to select a template:
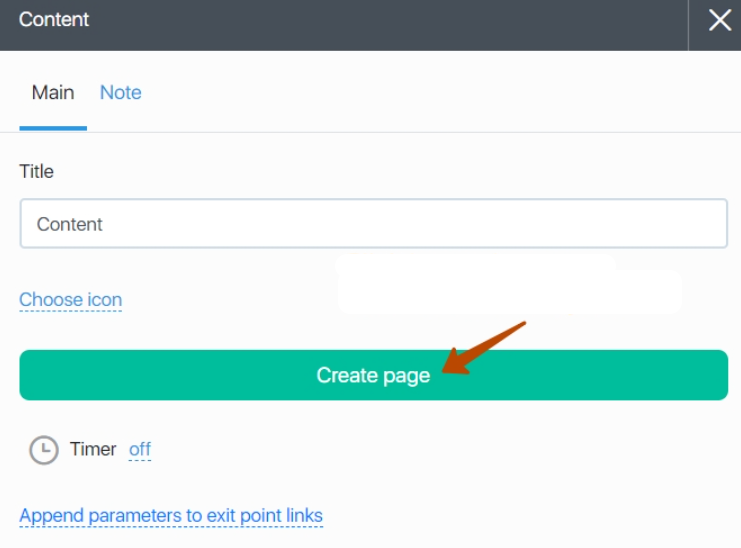
Then you can move to the page constructor to create a page from a ready-to-use template. Find out more how to create pages in a constructor in this article.
Once you create, save the pages and exit the constructor, you return to the element settings in the funnel.
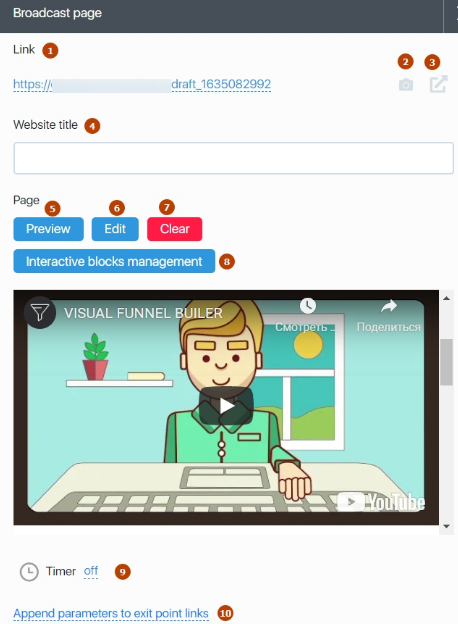
- A page link — this displays the current link to the page. Click it to change the link.
- Preview button — this button makes the page screenshot and adds it to the sales funnel as an element icon.
- Next page — click this button to open the page in a browser (if the funnel is disabled, then the page is opened in a preview mode).
- Page heading — here you can add/change the page heading.
- Page preview — click this button to see how your page looks like.
- Edit — click this button to edit the page in a constructor.
- Clear — click this button to delete a page.
- Control of interactive blocks — click this button to go to the control of the interactive blocks.
- Timer — set a page timer here. To display a timer on a page, drag Timer widget to the required place in the page constructor. Find out how to add a widget on a page here.
- Add parameters to the link from the block output — here you can add dynamic variables to the link from the “Next Page” output and the “Timer End” output. You can add the following variables:
{$name} – Contact name
{$email} – Contact email
{$phone} — Contact’s phone number
Double opt in
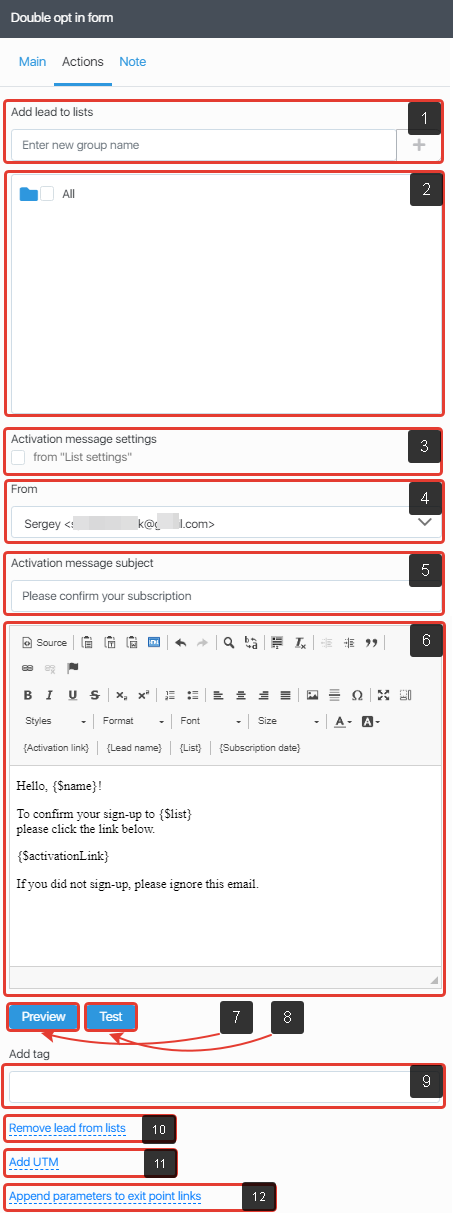
These pages are created in the same way as the content/activation/webinar page, but it has an additional “Actions” tab in the settings, where you can configure the subscription parameters.
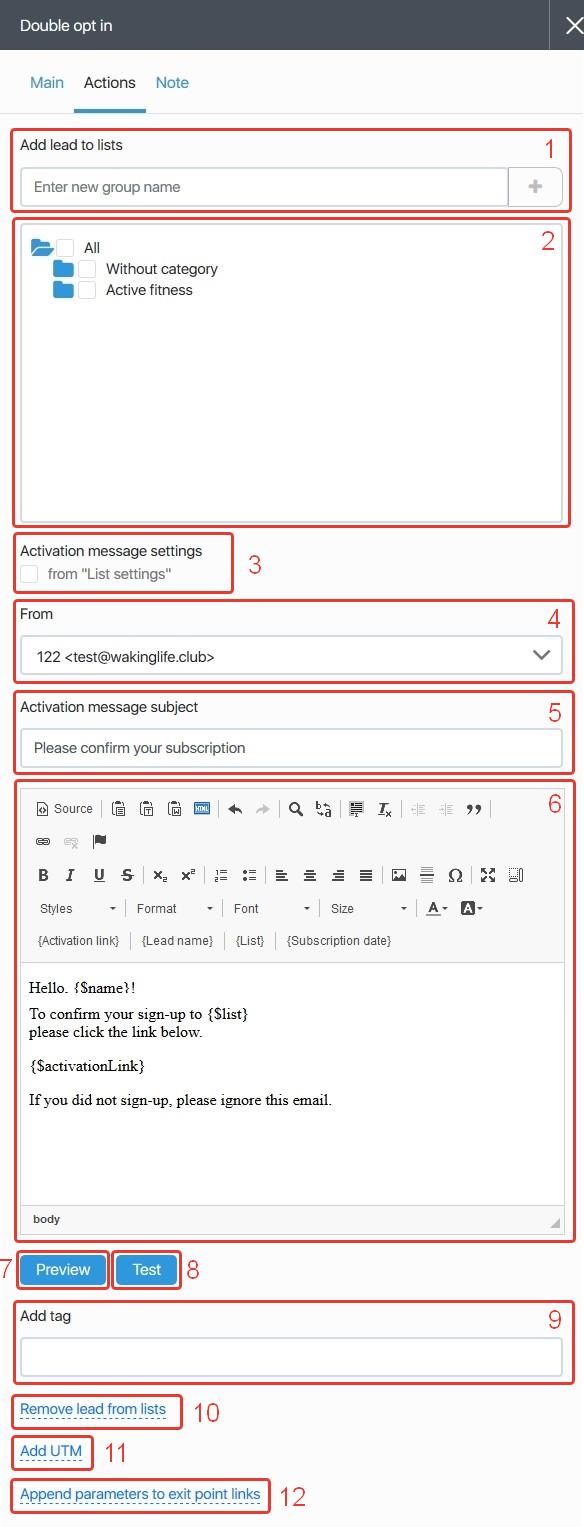
- Creating a new list of contacts – enter the name of the new group in the corresponding field and click on the button with the plus sign; a new group will be created and automatically selected in the form settings on this page.
- Selecting a list to which you want to add contacts after subscribing through the forms of this page – tick one or more groups, it is to this list/lists that the contact will be added after subscribing through this page.
- Activation message settings. If the checkbox is checked, the email settings are taken from the list settings. If the checkbox is not checked, then the activation letter is configured directly for the current page of the funnel.
- Select the sender’s contact for the activation letter.
- Activation message subject.
- Activation message text.
- Activation message preview.
- Testing the activation message.
- Add tag – here you can specify a tag, it will be assigned to all contacts who subscribe through this page.
- Remove lead from lists – here you can select the lists from which the lead will be removed after subscribing through this page.
- Add UTM – here you can set utm tags, they will be assigned to contacts who subscribe through this page.
- Append parameters to exit point links – you can add dynamic variables to the link:
– {$ name} – name;
– {$ email} – e-mail address;
– {$ phone} – phone. In this way, you can redirect the client to the payment page, and his data will be automatically inserted into the form.
Opt in
In terms of its settings, this block is almost completely similar to the ‘Double opt in’ block. The only difference of this block is that when subscribing through the ‘Opt in’ block, the contact immediately enters the list of subscribers; you do not need to additionally confirm your consent to receive letters by clicking on the link in the activation letter.
Members area
This element can add any available lesson from a course to a funnel or create a new course with a lesson.
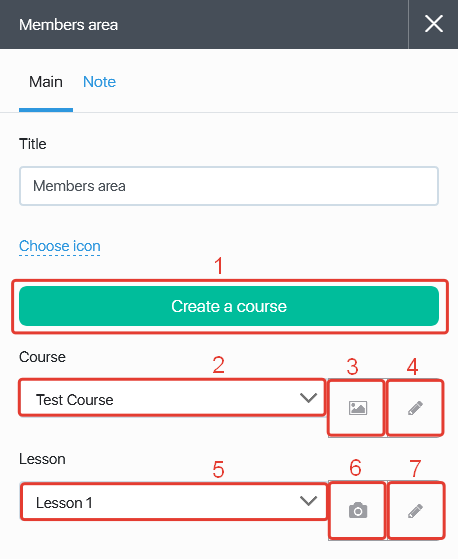
- Create a new course.
- Select a previously created course.
- Add a course icon as an icon for a funnel element.
- Go to the course settings. Course created in the funnels are configured via Courses section in the same way as the course created not via the funnels.
- Select a previously created lesson (first select the course with the required lesson).
- Add a lesson icon as an icon for a funnel element.
- Go to the settings of the selected lesson.
Upsell
This element can add a Upsell to the funnel and select the product for which it will be added. To create this page, follow the steps for Content/Opt in/Double opt in/Activation/Webinar page,but there’s an additional tab “Actions” in his settings to configure which product will be added to the upsell.
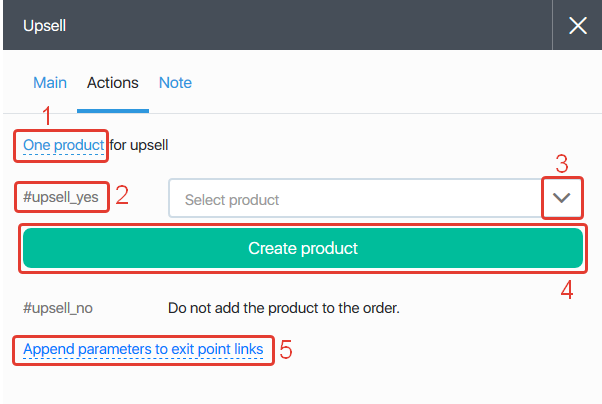
- Ability to select one or two products for upsell.
- Each product has its own variable, this variable must be specified in the settings of the button/link on the upsell page, so that when you click on it, the corresponding product is added to the order:
#upsell_yes – selection of product
#upsell_no – refusal from upsell, always shown, cannot be deleted. - Attach the product created before.
- Create and attach a new product.
- As well as in the page “Opt in” and “Double opt in” there is a possibility to add dynamic variables.
Order page
This element can link the landing and the payment pages in the funnel. You can create and configure the order page. To create this page, follow the steps for Content/Opt in/Double opt in/Activation/Webinar page, but its settings include an extra tab “Actions” to configure which product to sell on this page.
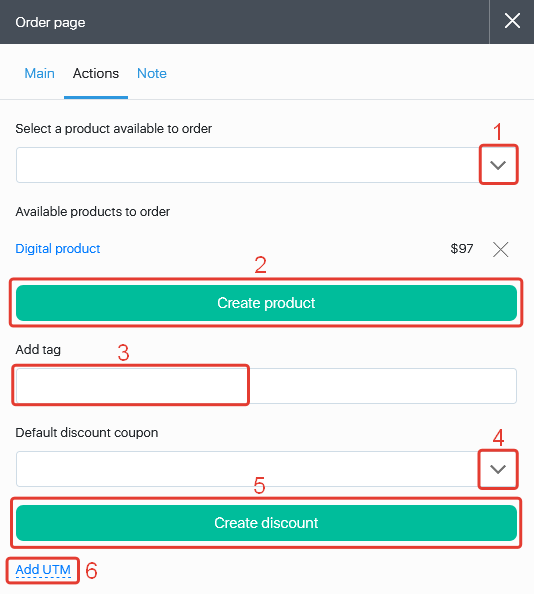
- Attach the product created before.
- Create and attach a new product.
- Add a tag to the orders generated on this page.
- Attach a discount created before (i.e. the attached discount coupon is attached to the orders generated on this page).
- Create and attach a new discount coupon.
- Add the ad tags to the orders generated on this page.
Payment page
This is due to the fact that in the forms of these pages, by default, the field “Payment card” is enabled, which we have described in more detail here.
Using this element, you can add a page to the funnel where you can place an order and pay for it with a card immediately without leaving the page.
The page itself is created in the same way as the content / activation / webinar, but in its settings there is an additional “Actions” tab, where you can configure which product will be sold through this page.
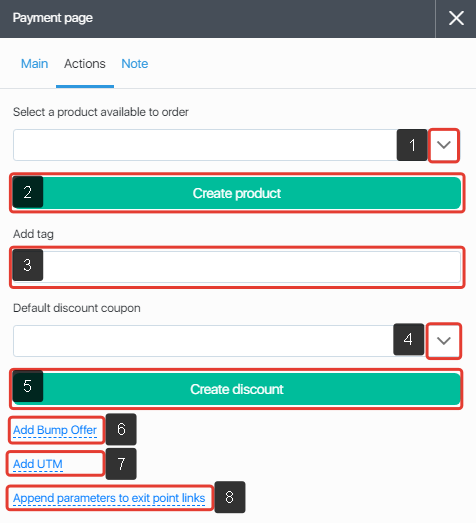
- Binding a product created earlier.
- Creating and linking a new product.
- Adding a tag to orders made through this page.
- Linking a discount to a previously created one (i.e., the linked discount coupon will be applied to orders made through this page).
- Create and link a new discount coupon.
- Adding a Bump Offer.
- Adding promotional tags to orders created through this page.
- Also, as in the ‘Subscription’ page, there is a possibility of adding dynamic variables.
The Bump Offer allows the customer to add another product to the invoice – with just one click! You can add a short but vivid description of the product, as well as the benefits of buying it along with the main product on the checkout page of which the customer is located:
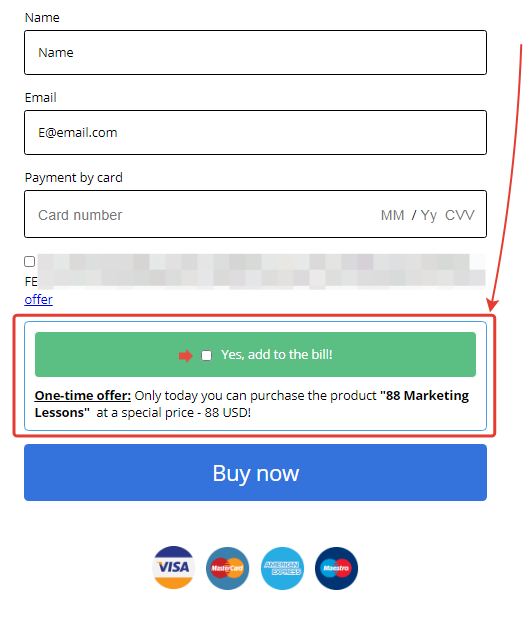
When a customer adds a product from the Hot Offer to the order, the product appears at the end of the product list.
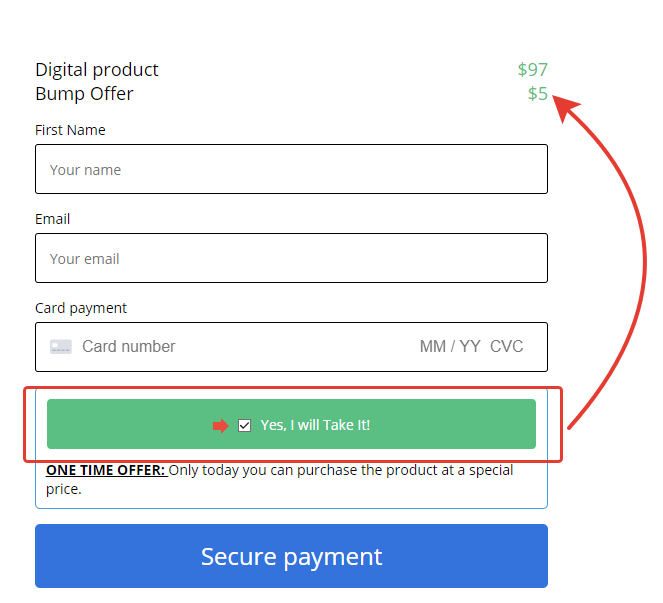
The Bump Offer field has flexible design settings:
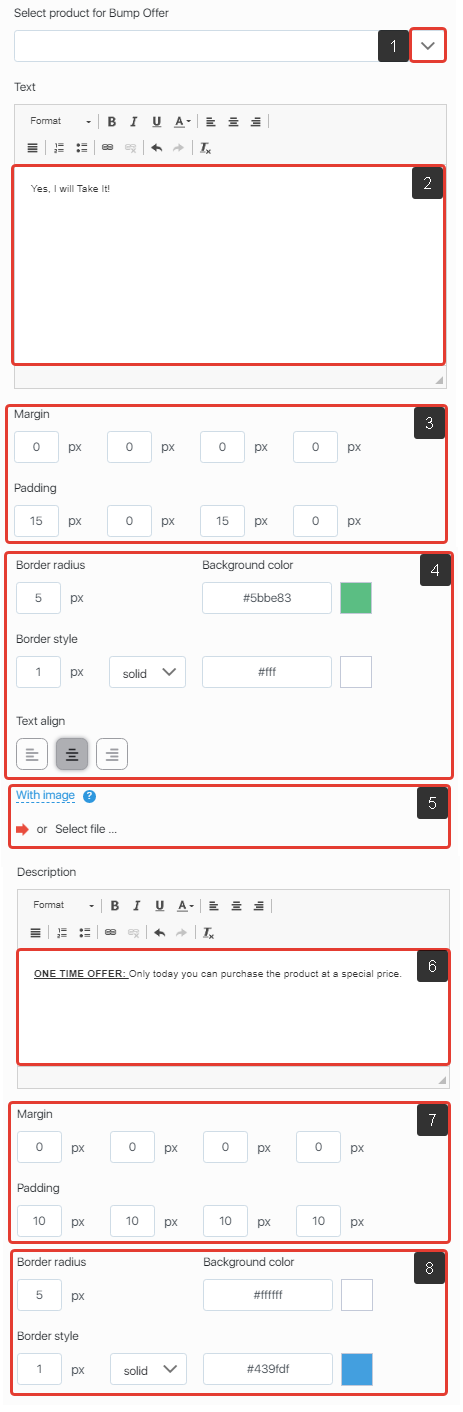
- Selection of a product that will be a “Bump Offer” to the main product.
- The text in the “Bump Offer” button, to the right of the checkbox (the checkbox is turned on not only by checking the box, but also by simply clicking on the hot offer button).
- Setting the outer and inner padding of the button.
- General settings for button design (rounding of edges, button color, size and color of the stroke, as well as centering of the text in it).
- Picture settings near the checkbox (by default, an arrow, you can change it to your picture or turn it off).
- Hot offer description text. Describe the product vividly and why it is better to buy it right now along with the main product!
- Setting the outer and inner indents of the description.
- General settings for the description design (rounding of edges, background color, size and stroke color).
Also, for all forms on this page, the field ‘Payment by card’ is included, which cannot be disabled. It is thanks to this field that the possibility of buying in ‘one click’ is realized without the need to go to other pages.
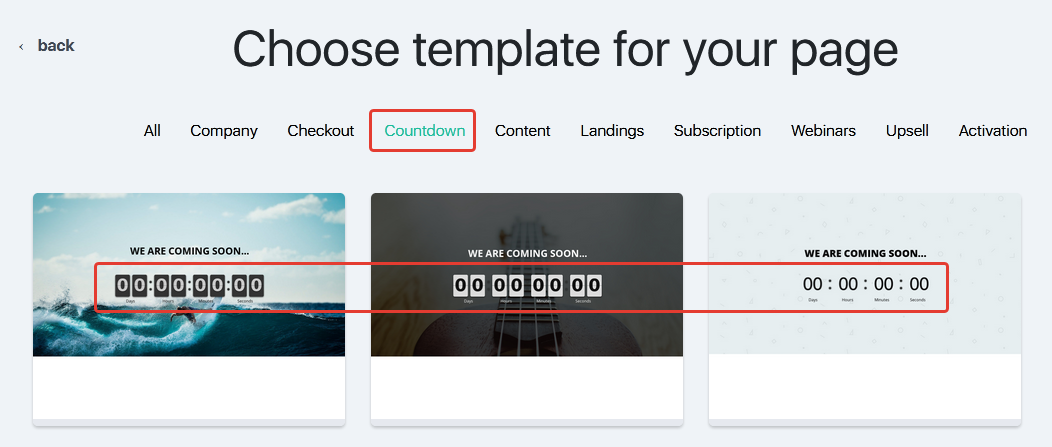
Countdown
This element, can add a bundle of a selling page and a payment page to the funnel. For the Countdown page, the creation and customization of the page itself is available. To create this page, follow the steps for Content, but the Timer widget is preinstalled in all the templates of these pages.
Webinar room
Using this element, you can create a webinar room. To create and configure it, click on the ‘Create a webinar room’ button. We described all the parameters and settings of the webinar room here.
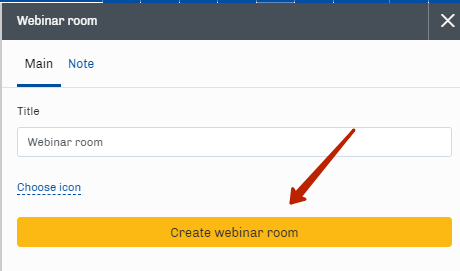
After configuring the webinar room, exit it and see the basic settings that will appear in the ‘Webinar room’ block.
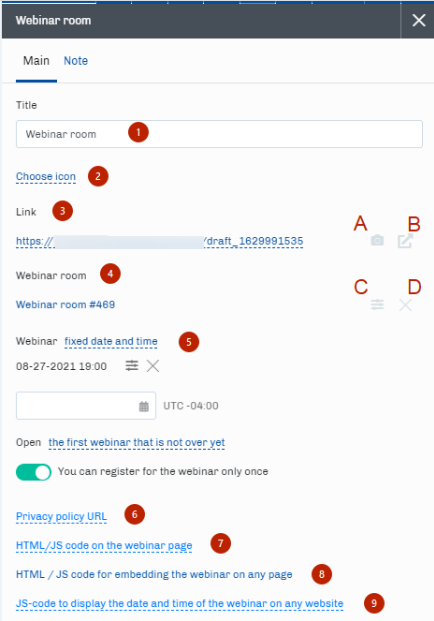
- Webinar title.
- Select an icon.
Here you can select the icon that will be displayed in the block preview in the funnel. - Link to the webinar room.
You can change the link if necessary. To do this, you need to click on the link, select a domain and enter the webinar room ID:
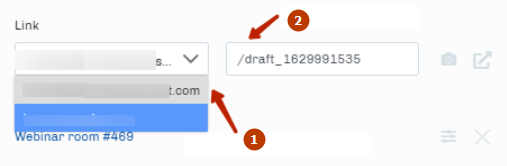 1. choose domain
2. specify ID
Also, to the right of the link there are two additional buttons: A) Preview button – with this button, a screenshot of the page is automatically generated and displayed in the ‘Webinar room’ block as a preview.
B) Go to page – by clicking on this button, you can open the webinar page in a new browser tab (if the funnel is disabled, the page will be opened in preview mode). - Webinar room – the name of the created webinar is displayed here. You can click on it and go to the settings of this webinar (webinar room mixer). Also, opposite the name, there are two buttons: C) Go to mixer – clicking on it, you will go to the settings (mixer) of this webinar. That is, the button works in the same way as the navigation by the name of the webinar.
D) Delete webinar – by clicking on this button, you will delete the created webinar room. After that you can create a new room in the same block. - Webinar times for this webinar room:
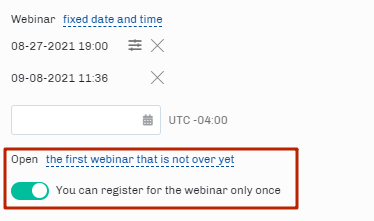 If the webinar is not a one-off (you have chosen different dates and times for the webinar), then additional settings are available:
– At what time and with what frequency should webinars start
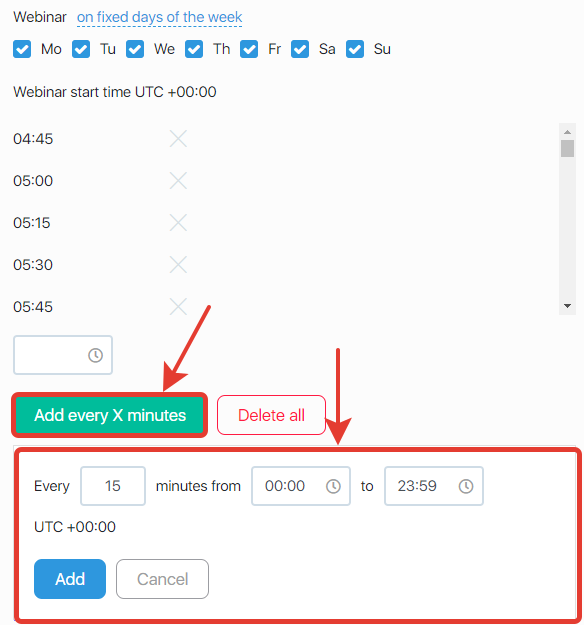
– Which webinar to open for a webinar participant;
– How many times can you sign up for a webinar (once or repeatedly). There are 3 options to choose which webinar to open:
The first webinar that has not yet begun – contacts will be included in the next upcoming webinar.
The first webinar that has not ended yet – contacts get into the webinar, which started earlier than everyone else and has not finished yet.
The last webinar, which lasts less than X minutes and is not over yet – contacts get into the webinar, which started later than everyone else and lasts less than X minutes. If not, then the next one.
For webinars created in funnels, there is an additional option for the time of the webinar – according to the funnel timer. In this case, the date of the webinar for a specific contact will depend on the value of the selected timer (we described in detail about the settings of timers for funnels in this article).
If the timer is not expired, then the contact will see a suitable webinar or a recording for it.
If the timer is expired, then the contact will see the page to which the arrow goes from the “Missed webinar” exit (if there is no arrow to the page from the “Missed webinar” exit, then he will see the standard “Webinar completed” page).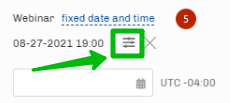
The webinar control mixer is available when the funnel is enabled. If no mixer is available, turn on the funnel, save the settings, reset the turned on funnel and go to edit the “Webinar Room” module again. - Consent to the processing of personal data.
Clicking to open a field for entering a link to the Privacy Policy:
 If there is a link in this field, agreement with the Privacy Policy is added to the registration form.
 - HTML / JS-code for placement on the webinar page.
The code can be placed:
– on the login page, where the registration form,
– in the webinar room (the code will be on the page all the time),
– in the webinar room (the code will be added after the start of the webinar and disappear after the end). - HTML / JS-code for embedding the webinar on any page.
You can copy the webinar code and paste it on any website. - JS code for displaying the date and time of the webinar on any site.
You can copy the webinar start date and time code and paste it on any website. The closest date and time of the start of the webinar will be displayed.
How to add an action for contacts who have already passed the “Pages” block to the next block
You can send an email or add any other action for those contacts who have already passed the “Pages” block.
Example: Subscription and other blocks have been added to the funnel. Contacts have activated a subscription and moved to the “Content” block.
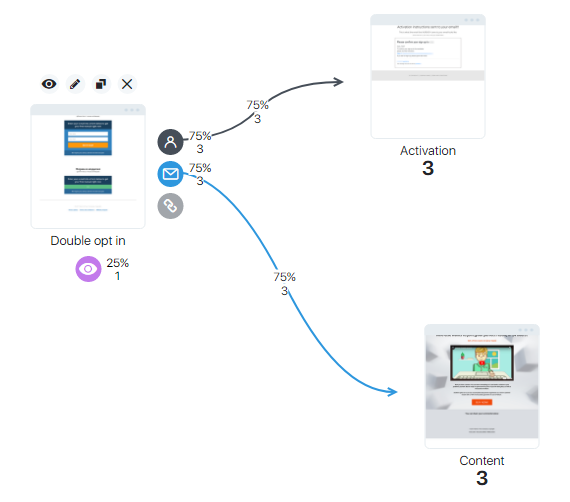
The task is to send an email to those contacts who have activated a subscription.
In blocks from the “Pages” category, contacts will be saved regardless of their further progress through the funnel. This way the user doesn’t need to search for contacts all over the funnel, but rather add a new block from the “Actions” category (in our example it’s the “Letter” block) and then pull the link from the desired output and save the funnel.
As a result, for all contacts from the “Subscription” block an action was applied (sent a letter).
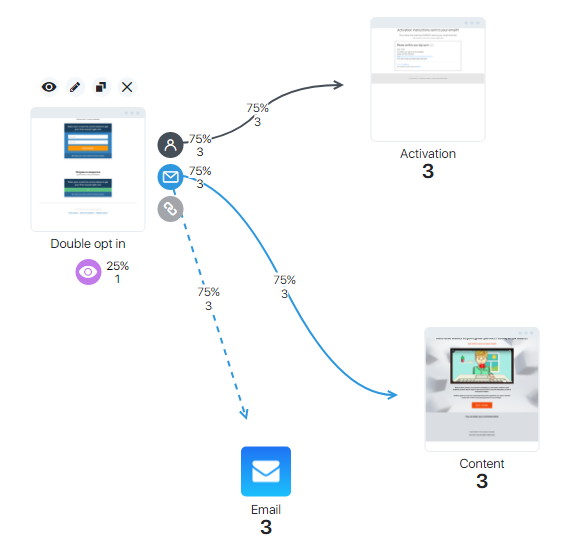
Important! Do not forget to save the funnel after making changes.
![]()
+ Forms
Subscription forms and orders can be created directly in the sales funnels. The first entry to edit this element provides the access to the button to create a form and to select a template.
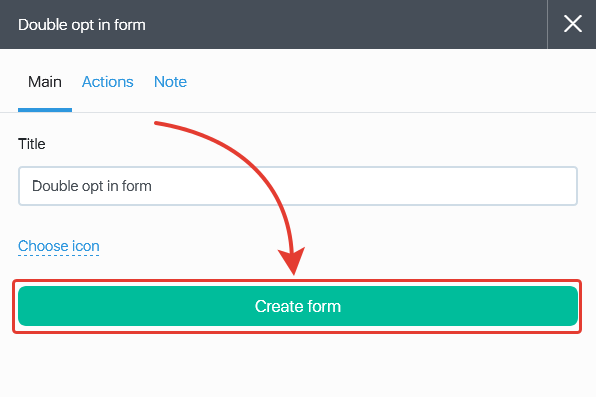
Then you go to the form constructor to design a form from a ready-to-use template. Find out more how to design a form in the constructor in this article. Once you create, save a form and exit the constructor, you return to the element settings in the funnel and can configure the form settings in the tab “Actions”.
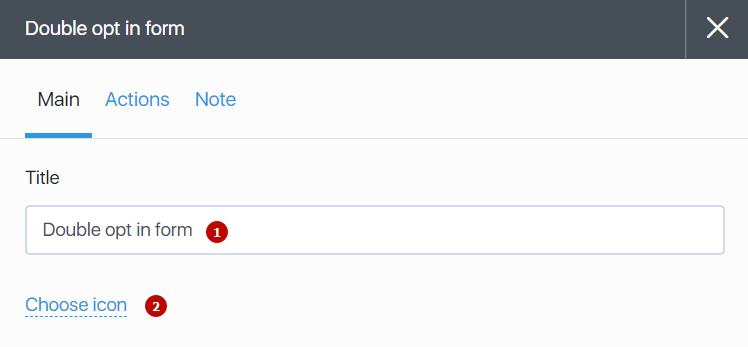
Double opt in form
- Creating a new group of contacts – enter the name of the new group in the corresponding field and click on the button with the plus sign; a new group will be created and automatically selected in the form settings.
- Selecting the group to which you want to add contacts after subscribing through the forms – tick one or more groups, it is to this group / groups that the contact will be added after subscribing through this form.
- Activation letter settings. If the checkbox is checked, the email settings are taken from the group settings. If the box is not checked, the activation letter is configured directly for the current funnel form.
- Select the sender’s contact for the activation letter.
- Activation email subject.
- Activation letter text.
- Activation letter preview.
- Testing the activation letter.
- Add tag – here you can specify a tag, it will be assigned to all contacts who subscribe through this form.
- Remove contact from the following groups – here you can select the groups from which the contact will be removed after subscribing through this form.
- Add advertising tags – here you can set advertising tags, they will be assigned to contacts who subscribe through this form.
- As well as in the page “Opt in” and “Double opt in” there is a possibility to add dynamic variables.
Opt in form
The settings of the ‘Actions’ tab for this block are the same as for the ‘Double opt in form’ block. The only difference of this block is that when subscribing through the ‘Opt in form’ block, the contact immediately enters the list of subscribers; you do not need to additionally confirm your consent to receive letters by clicking on the link in the activation letter.
Order form
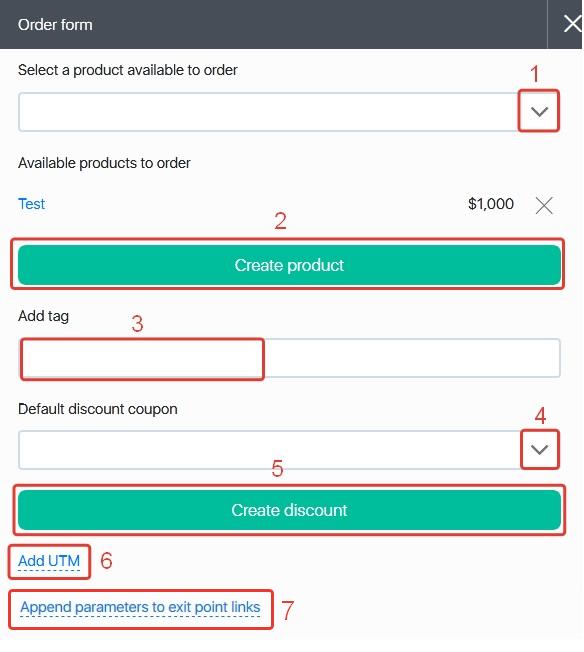
- Attach a product created before.
- Create and attach a new product.
- Add a tag to the form-generated orders.
- Attach a discount created before (i.e. the attached discount coupon is applied to the form-generated orders).
- Create and attach a new discount coupon.
- Add the ad utm-tags to the form-generated orders.
- As well as in the page “Opt in” and “Double opt in” there is a possibility to add dynamic variables.
Payment form
This is due to the fact that in the forms of these pages, by default, the field “Payment card” is enabled, which we have described in more detail here.
The settings of the ‘Actions’ tab of this block are exactly the same as those of the ‘Order Form’ block. The only difference of this block is that the field “Payment by card” is enabled in the form settings, which cannot be disabled. Thanks to this field, it is possible to make a one-click purchase immediately after submitting the form, without having to go to other pages.
+ Chatbot
Chatbot Facebook
Social media is an essential resource for today’s online business. It is now possible to automate interactions with your current and potential subscribers and customers thanks to Facebook integration and a convenient chatbot.
For more information about connecting and setting up a Facebook chatbot, see this manual.

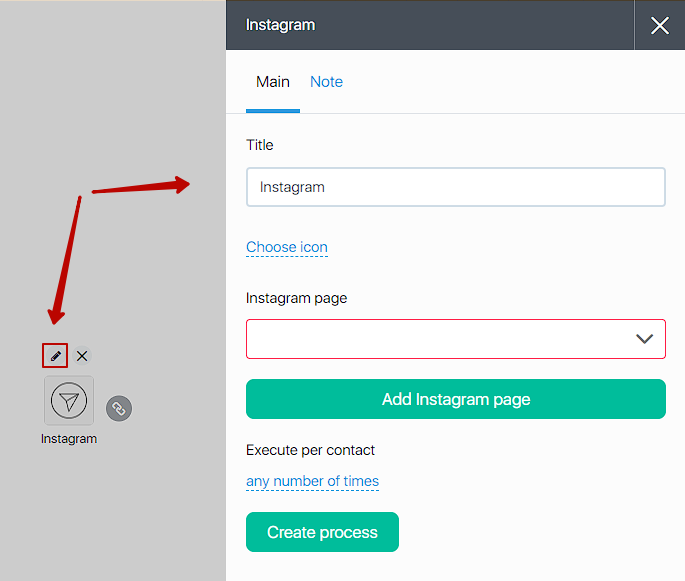
Chatbot Instagram
Now it is possible to automate interaction with your current and potential subscribers and customers thanks to integration with Instagram and a convenient chatbot.
By enabling integration, you will be able to receive Instagram user data into your JustClick contact database (with subsequent use of this data in all tools of the service), as well as respond to subscribersauto-matically via a chatbot in the social network messenger.
For more information about connecting and setting up a Facebook chatbot, see this manual.
Chatbot Telegram
Previously, you had to request a contact’s email through the “Subscribe via Telegram” block, so the chatbot could identify the contact by email for further interaction.
Now the chatbot will recognize the contact’s email if he/she has subscribed or been in your database, storing a cookie. This will allow you to interact with the contact/subscriber/client/student through the chatbot in Telegram, collecting more data about them and guiding them through your funnel. You can also set up UTM tags for the Telegram chatbot.
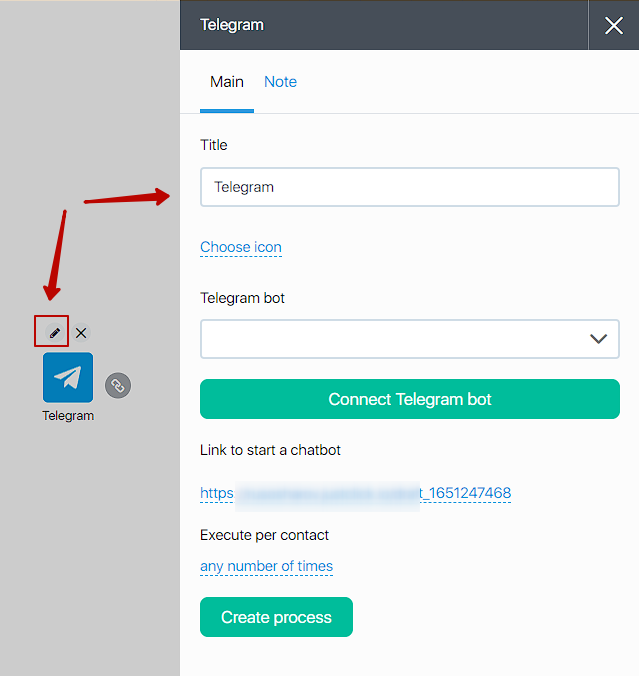
Add parameters to link from block output – here you can add dynamic variables to the link from the “Next page” output. With this setting you can pass data from the Telegram process/chat bot to the Webinar, e.g. Username or other data.
You can add the following variables:
- {$name} – Name of the contact.
- {$firstName} – Contact name
- {$lastName} – Contact`s last name
- {$email} – Contact’s Email
- {$phone} – Phone number of the contact
- {$contactId} – Contact ID
An example of a link to pass data in variables:
?user_full_name={$name}&user_email={$email}&user_phone={$phone}
You can name the field names before the equal sign however you want, as long as you don’t change the variable in the curly braces.
+ Actions
You can add several types of actions in the sales funnel:
- email;
- A/B test;
- filter;
- process;
- timer;
- custom block.
Let’s look at the settings of these actions in detail:
You can send a letter here.
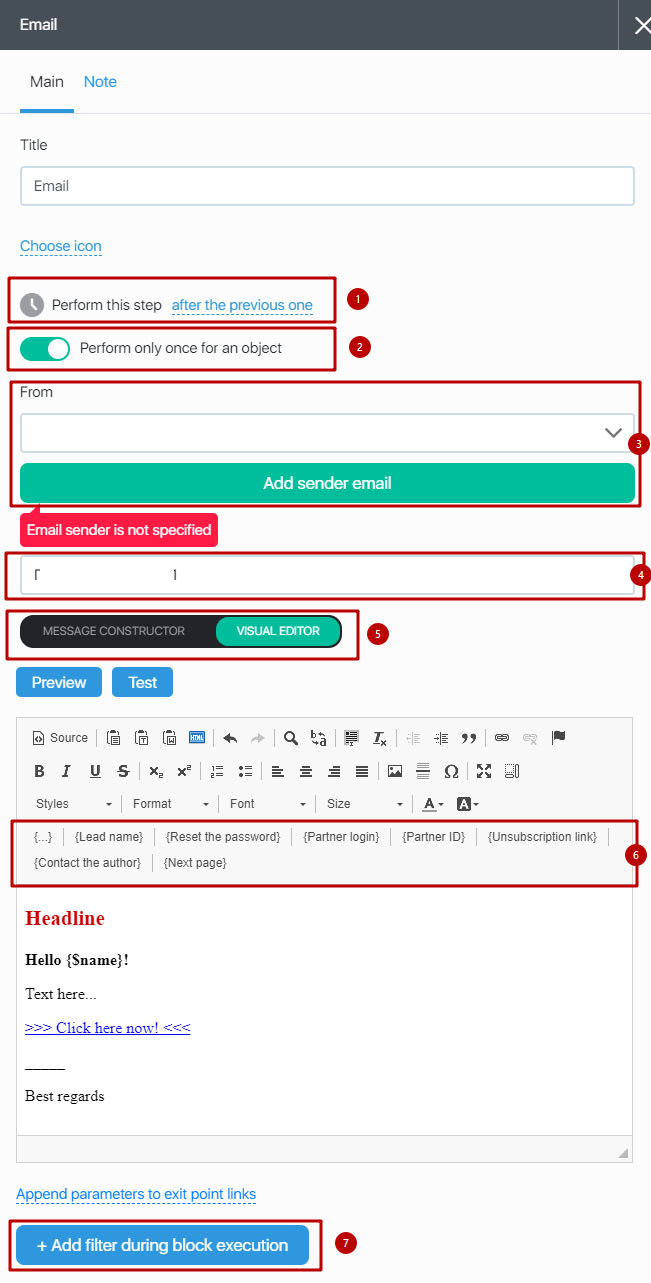
- Select the period between the previous action and sending a letter.
- Select whether a letter should be sent again once a lead gets into the funnel for the second time. Grey means the letter is sent again, green means the letter is sent once when a lead gets to the funnel for the first time.
- Select sender’s contacts.
- Subject of the letter.
- Select the mode to create a letter — message constructor or visual editor.
- List of variables that can be used in the letter. When you click on the {…} icon, a list of all contact fields opens, and any of them can be added to the letter.
- Add parameters for sending a letter.
А/В test
You can apply A/B testing here, for example, to expose the leads to different versions of the landing page or to send the letter with different headings to evaluate which version has better conversion results.
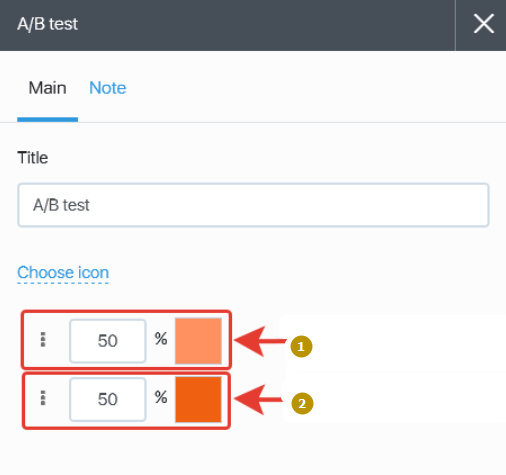
- A version share
- B version share
Filter
Here you can group the leads by the parameters set in the filter (for example, the invoice is generated, a lesson is accessible, included into a client group, etc.). This determines further actions in the sales funnel.

- The choice of how long after the previous step the filter should be applied.
- Adding conditions for filtering contacts.
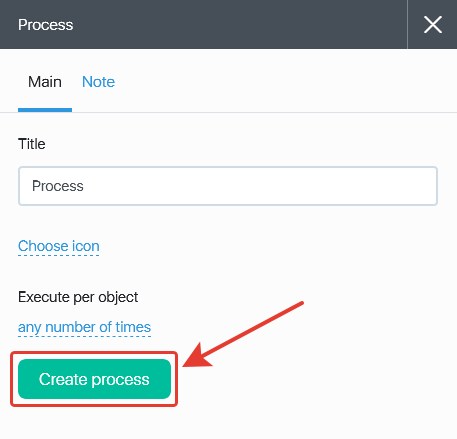
Process
Using this block, you can create a process and add it to the funnel. To create a process, click on the Create process button.
After that, a modal window will open, in which you can specify the name of the process. Then you can either save the settings and return to editing the funnel – to do this, click “Save”. Or you can go directly to setting up the process itself – for this click “Save and configure”. We talked in detail about setting up processes in this article.
After saving, the process is substituted in the block settings. The button “Edit Process” opens editing – the constructor of the process, after saving or canceling it returns to the funnel.
Execute for an object:
- Any number of times. If the contact enters the block a second time, then the process is executed for it.
- Just one time. If the contact enters the block a second time, then nothing happens to it.
- Any number of times, but not simultaneously. If a contact enters the block a second time before this process completes for it, then nothing will happen to it. If the contact enters the block a second time after this process completes for it, then the process is repeated for it.
Please note that the processes created through the funnel can only be seen through the funnel, they are:
- are not displayed on the “Processes” page;
- are not displayed when adding a contact to a process from a contact card.
The created Process for a contact can be launched in 2 ways:
- the contact got into the “Process” block-action during the passage through the funnel;
- the contact got into the process through the start trigger of the process (for example, in the middle of the funnel there is a process in which there is a trigger “added to the group” and when this trigger fires, the contact enters this process of this funnel).
The funnel process turns on and off with the funnel.
Add parameters to link from block output – here you can add dynamic variables to the link from the “Next page” output. With this setting you can pass data from the Telegram process/chat bot to the Webinar, e.g. Username or other data.
You can add the following variables:
- {$name} – Name of the contact.
- {$firstName} – Contact name
- {$lastName} – Contact`s last name
- {$email} – Contact’s Email
- {$phone} – Phone number of the contact
- {$contactId} – Contact ID
An example of a link to pass data in variables:
?user_full_name={$name}&user_email={$email}&user_phone={$phone}
You can name the field names before the equal sign however you want, as long as you don’t change the variable in the curly braces.
Timer
Using this element, you can add a Timer block action to the funnel. Thus, you can make a common timer for several pages or emails at once.
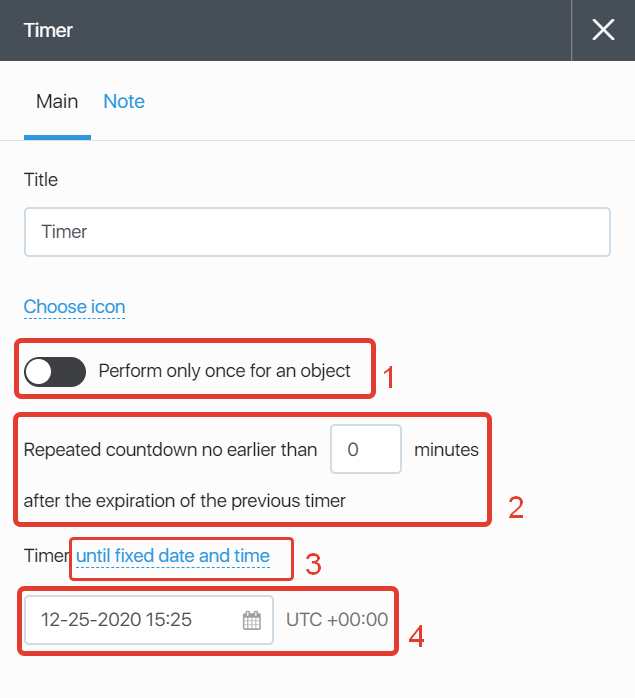
- Perform only once for an object – using this switch you can choose whether the timer will be applied repeatedly for the same contact or not. Switch green – the timer is applied only once, gray – the timer can be used repeatedly.
- Timer reapply settings. Here you can specify the delay (in minutes) after which the timer can be reused.
- Select a type of a timer.
- Settings for the timer expiration time.
Custom block
This is a user-defined block. You can use it, for example, to specify some funnel stages. It has no particular settings – just enter the name and choose an icon for it.
+ Traffic
The elements from Traffic category are designed to add the traffic sources into the funnel.
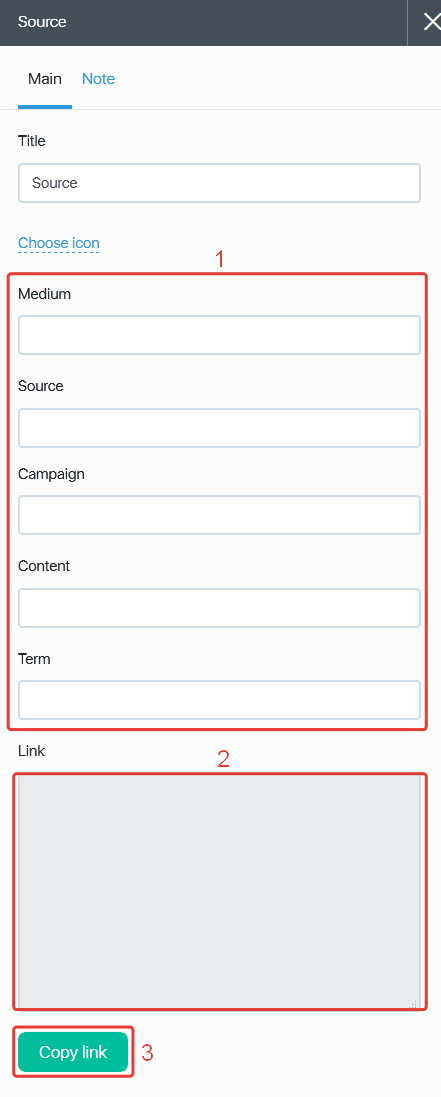
- Here you can set the utm-tags for this particular traffic source.
- This is where the link tail with the tags is displayed.
- Copy the link — click the button to copy the link tail.
Funnel will monitor all traffic from the link with the tags set in this block.
The elements include 8 pre-defined traffic sources with the configured basic tags:
- Adwords
- Youtube
- Affiliates
- CPA
A Source block can be used for any other user-defined set of tags.
Links between the funnel elements
How to link the funnel elements?
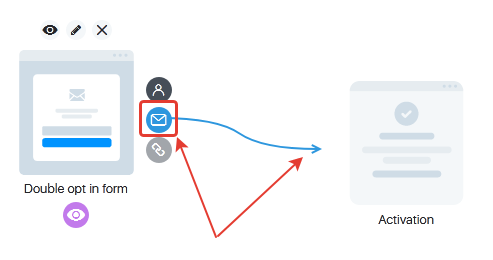
To link the funnel elements, just hold the mouse pointer over the required exit from the element, drag it to the element to be connected with and then click the element to be connected with.
In order not to get confused in the arrows of the links, when there are a lot of them, you can bend the arrows as you need.
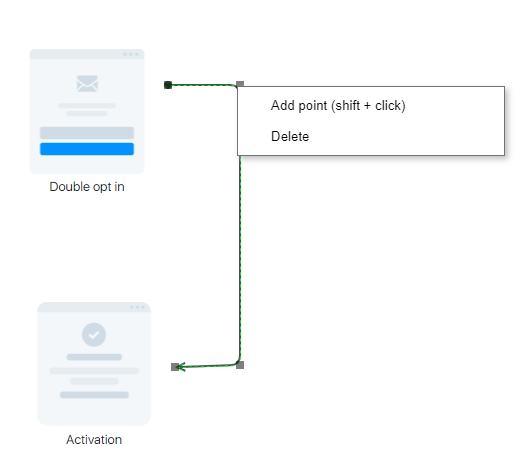
In order to bend the arrow, you need:
1. Select it.
2. Click on the arrow with the right mouse button at the place where you want to add the break point.
3. Press the ‘Add point’ button or the key combination Shift + click the left mouse button.
4. After that, the added point can be held down with the left mouse button and dragged to the desired location.
You can add as many breakpoints per arrow as needed to give the arrow the bend you want.
In order to remove an extra breakpoint, you need:
1. Select the arrow.
2. Click the right mouse button on the point to be deleted.
3. Click on the ‘Delete’ button.
Link types between the funnel elements
There can be two types of links between the elements of the funnel, logically different from each other: solid arrows and dashed arrows:
- Solid arrows are the movement of a contact from one page to another. For example, an automatic redirect or click on a link;
- Dashed arrows are actions to be performed for a contact. For example, sending a letter.
Moreover, links between elements can be divided into several types, depending on their purpose. For different elements, the set of possible connections-outputs from the element will differ. Let’s consider each possible communication option in more detail.
 Arbitrary exit
Arbitrary exit is just a visual link between the elements. It can be used to visualize the logical connection between the elements. But it is not worth expecting that this connection will ensure that the contact enters the next block. When you enable analytics, a conversion will be shown. The arrow from the ‘Link of elements’ exit can be extended simultaneously to several actions, pages, traffic (and to watch the conversion at the same time on all arrows between the blocks).
It can be linked with
- any block.
 A lead is added
This link shows the path once a lead is added to a group.
It can be linked with
- any page and form.
- A/B test (of a page and form) -> any page.
- any action.
 Subscription is activated
This link shows the path once the subscription in a group is activated.
It can be linked with
- any page and form.
- A/B test (of a page and form) -> Any page.
- any action.
 A page is visited. A page with a form is opened. A letter is opened
This link shows the path once a page is visited/a letter is opened.
It can be linked with
- any action.
 Next page. A link/button is clicked
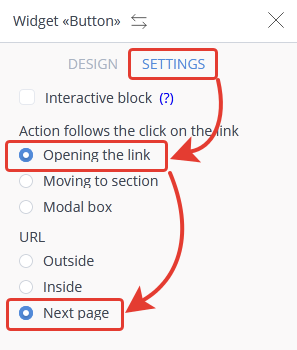
This link can transfer a user to the next page once the button on the original page is clicked. To enable this link, select “Opening the link” – “Next page” in the Button widget settings on the original page.
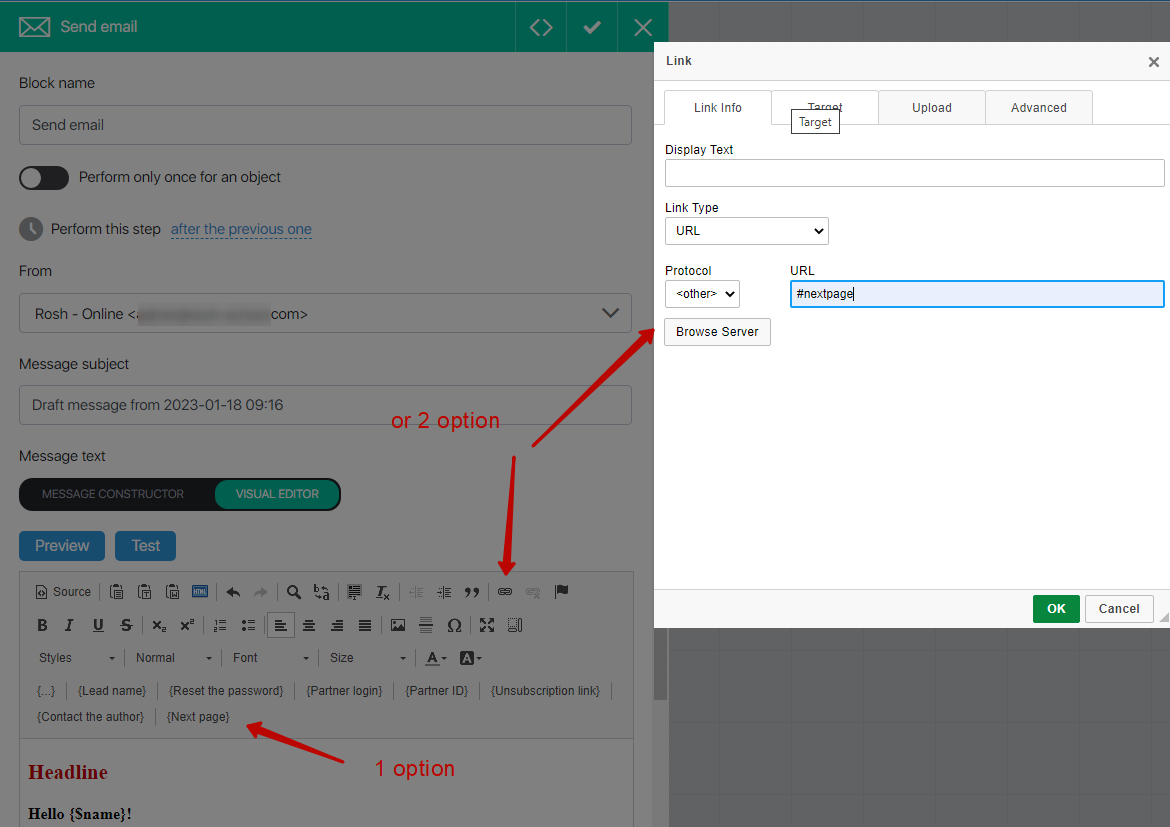
Or you can select the “Opening the link” field and add the #nextpage variable instead of the link.
Due to this, if necessary, you can easily change the relationship between the elements and when you change the connection, you will not need to change the link on the original page/in the letter each time.
It can be linked with
- any page and form.
- A/B test (of a page and form) -> any page.
How does the #nextPage tag work?
Previously, in order to take a contact to the next step of your funnel, you had to specify a link in the settings (form, button, link) to the next step. This is inconvenient because you have to open the settings and change the link. You can forget to change the link somewhere and it takes time.
The solution is very simple! Connect the necessary blocks with arrows, and instead of a link in the settings specify the tag #nextPage. Change the link between the blocks by changing the arrow and the contact already follows a different route. There is no need to edit links in buttons and forms.
Let’s show by example a message in Telegram through a chatbot.
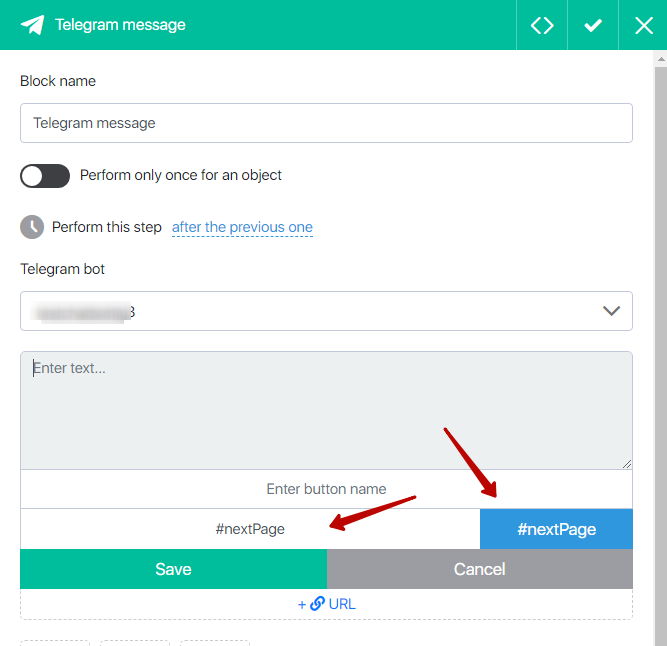
Or in the settings of the link of the visual editor:
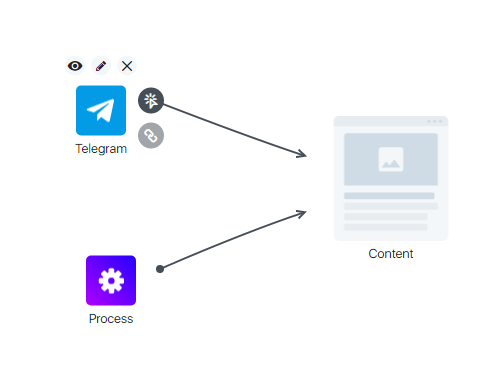
Connect the “Next Page” output of the chatbot/process with the next block of your funnel.
When you click a link in a messenger/email, the contact will be redirected to the next step. You will be able to quickly change the links between blocks without having to edit the links every time.
 A lesson is completed
This link defines the path once a lesson is completed.
It can be linked with
- any action and traffic.
 An invoice is generated
This link defines the path once an invoice is generated. Besides, there is always a non-deletable link with a block “Select a payment method” — this link transfers a user to the page to select a payment method once an invoice is generated.
It can be linked with
- any page and form.
- any action.
 An invoice is paid
This link defines the path once an invoice is paid.
It can be linked with
- any page and form.
- A/B test (of a page and form) -> any page.
- any action.
 Next action
This link defines the path once a letter is sent.
It can be linked with
- any action.

 А/В test — Option А/Option В
This link defines the distribution for А/В testing.
A/B test (actions) can be linked with
- any action.
A/B test (of a page and form) can be linked with
- any page and form.

 Next action, if a lead matches/does not match the filter parameters
This defines the path once a filter is applied — a separate path, if a lead matches the filer parameters (green), and another path, if a lead does not match the filter parameters (red).
It can be linked with
- any action.
Enabling / disabling the display of action diamonds on link arrows
To make it more convenient to work with the funnel, you can enable the display of action diamonds on the traffic arrows (solid arrows). This will allow you to focus not only on the color of the arrow, but also on the action icon.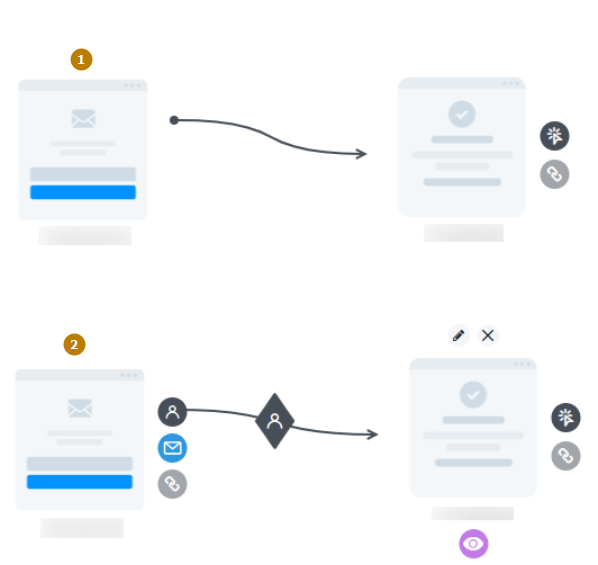
- display of rhombus-actions off
- display of rhombus-actions on
Using a filter, you can display only a specific type of action or all actions at once.