Content
Where can I add/edit a product?
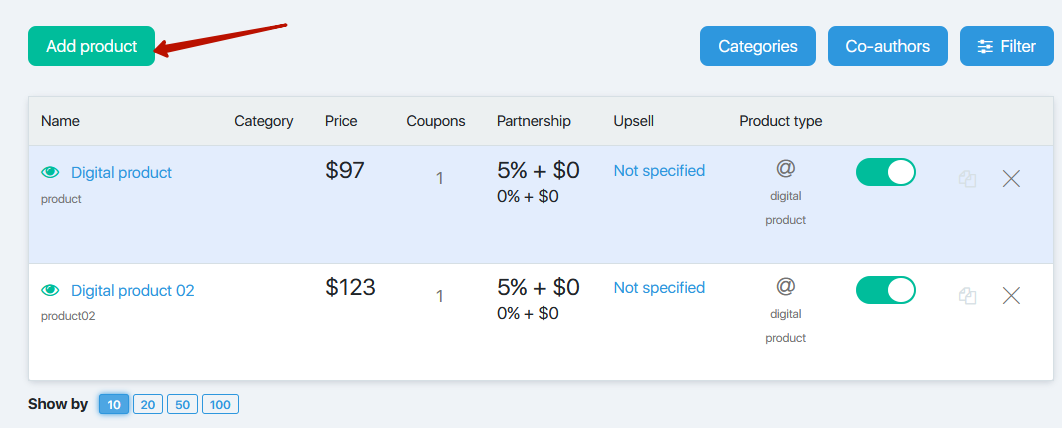
To add a new product, go to the Store – Products section and click the “Add product” button. If you want to edit an existing product, then in the same subsection you need to click on its name.
A page containing several basic tabs will open. Depending on the settings, the number of tabs can vary. Let’s deal with them.

Tabs (settings)
Main settings
The “Main settings” tab looks like this. Please note: the options underlined in red can be selected only when creating, but not editing the product.
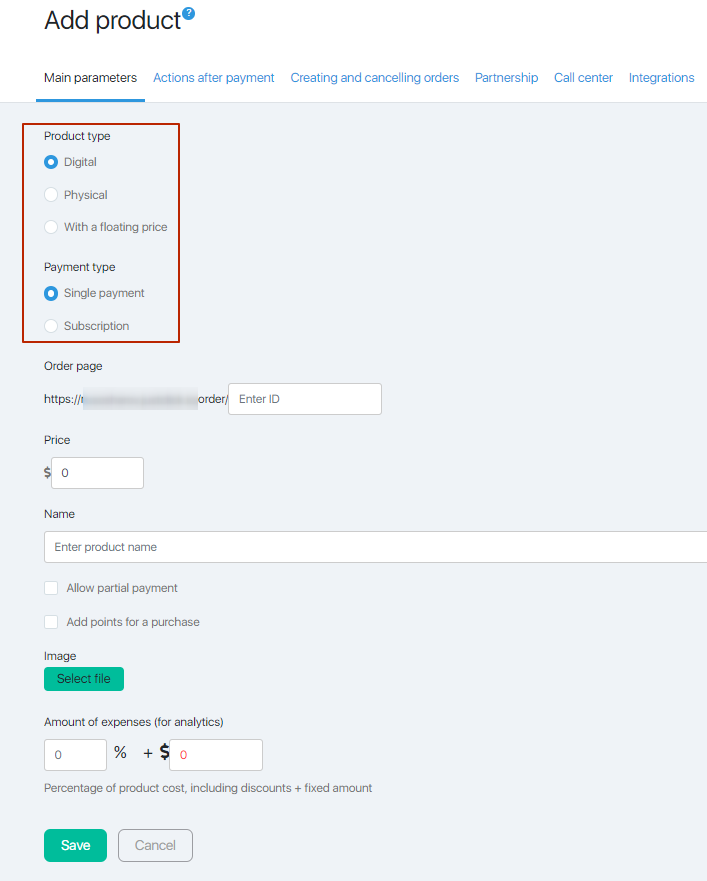
Product type
Set by switching the radio button. Can be digital, physical or floating price.
Most of the products in the info-business, if not all of them are digital. Usually a digital product is sent to the buyer after payment as a download link. Also, such a product can be a subscription to the newsletter, access to the training, a password for entering a private club, advice, coaching or just the information you are willing to pay for is all a digital product.
Physical product. It is often a combination of digital and physical. For example, after payment, a link to the course for viewing online is sent to the user, and a disk with the recording of this course is sent. A disk with a record in this case is a physical product. However, it can be other subjects: books, souvenirs, bouquets of flowers and even metal structures. ?
For physical product, sales tax will be charged based on shipping address, and for digital product, sales tax will be charged based on billing address.
With a floating price. This is a kind of digital product. The idea is that you determine the price of the service for some amount or duration, and the user determines the amount or duration necessary for him by paying the appropriate amoun. For example, you are consulting on Skype. The price of the consultation hour is 87 dollars, you indicate this information on the account registration page. If the buyer makes 174 dollars, you understand that he needs two hours, and if 43,5, then half an hour.
Payment type
Single payment. The most usual type of payment. The buyer once transfers money to you and once the product is sent to him. ?
Subscription (periodic auto-payment, recurrent payment). Will be debited from the buyer’s plastic card at regular intervals. Often for the connection of some service, which they need constantly. For example, a subscription to a group for which paid mailing or membership in a club is conducted.
When you select a function, an additional tab “Auto payments” appears.
Order page
When adding but not editing the product, you must enter the page identifier in Latin letters. It must be unique (there can not be 2 pages with the same identifier). It will be a part of the URL (address) of the page on which the buyer will draw up a bill for the product. In a broader sense, this is the article of your product. Use only Latin letters when creating it. Also, the lower-level underscore character is allowed.
Prepayment

1 – It is indicated in dollars. After the checkbox “Allow partial payment” is activated, the “Prepayment” field will appear where you can enter the minimum amount of the prepayment. The default value is set in the Store – Settings section, but you can set different values for each product.
We strongly recommend you to specify the amount of the prepayment as a factor of the total cost and no more than half of the value, because the current setting is responsible not only for the amount of the prepayment, but generally for the minimum amount of any payment for this product.
The function for obvious reasons can not be used together with auto-payment.
2 – After activating the “Add points for purchase” checkbox, a field will appear where it is possible to specify the maximum amount of points accrual as a percentage, plus a fixed amount in dollars. One point = one dollar.
Other settings
The product’s name. The name of your product. The name is visible to buyers.
Category – selected from the dropdown list. If no product categories are specified, this field will not be displayed. Categories are used for your convenience. For example, for reminder letters, it is much more convenient to mark an entire category than to select products in alphabetical order. The buyer does not see them.
Price. The price of your product.
Image – the Select file button allows you to download the product image (for example, the cover of the book, the disc box) from your computer. The image will be shown to the buyer on the order registration page.
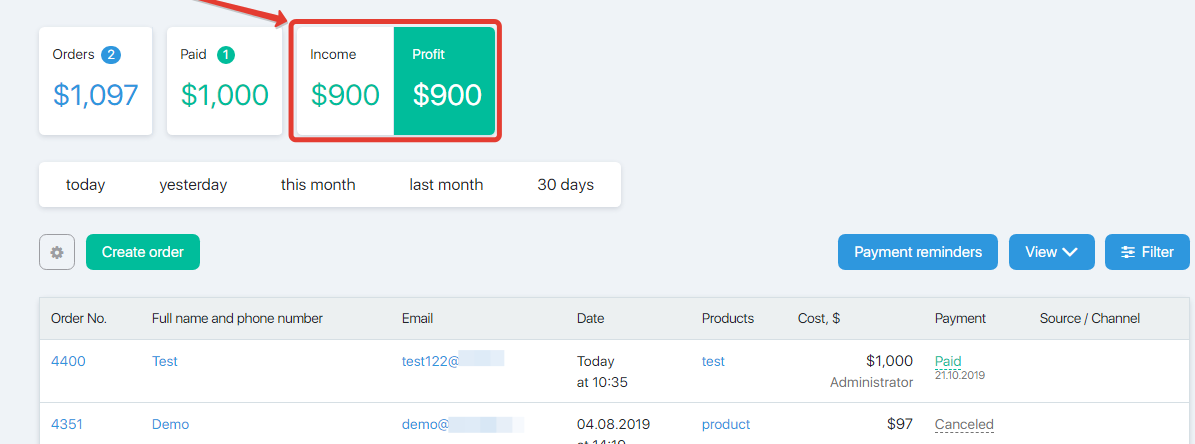
The amount of expenses – the default value is set in the Store – Settings section, , but you can set different values for each product. Allows you to see more accurate statistics of income and expenses. For example, you can make taxes or expenses for the delivery and production of a physical commodity. The setup carries only the informational component.
The function will be visible in the header of the “Orders” subsection of the “Store” section. You will see the difference between Income and Profit.
Actions after prepayment
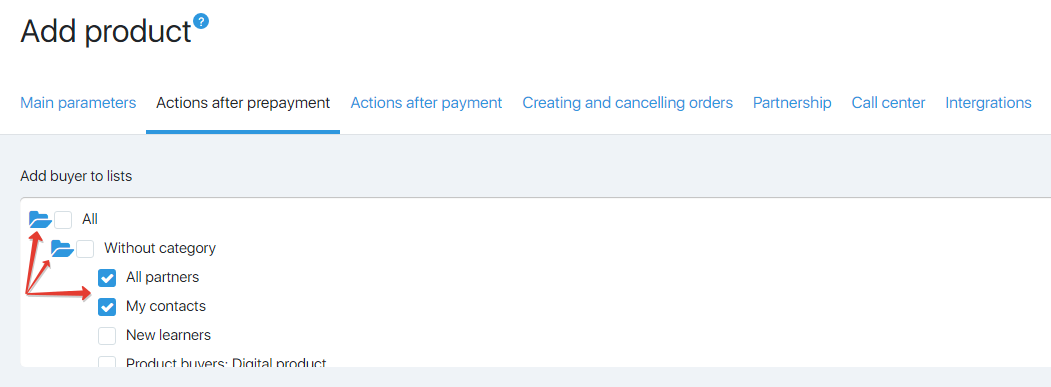 In cases where a prepayment is included for your product, you will see this tab. It is possible to add a buyer to a certain group (in order to open a folder – click on it). One way to use this approach is to send part of the paid content or additional “warming up” bonuses to this group.
Also you can form a letter that will be sent to the buyer after the advance payment. Several useful variables are included in this letter:
- {$ name} – instead the buyer’s name indicated in the invoice (or already available in the system from previous orders/subscription subscriptions)
- {$ bill_id} – order number in the JustClick system
- {$ sum} – the amount that the buyer just paid
- {$ good} – the name of the product
- {$ leftsum} – the balance for this order
- {$ bill_link} – payment reference
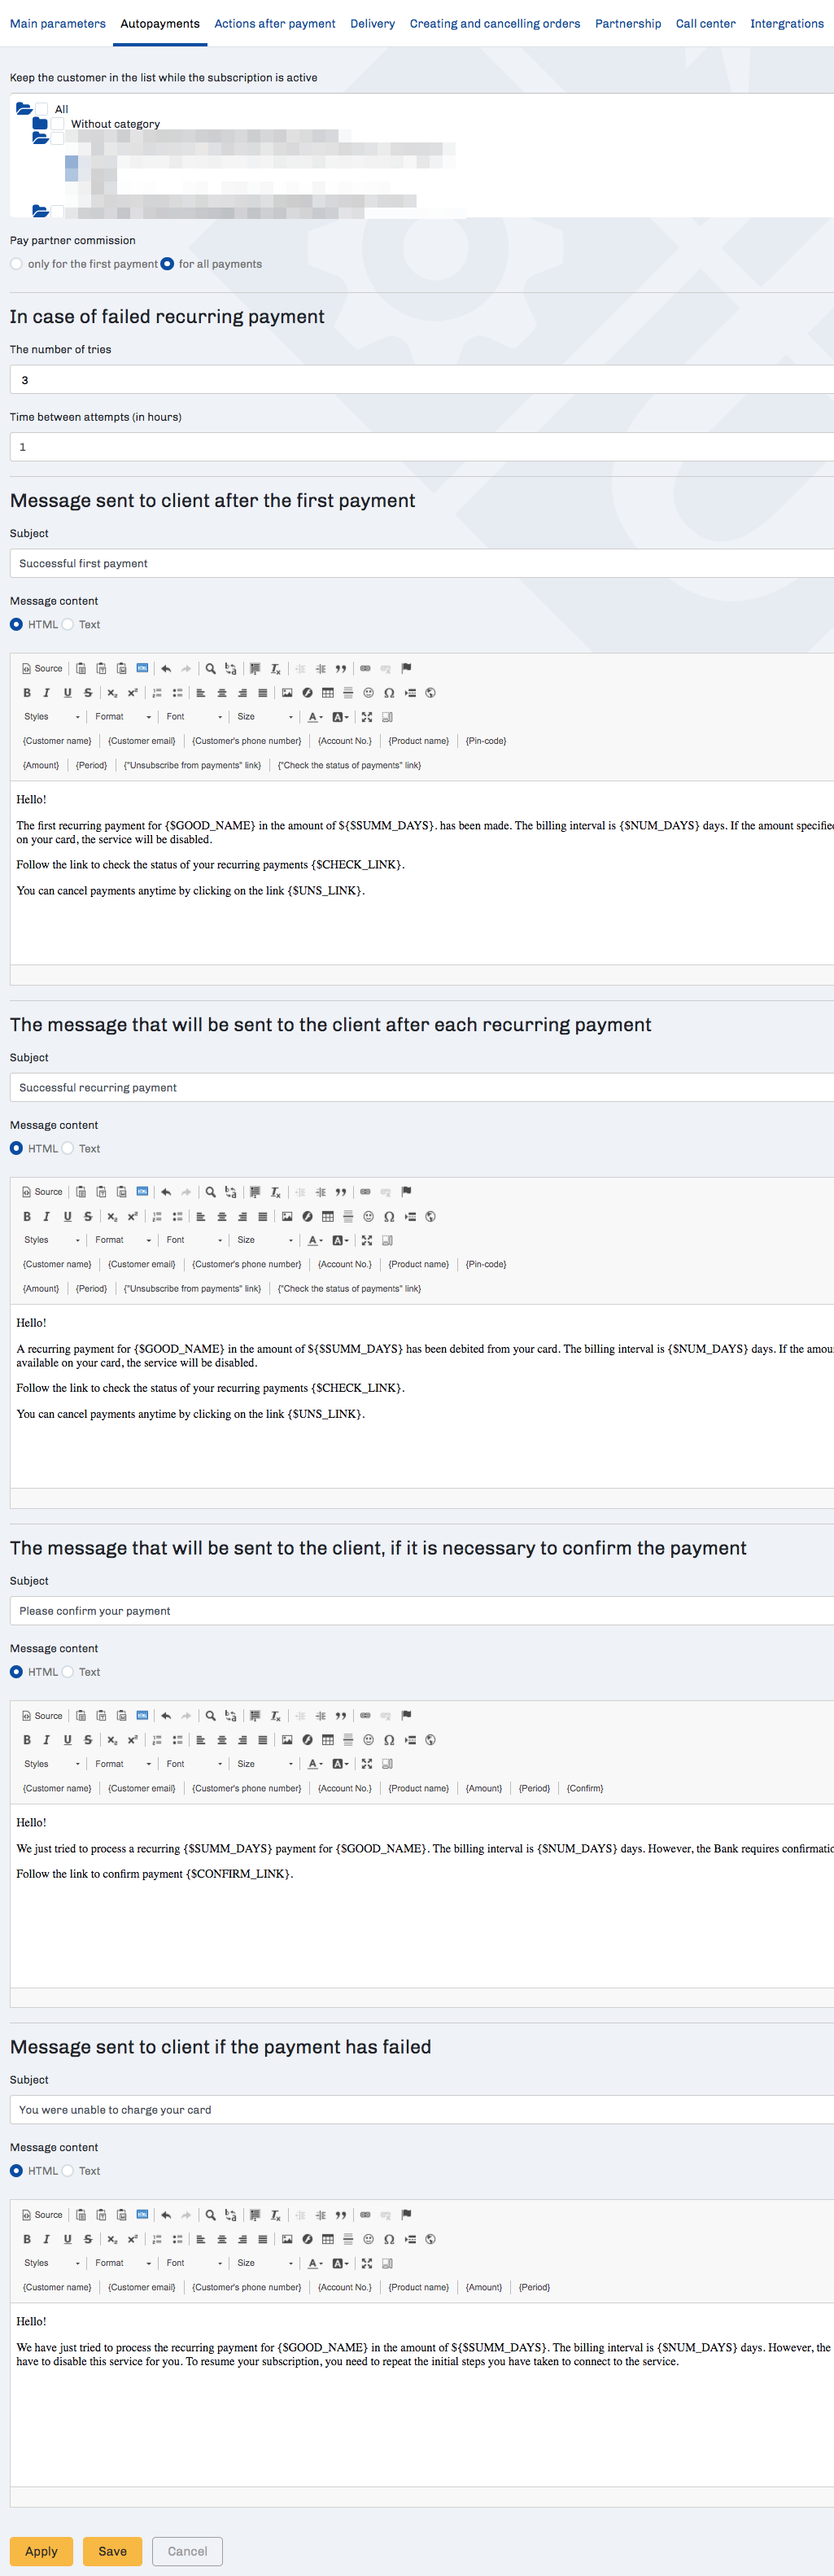
Auto-payments
If the “Subscription” payment type is enabled in the product settings in the “Main parameters” tab, this tab will appear. The tab displays a lot of information, so we decided to insert it with a gif image. Click on it to open it in full size.
In case of unsuccessful debiting of funds for a recurring payment, the client receives a letter when all attempts are over and the recurrent payment is canceled.
Below on the tab are a number of settings related to the frequency and amount of repeated payments. Let’s look at them:
- Keep the customer in the list while the subscription is active -here you can select a group to which clients will be added, for a period while auto payment is active. That is, it is a group with access to a product or course. The system will automatically exclude the contact from the group if payment is not received, which means that the client will not be able to use the unpaid service.
- Pay partner commissions (or only for the first payment or for each) – if the order is assigned to a partner, you can choose the principle of charging commissions
- The number of tries (In case of an unsuccessful periodic write-off) – how many times to try to write off money from the user if the planned attempt was unsuccessful before canceling the auto payment
- Time between attempts (in hours) is 1 hour by default. After 1 hour, a second attempt will be made.
Below is 4 letters editor. You can set up automatic emails for different situations.
- Message to client after the first payment – is a message that will come after the first payment. Please note that the email contains useful variables. They differ from the usual non-autopayment message variables.
- The message that will be sent to the client after each reccuring payment – is a message that will come after every next charge-off. By default, the text of the message is just a reminder of what kind of auto-payment is for which product, a link to check the activity of payments for this product and a link with the option to cancel the auto-payment.
- The message that will be sent to the client, if it is necessary to confirm the payment – is a message that the client will receive if it is necessary to confirm the payment.
- The message sent to client if the payment has failed – is a message that the client will receive if all attempts to write off the payment failed.
-
Summarizing, it can be said that the existing settings of auto-payments make it possible to organize a variety of options for writing off, and hence business ideas: it can be paid mailings with a fixed cost (when the distribution for the group in which the buyer will be is set up, while the payment is active), membership in a community, the organization of access with a high entry threshold, but a humane regular payment or vice versa, low cost for the duration of the introductory period and higher in the future, as well as a classical version with steady and regular payments.
Actions after payment

The editor now has a {…} button for using variables. More details can be found here.
On the tab Actions after payment, you can configure:
Create a contact group and add a buyer to it – a radio button that allows you to add product buyers to a separate customer group. This is an additional opportunity for database segmentation. For example, if the product is an online training, you can send newsletters to participants with reference to the first task. Another possibility is to exclude buyers of the product at the full price from a notice of a sale at a discount.
Add Buyer to Groups – allows you to specify the addition of a product buyer to other existing groups (optional parameter). To add a client to a group, you need to mark it with a checkbox.
Page “Thank you for your purchase” – allows you to set the redirect page after a successful payment. On the page you can thank the client, tell him about the order of the training or about the delivery of a physical product, make an additional offer, and so on.
Letter “Thank you for your purchase” – allows you to set up a letter that the customer will receive after paying the bill. By default, it contains a default version of the message, which can be edited. In addition to the default buttons, the text editor contains the buttons of the substitution variables, which allow creating a single letter template for all clients. In the example in the figure, the Client Name button inserts a variable {$ name} into the text, which, when sent will be replaced with the name of the particular client, taken from the database.
By clicking on the ellipsis {…}, a menu will open that allows you to substitute any variable from the contact card into the letter. You can read more about this in this article.
PINCODES – allows you to arrange the issuance of protection codes to customers in automatic mode. It is necessary to load the list of codes (1 on each line), and in the letter use the {$ pincode} substitution variable. The system will give 1 pin each to the buyer in the order in which they were downloaded. This field is optional.
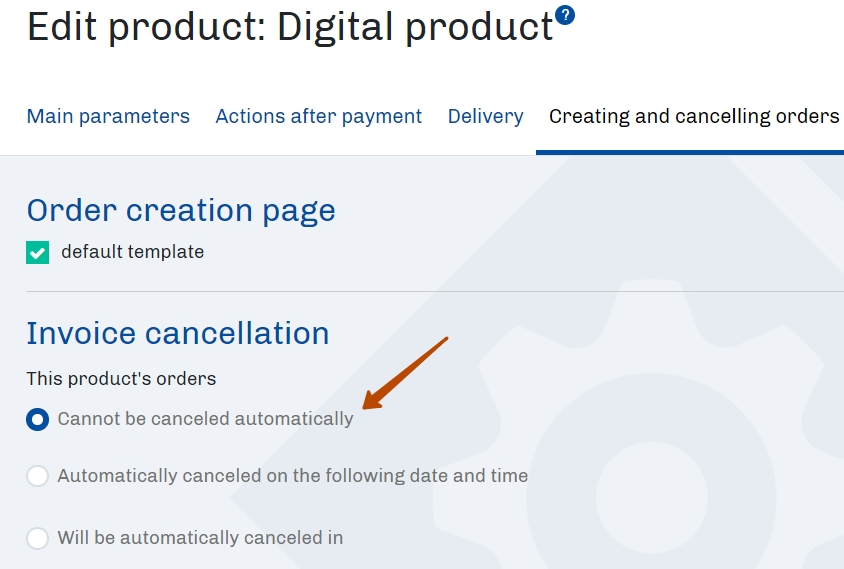
Creating and cancelling orders
This tab allows you to customize the appearance of the order generation page and the procedure for canceling invoices for the product.
 The page for generating the invoice by default contains the product image, name and price. A default text editor allows you to add additional information to the page.
The Reset text button returns the contents of the page to the default version by default.
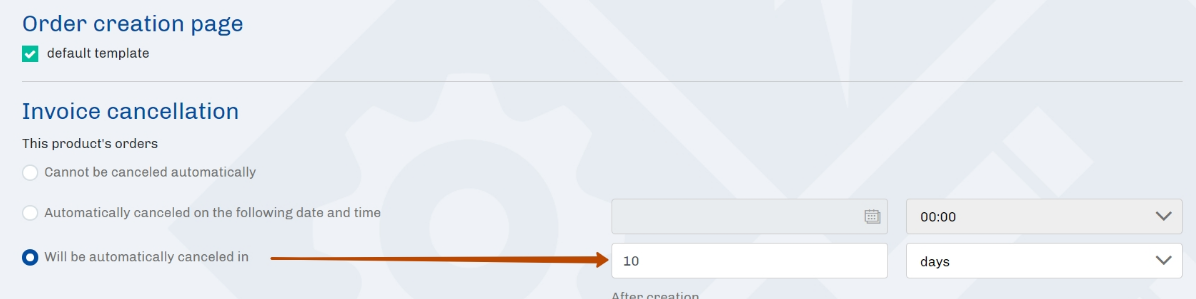
Here, using the radio button, you can specify the order of cancellation of orders in case of non-payment:
- Do not cancel automatically
- Cancel at the specified date and time (absolute date) – can be used, for example, during discounts or sales
- Cancel via (relative time) – is specified in minutes/hours/days from the moment of the order formation
If you select options with cancellation, the client will be shown a timer when creating the order, which will show the available time for payment.
Partnership
This tab allows you to set up payments to partners and co-authors.

On the tab, you can configure the following settings for partners:
- Commission – in % or a fixed amount. These settings will have a higher priority than the general settings of the affiliate
- Individual commission to an individual partner – you can specify the login of the partner and the amount of the commission that differs from the total, increase or decrease the number of partner levels.
- If you set the flag in the Show partners checkbox, an additional block of product display settings will be opened in the partner account:
The Landing page URL is the address of the advertised page.
Checkbox direct link will be available only after the script is installed in the page code. You need to copy the script to the product page and click the Check code button. After the appearance of the Now title script is set correctly the direct link will be available to the partners. This option is not necessary. Without it, a default affiliate link to this product will be available to partners.
The settings block for co-authors is shown on the page only if at least one partner is added to the account. This is an optional block.
Here you can:
- Select a collaborator from the list
- Indicate payments to the co-author
- Adjust, deduct whether the commission partner from the cost before the mutual settlements with the co-author (checkbox Subtract commission from the cost)
The Add button allows you to add multiple collaborators.
Call center
This tab allows you to adjust the amount of compensation to managers who call customers and and make instructions for them.
 The remuneration to the employee can be set in % or a fixed amount.
Instructions for the employee – a text field that allows you to write any comments to employees who make calls.
Products that can be added to order with this product by call-center employees while calling customers – this field allows you to configure the possible upsells, which will be offered to customers over the phone. To select products, you must tick the checkboxes next to them.
After the call, the manager can send a letter to the client. Default templates of letters are configured in the form CRM-> Settings. But if you need to configure specific messages for this product, tick the checkbox Specify individual email templates. After that, the form will look like this:
 Using the radio button, you can choose which template to edit:
- The conversation went through
- Did not get through
- Call back
- Already notified
- Invalid lead
Letters are edited using a default text editor.
The Reset to default message button allows you to undo all changes and return to the default email template.
Integration
This tab allows you to synchronize JustClick with external services by API. In addition, when using CPA-services (lead customers by the model of “pay per click”), you can also insert the tracking code here.

After making all necessary changes on all tabs, you need to click the Save button. The product will be added to the general table on the Products page.
FAQ (answers to frequently asked questions)
To disable auto payments for a specific client, in the Store – Orders section, enter the View button, enable the display of the status of auto payments,

and after the column with the auto payments switch appears, find the customer account and disable auto write-off for this account. To do this, slide the switch to the gray, inactive position.

Please note that both the main account administrator and an additional administrator with the appropriate rights can disable auto payments.
You can specify any integer (except “0”) in the Auto Payments field. Then autorecording will begin in this number of days. And then, all further auto-lists will be carried out according to the set interval in the “Interval in” field.
If you specify in the Auto Payments field in 0 days and save the settings, the system substitutes a digit from the Interval In field. Accordingly, the first auto-write will be performed after this interval.
To turn off the timer on the checkout payment methods page:
Go to Store – Products.
Open the settings of the desired product and in “Creating and cancelling orders” select the option “Cannot be canceled automatically”
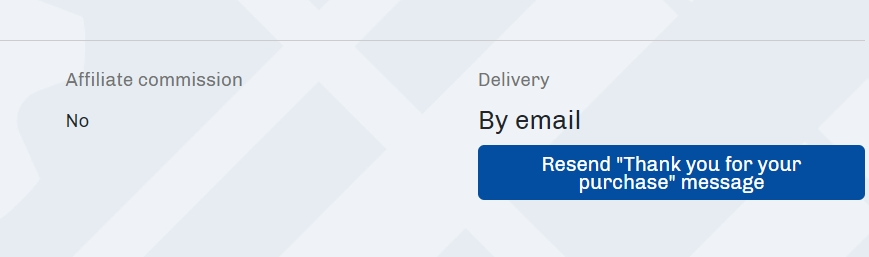
If your client has not received paid materials that should arrive automatically after payment, you can resend them:
Click on the account number in the Shop – Accounts section.
In the account card that opens, click “Resend “Thank you for your puschase” message”
You cannot change the product type and payment type after the product is created. You can only do this when you create a new product.
After you pay an invoice for a product that has a PIN added to it, you’ll receive a notification email for notifications. In addition to the buyer and PIN data, the number of remaining PIN codes in the product will be shown in parentheses. You will be informed in advance of the available code balances in the product and will be able to add new codes in advance.
There are two ways:
- Shop – Products simply turn off the product using the switch (it needs to be moved to the left to make it black). After that, the product order page will not open.

- In the product settings “Creating and cancelling orders”. Here you can choose how long the accounts of this product will be cancelled:
– you can issue automatic cancellations after you have created the invoice.
– or can be canceled on the specified day and time.
Then, after the timer is triggered, all invoices for this product will be canceled automatically and cannot be issued.
There is no way to create free products in the system. That is, in any case, the product should be priced (minimum product cost = 1$).
If you need to provide the product to the customer for free, you can do this, for example, by entering a link to the page in the settings of the subscription form in the “URL after activation” field, on which you will be able to download/view your free product. Thats mean: person subscribes to your newsletter, agrees by clicking on the activation link in the email, and opens a page with a free product.
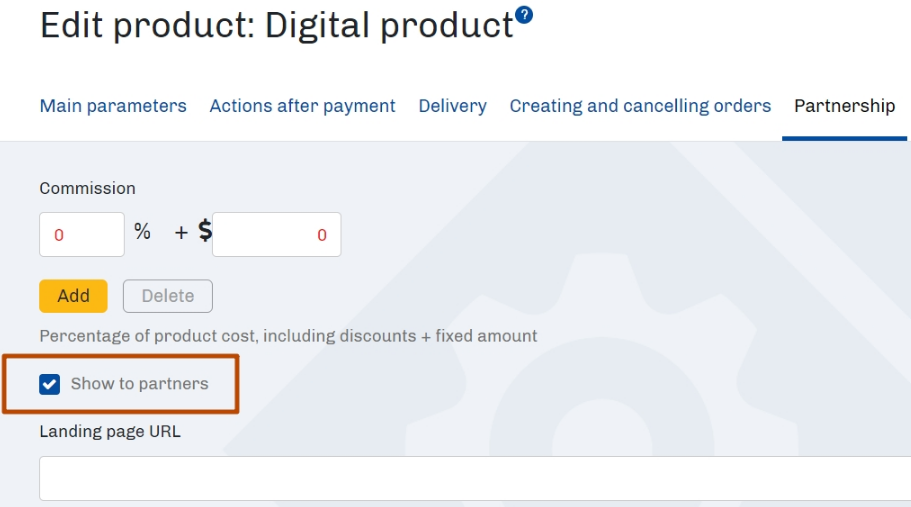
You need to check the product preferences (in the Partnership tab), check the box “Show to Partners” – and specify the amount of partner rewards. Also, be sure to add a link to the product description page in the URL field of the product description page.
Than the product link will appear in your partner accounts.
- Go to your product settings (or create a new product) under Store – Products.
- Actions after payment — edit the letter “Thank you for your purchase” message.
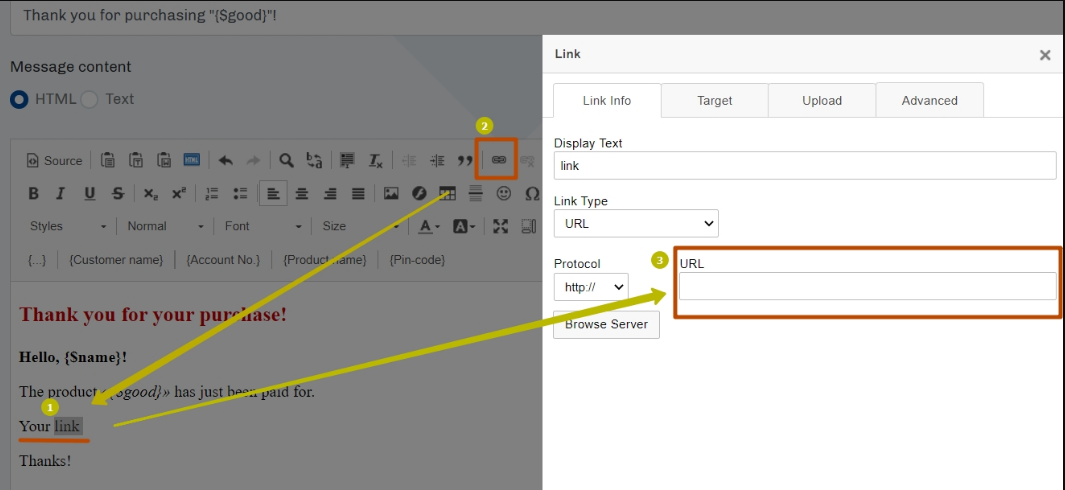
Please note that the file must be pre-downloaded either in the Websites – Pages – File Manager section of your personal account, or on third-party cloud services (for example, Google)
Then save your settings by clicking the Save button at the bottom of the page.
Settings completed! When a customer pays for your product, they will receive a Thank You For Buying email that will link to the file you specified.
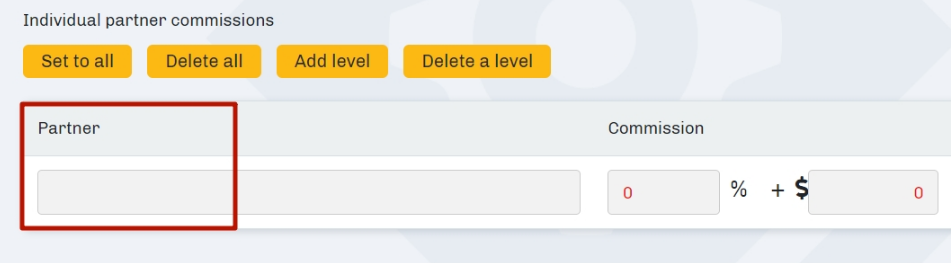
You can set an individual commission for a partner in the product settings:
In the product settings, click the Partnership tab.
In the Individual Partner commissions section, add a partner and set the required commission.
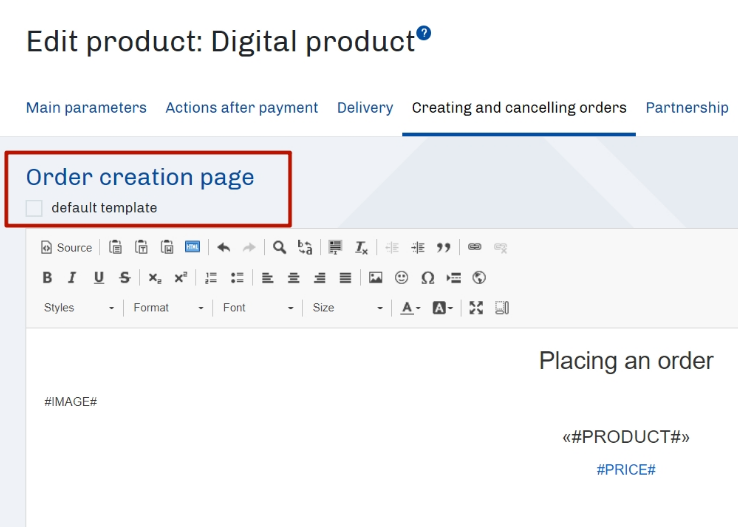
The product description from the Main parameters tab (in the product settings) should not appear on the checkout page.
You can add a description to the checkout page here: Creating and cancelling orders — Order creation page — default template.
In the product settings there is a “Call Center” tab. On this tab, check “Set individual message templates” and you’ll see custom email templates that you can edit.
How to set up a common template for all products?
Contacts – Settings – CRM settings – Messages for order callings.
Create a process in which select the ‘Paid invoice’ trigger as the start trigger and select all products in it, for the purchase of which points are awarded.
Add the filter ‘Field ‘Points’ is greater than or equal to 1′ and set the filter delay to 1 minute. 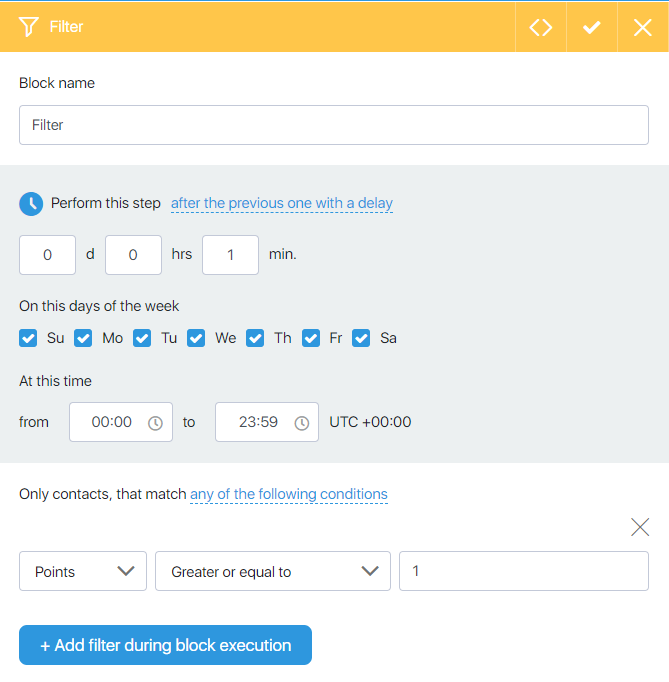
At the output ‘No’ from the filter, add the block ‘End of process’.
At the exit ‘Yes’ from the filter, add the ‘Send email’ block. Add notification text and a variable to display points in the letter. 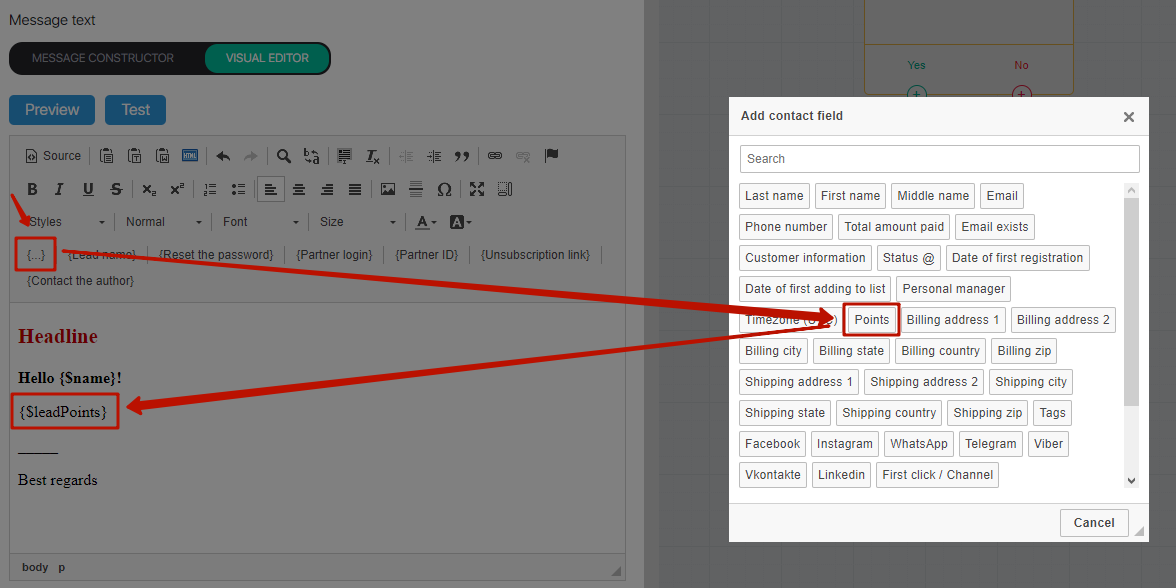
After the letter, repeat the filter ‘Field ‘Points’ is greater than or equal to 1′ and set a filter delay of 30 days (this will be the period through which the reminder will be repeated, the period itself can be any).
At the ‘No’ output from the filter, add the ‘End of process’ block (to not send any more notifications to those contacts who have 0 points).
From the ‘Yes’ exit, drag the arrow to the reminder email you created above. 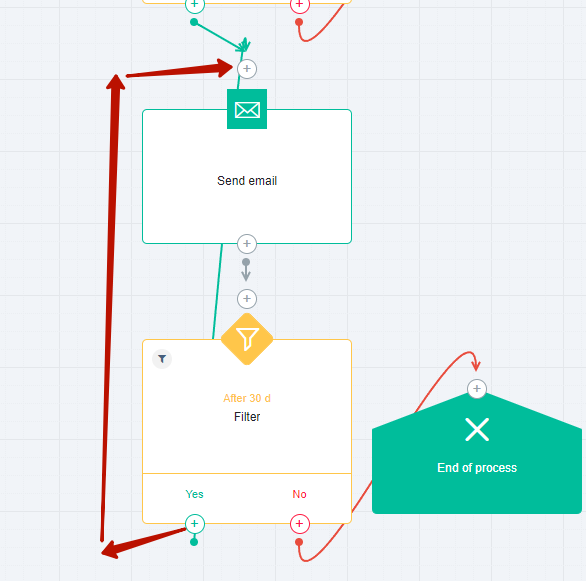
Thus, reminders will be sent while the contact has points and stop being sent if there are no more points.
The result is a process like this: 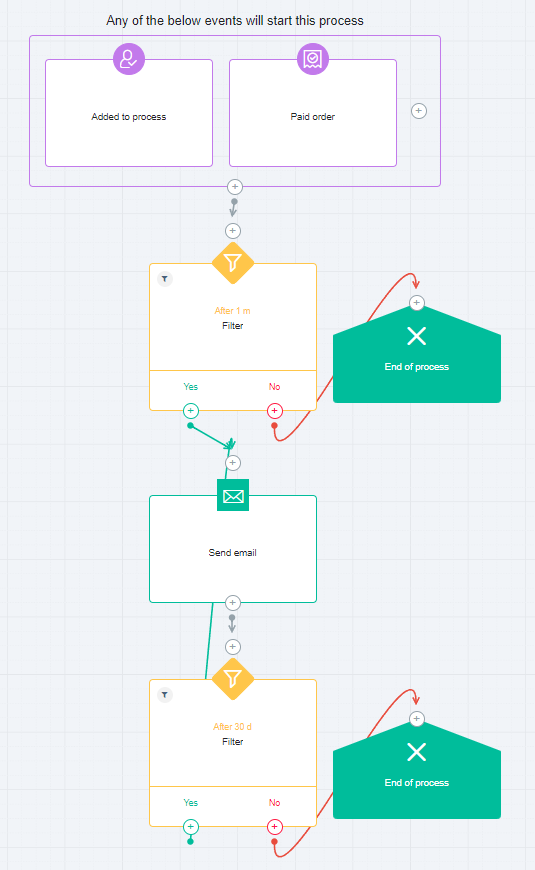
For the entire process, in the ‘Run for contact’ field, set the setting to ‘any number of times, but not simultaneously’. 

 (2 votes, avr.: 4.50 / 5)